On a hot summer day, it’s difficult to deny yourself the pleasure of cooling off in a cool pond. Not everyone has a country house on the banks of a river or lake, and building a permanent pool requires space, time, and material costs.
Is there an alternative to capital expensive construction? Fortunately, people's ingenuity did not ignore this issue. We have selected not only the most interesting and simple ideas, but also the most viable ones that can be realistically implemented on a summer cottage without special skills.
The presented structures are not designed for 10-year use; they do not comply with all swimming pool construction standards. But the authors set completely different goals: cheap, fast, seasonal. Nevertheless, certain rules must be followed during such construction, so first we will familiarize ourselves with the general recommendations.
Important points when planning and building a homemade pool
Regardless of the choice of material for the construction of a seasonal pool, we recommend paying attention to the following points:
- the place for the pool should be in direct sunlight, and not in the partial shade of the garden: the water will heat up faster and there will be less debris in the form of falling leaves and insects;
- the area must be leveled and compacted;
- the bottom and walls of a homemade bowl should not have sharp protrusions or a hard surface;
- you need to immediately think about how and where the water will be drained during regular replacement (especially if installing filters is not provided);
- the frame needs to be strengthened so that the structure does not fall apart under water pressure;
- when purchasing a waterproofing film (tarpaulin), take into account the size of the container with a margin of 50 cm around the entire perimeter.
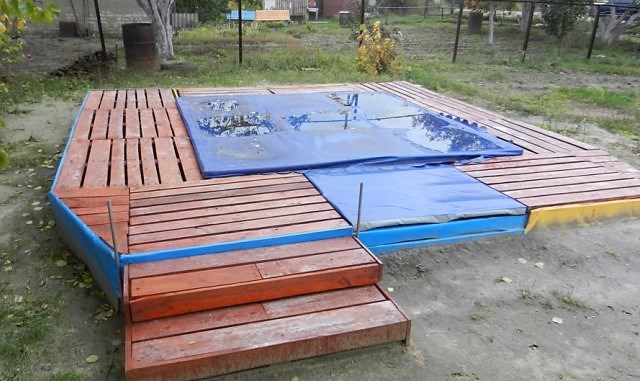
When installing a budget pool, do not forget about landscaping the area around it. You can make an embankment of pebbles or river sand around the perimeter, decorate the approaches with decking boards, or simply knock down wooden flooring from old pallets. Also, for comfort, it is advisable to consider a towel rack.
Just dig a hole and cover it with film
The first stage is the most labor-intensive - digging a hole of suitable size and depth. When the pit is ready: the bottom is leveled and compacted, the walls are perpendicular to the bottom and do not crumble, proceed to the second stage - preparing the surfaces.

Cut cardboard boxes are laid on the bottom to make it soft to step on. The walls are covered with bags so that the film does not tear on uneven surfaces and plant roots.
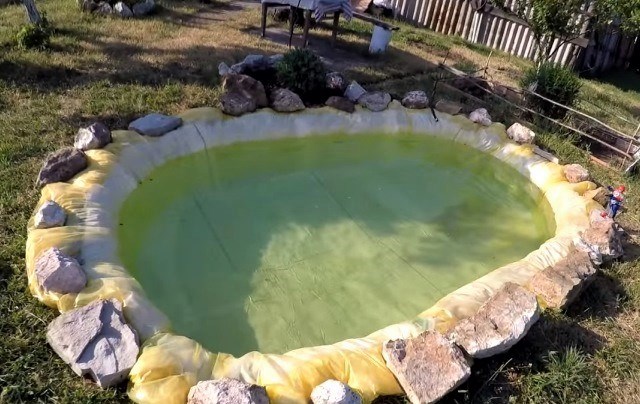
At the third stage, the pit is covered with waterproofing film. The upper edge is pressed with stones, which additionally plays the role of decoration.

You can bury a bowl made of scrap materials, covered inside with film, into the soil. This will require a lot of effort, but it will be possible to increase the depth of the pool. Since the edges of the bowl protrude above the soil surface, the soil will not be washed into the water.
We are sure that you will like the idea of having a swimming pool. And by next season you won’t want to build temporary structures. The optimal solution would be to organize a pleasant vacation spot for many years to come. To build a private pool, it is best to contact professionals who will help at all stages of its construction. The POSEIDONSTROY company has already received many good reviews. They will be able to make a pool according to your wishes or offer standard projects for implementation.
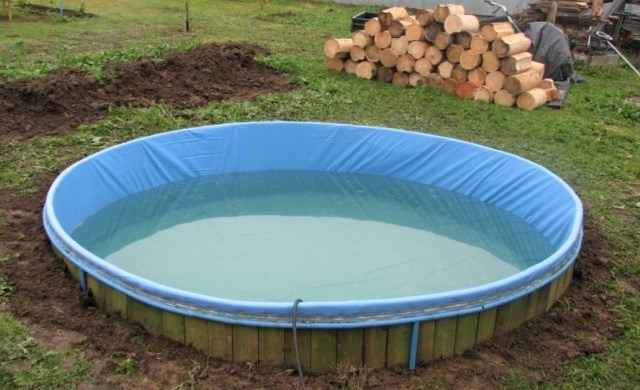
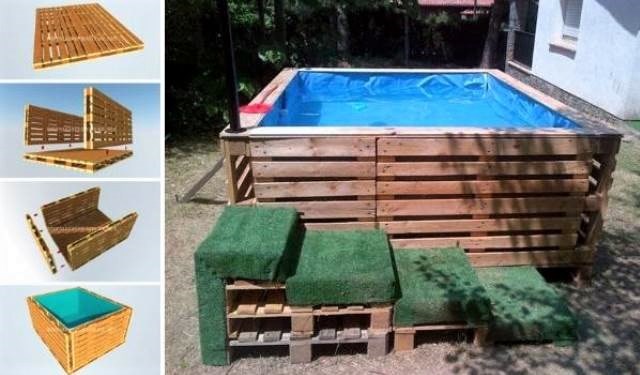
Frame pool made from pallets
To begin, choose a flat area and cover it with a thick tarpaulin (perhaps an old banner or canopy). Next, take 9 pallets and fasten them with screws and slats. Pallets are placed on edge, connected by a ring. When the round frame is ready, it is secured with tie straps for additional rigidity.
At the next stage, the inner surface of the “bowl” is covered with thick greenhouse film, and old towels, bedspreads or blankets are placed on top at the junction of the pallets and on the bottom. This is done to soften the surface so that while swimming it is comfortable to press against the stacks and walk along the bottom.
The final layer is a waterproofing film. If it is blue or blue, the water in the pool will always be bright. Some advise using black film to improve water heating. It is important that under the film there are no open sharp corners, protruding boards or rough surfaces on which the film will quickly tear.
The film is secured to the top edge of the pallets using a special adhesive tape. For decorative finishing of the outside of the pool, you can use reeds or bamboo. Narrow boards are nailed on top to hide the pallets.
The frame can also be made rectangular by connecting the pallets at right angles. The bottom can also be lined with pallets.
To create the most comfortable zone, you can attach a lighting stand to the corner and make steps from pallets.
These pools are filled with tap water from a garden hose and drained manually or using a low-power pump. If chemicals were not used for disinfection, then vegetable beds and flower beds can be safely watered with water.
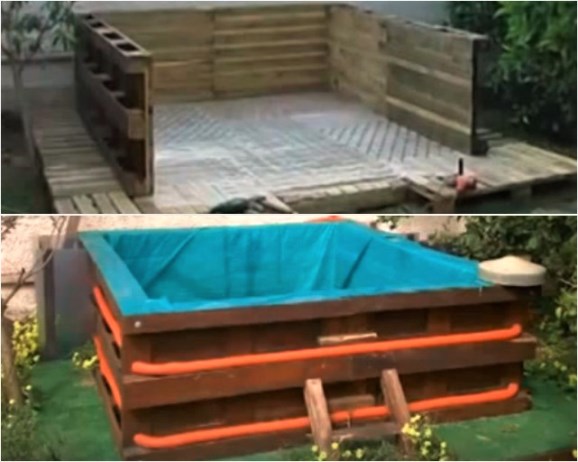
Pool made from old boxes
The pool frame can be made from old wooden or plastic boxes. They make up a rectangular box, fasten each one together and additionally wrap it around the perimeter with plastic tape.

The structure is assembled on a tarpaulin. The inside of the box is covered with a thick waterproofing film, pressing the top edge with wooden boards.
A pond made of hay - simple and cool

Looking for available materials for the construction of a swimming pond in the dacha sector, enthusiasts turned their attention to hay, which is an indispensable attribute of agricultural land.

It is spread out on a prepared area, and sides are built from rectangular compressed bales. Further, everything is according to the already shown scheme: a thick film is covered in the resulting bowl, the structure is tightened with belts. To protect the waterproofing film from damage, cardboard or a thick tarpaulin can be placed on the hay as the first layer.

Pool on a metal frame
For those who are familiar with welding, it will not be difficult to make a simple pool with your own hands from metal.
Each wall is made separately from a profile pipe and galvanized sheet. The structure can be assembled by welding or made dismountable with bolts.

An insert made of waterproofing film is installed inside, which, if desired, can be made to order according to the dimensions of the resulting structure. You can decorate such a pool using flooring from pallets, and also make a cover.
To increase ease of use, it is recommended to install a pump with a filter and use disinfectants for regular use. Thanks to this, your pool will not turn into a muddy swamp in a few days, the water from which will need to be completely pumped out and replaced with new water on a regular basis.
Mini-pool made from a large tire
Our selection will be completed by a very simple idea for making a pond from a large diameter tire from heavy special equipment.

To expand the future pool, the first step is to trim the sidewalls of the tire. The resulting workpiece is installed on a previously prepared concrete platform and filled with concrete. Thus, the tire and concrete form a bowl, which, after the concrete inside has dried, must be painted with a special paint.
As a result, you will get, albeit small, but not requiring much effort in maintenance and a very cozy pond that will help you cool off on hot days.
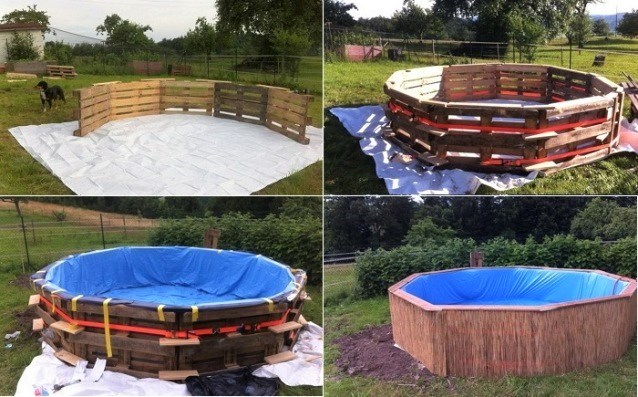
Pallets never cease to amaze. If you have pallets, you can do anything. Meet the pallet pool.
The authors left some interesting details behind the scenes of the video, but the main idea is completely clear. A pedestal for the pool is made from pallets. The pallets are leveled and fixed to each other. Next, they are installed from pallets placed on the edge of the wall of the future pool. Particular attention should be paid to the reliability of fastening the pallets to themselves and the base. Such a pool would hold up to 5 tons of water, and a sudden “dam break” could be dramatic but devastating. For structural strength, the authors seem to have reinforced the perimeter with a cable running through plastic pipes.
Left a little. Give the podium and pool a nice look with paint and artificial grass. Add a secure ladder. Place PVC film in the pool (sold in rolls in the store). Start filling with water, and during the filling process, align the film along the bottom and walls. Secure the edges. And you can dive.
It’s a good idea to add a simple water purification system to your pool. Also sold in stores for plastic swimming pools.
The pallets surprised me once again. There is nothing more to say. Watch the video.
For those who are not satisfied with a square pool made of pallets, here’s a round one for you. The author of the second tied the pool with slings for strength. There are no longer 5 tons of water, but all 9, at least.
- Double-sided pallet garden (0)
Another idea for using an old pallet. Vertical garden. Machine translated article. Ideal for herb garden outside […] - Make beehives from old wooden pallets. And this is possible. (0)
Although, why be surprised. Old pallets are a versatile material and can be used to make almost anything. Bee hives are not [...] - DIY pallet terrace (0)
I just decided to raise a section about products made from pallets in the feed of my website. I haven't written there for a long time. Another way to recycle […] - DIY gift for Valentine's Day. (0)
A book for your loved one - 55 reasons. Gift idea for February 14th. Anyone can give a gift on February 14 with their […]
A swimming pool in the courtyard of a country house or cottage is associated with the luxury and wealth of the owner. This is partly true, but anyone who owns even a small plot can afford their own swimming place.
This will require minimal cash investments, available materials, free time and a simple tool that most summer residents have. How to make a pool with your own hands - read our article.
What available materials can be used as materials for making
When we talk about available materials, we mean materials that can be easily obtained without spending a lot of money. In this case, the final result, except for the appearance, will differ little from the finished products.
Old tire
An old tire from large construction or agricultural equipment is an inexpensive material for building a small pool. It is best to use a combine tire with a diameter of 30-32 inches. This size is enough to set up a pool for one adult or two children.
To find a tire that fits your size, you should contact a tire repair shop, where they will sell an unusable product for a small fee. Large tires are often sold second-hand on the Internet.
Residents of large cities can go to a recycling warehouse, from where old tires are transported to factories for further processing.
Among the advantages of a tire pool are:
- the width of large tires allows the material to be used for the construction of pool walls;
- the rounded shape of the tire is ideal for creating a water container;
- the durable inner carcass of the tire will reliably hold water;
- the rubber used in the manufacture of the product is not afraid of sudden changes and sub-zero temperatures;
- the total cost of materials spent for manufacturing is several times lower than when purchasing a finished structure;
- A tire pool can be easily decorated with paint.
The main disadvantage of such a pool is the total volume of the structure, which is only enough for one, maximum two adults. You won't be able to fully swim or dive in it.
In fact, a pool made of tires will resemble a swimming pool in which you can relax and lie down in comfort after a hot day of work.
Wooden pallets
Wooden pallets are rough plank flooring on a support, used for storing bulk mixtures in bags. The pallet has a convenient design and shape suitable for creating supporting walls of the pool.
The pallets are knocked together in a vertical position, forming the frame of the future pool. The more pallets, the more round the water container will be.
For an average-sized pool, 9–11 pallets will be sufficient. This is enough for a container in which 3-4 people can comfortably sit.
The advantages of a homemade pool made from pallets include the following:
- the height of the pallet makes it possible to build a large-capacity pool;
- ease of installation and fastening of stairs, steps, slides for descending into the water;
- no need to dig a deep foundation pit;
- easy to dismantle and move to a new location;
- if necessary, it can be quickly repaired or expanded by adding one or two sections.
Among the disadvantages of such a pool can be noted general instability. It will be necessary to use tie-down straps and supports to strengthen the structure, which must be checked and tightened before each fill of water.
To protect against moisture and natural precipitation, finishing on the outside is required, with further treatment of all wooden elements with an antiseptic.
Gabions
A gabion is a reinforcing structure made from wire mesh. Previously, such products were used to strengthen river banks, preventing their erosion. In construction and gardening they are used to create three-dimensional products of various shapes.
When creating a pool, they are ideal for forming walls. To fill the mesh molds, it is best to use dry stone of various sizes.
The advantages of such a pool include:
- gabions allow you to create a container of any shape: circle, oval, square, rectangle;
- solidity and strength of the structure;
- simple operating technology that allows you to create a pool of any size;
- original appearance that does not require additional finishing.
The labor costs for constructing this pool are quite high, since it will be necessary to find a sufficient amount of stone and deliver it to the work site. Dismantling is another weak point of the structure, since dismantling the pool will take a lot of time.
Plastic bottles
Plastic containers are constantly used to create garden devices and transfer water around the site. But it can also be used and used to build a swimming pool.
The essence of the method is that a plastic bottle will be placed on cement mortar, forming the walls of the future pool. During installation, the seams and space between the bottles are filled with cement, which will give sufficient strength and tightness to the future structure.
The volume and shape of the container will depend only on the amount of containers that can be found. This is the main disadvantage of this method, since it will require lengthy preparation of the material.
If possible, you can purchase containers in bulk. On average, building a large pool will cost no more than 2.5–3 thousand rubles, not including the cost of cement-sand mixture.
Concrete ring
Concrete rings are used to strengthen the walls of well and sewer shafts. The standard dimensions of a reinforced concrete ring depend on the product labeling. For example, products marked KS-15–9 have a height of 90 cm and a diameter of 150 cm.
The optimal sizes of well rings for building a swimming pool can be seen in the table below. There are rings with a ready-made bottom, which will simplify the process of constructing a pool, since you will not have to pour a concrete base.
The advantages of such a pool include its strength and durability. Concrete walls do not need to be strengthened or treated with a protective compound. The width and depth of the resulting container is quite enough for bathing 2-3 adults.
The only negative is that to deliver the ring to your summer cottage you will need to order large-sized transport. A crane is used to unload and transport the pool to the location, which will also require certain costs on the part of the customer.
Metal container
Large metal containers are used for transportation by rail or shipping. You can find them at metal delivery points, where leaky products are often delivered.
This container is well suited for a swimming pool - you just need to weld the resulting cracks. The capacity of the container directly affects the size of the future pool.
As in the case of a well ring, you will need to order special equipment for delivery, unloading and moving the container to a place not prepared in advance. Otherwise, the container is almost identical to ready-made plastic pools. It only requires minor cosmetic repairs and treatment with an anti-corrosion compound.
The inside of the container is coated with waterproof paint or lined with any suitable tile.
Preparation and calculation of the structure
An old tire and wooden pallets are the most affordable materials for creating a pool with your own hands. Based on this, we will calculate the volume of the container based on the overall dimensions and the number of pallets.
As a wheel tire, it is better to use a tire from a BelAZ truck model FT-116AM2 or FT-117M2. These are large tires with a width of 955 mm and a diameter of over 3000 mm.
Other models and their sizes can be seen in the table in the photo below.
To calculate the volume of the future pool, we will use a simple formula: V=π * r 2 * h, where V is the volume of the container in the form of a cylinder, π is a constant value (3.14), r is the radius of the circle, h is the width of the tire.
Let's carry out the calculation for the FT-117M2 tire, the width of which is 1175 mm and the diameter is 3575 mm. The total thickness of the sand-concrete cushion will be 30 cm.
The sequence of calculations is as follows:
- According to the initial data, the tire radius will be equal to: 3575 / 2 = 1.7875 mm.
- We substitute the data into the formula and calculate the volume of the structure: 3.14 * 1.7875 2 * 1.175 = 13.1899 or 13.19 m 3.
- Similar steps to calculate the volume of sand and cement: 3.14 * 1.7875 2 * 0.15 = 1.6838 or 1.68 m3.
Other finishing materials are selected individually according to taste and the design project, if one was drawn up earlier.
Wooden pallets are produced in accordance with GOST and have dimensions of 800×1200 mm. Knowing the dimensions of the pallet, you can calculate the volume of a pool of almost any shape. Since we advised using 9 or more pallets, we will carry out the calculation for a pool in the shape of a hexagon.
To do this, we will use the standard formula for calculating volume: V - S o * h, where S o is the base area, and h is the height of the pallet. The formula for the area of a nonagon: S o = 6.18182 * a 2, where a is the side of the nonagon, which in our case is equal to the height of the pallet.
The sequence of calculations is as follows:
- We calculate the area of the base: 6.18182 * 1.2 2 = 14.8363.
- Pool volume: 14.8363 * 0.8 = 11.869 m3.
If the pallets are arranged in height, then instead of 1.2 m, 0.8 m should be substituted in the first formula. We do the same with the second formula. In this case, the pool will be deeper, but slightly smaller in diameter.
Tools and accessories
To build a pool from an old tire you will need the following tools:
- A sharp knife with a strong blade.
- Shovel and bayonet shovel.
- Container for mixing cement-sand mixture.
- Construction mixer or drill with appropriate attachment.
- Tape measure and bubble level.
To mix a large volume of mortar, it is better to use a concrete mixer. This will significantly speed up the work process.
To build a pool from pallets you will need the following:
- Hammer and screwdriver.
- Jigsaw, plane and sander.
- Pliers, screws and nails.
- Shovel and bayonet shovel.
- Containers for sand, cement and water.
- Tape measure, square and pencil.
A jigsaw can be replaced with a regular wood hacksaw, and a grinder can be replaced with sandpaper. This will have virtually no effect on the final result.
How to make a pool from a tire
Before carrying out work, it is necessary to carry out initial clearing of the site. You will need to remove old foliage, branches, uproot sprouting bushes, etc. To carry the tire to the work site, you will need the help of a partner.
The sequence of constructing a pool from a large tire is as follows:
- Turn the tire on its side. Using a knife, you need to cut out the side part around the circumference. When making a cut, follow the markings on the tire. This will simplify the cutting process and allow you to get a cut with a smooth edge. It is not recommended to use a grinder, as the rubber will quickly turn into crumbs and stick to the disc.
- Next, the site is prepared for the arrangement of sand flooring. This can be done in two ways. In the first case, we remove a layer of soil to a depth of 25–30 cm. The base area should be slightly larger than the diameter of the tire. Carefully level the base of the pit and fill it with fine-grained sand. The layer thickness is 15 cm. Then lightly moisten the sand with a small amount of water and compact it with a shovel.
- In the second case, there is no need to dig a hole. It is enough to level the area of land on which the sand will be poured. Further compaction technology is similar. We recommend using the first method, since a similar method is used for the construction of blind areas and allows you to create a more durable foundation.
- A layer of concrete mortar at least 15 cm thick will need to be poured onto the compacted sand. For this, ready-made mixtures of grade M300 and higher are used. When mixing independently, the proportion of cement to sand is 1:3. The amount of water affects the ease of installation and distribution of the solution.
- While the solution is wet, you need to move the tire to the pouring site. After installation, the tire is slightly pressed into the solution. Another 2-3 buckets of the mixture should be poured into the void between the concrete solution and the tire.
- You can start decorating the pool and wait for the mixture to dry. After 14 days, the concrete layer will gain 80% of its strength. Complete drying of concrete occurs within 25–28 days.
To decorate such a pool, exterior paint, decorative stone, and pieces of tile are used. Before pouring water, it is better to coat the inner surface of the tire with waterproof paint.
Setting up a swimming pool from plastic bottles
In addition to cement and sand, to create a pool from bottles you will need to prepare wooden boards, small blocks and gravel. The size of the bar is 25×50 mm. Gravel fraction - 5/20. The length of the board should be equal to the length of the base where the sand and gravel cushion will be poured.
The sequence of actions for creating a pool from bottles is as follows:
- The selected area should be cleared of debris and branches. Next, you will need to remove the top layer of turf and dig a pit to a depth of 30 cm. The dimensions of the pit should be larger than the pool by 20–30 cm on each side. For example, for a pool with sides of three meters, a pit measuring 330x330 cm is suitable.
- The formwork is being installed. To do this, the bars should be sharpened at the end using an ax. A block is nailed to the board every 100–120 cm. A metal corner for furniture is used to fasten the boards into a frame. For example, a corner marked 40*40*16 is suitable.
- The formwork is installed in a dug pit. The base of the dug recess is leveled and lightly compacted. If necessary, the ground can be treated with an antiseptic to kill weeds. Afterwards, a layer of sand and gravel 12–15 cm thick is backfilled.
- If there is no gravel, then you will need to lay a reinforcing mesh assembled from reinforcement bars. To do this, the rods are knitted using ordinary wire. The frame is installed so that the reinforcement does not touch the sand. Installation on pre-laid stone or brick is allowed.
- Before pouring concrete, the location of the drain hole should be provided. It is better to use a ready-made product for draining water. The pipe is attached to the fittings. During the pouring process, it will need to be straightened relative to the upper plane.
- The concrete solution is being poured.
In this case, it is better to use a concrete mixer, since large foundations will require 1.5–2 m 3 of concrete. During the pouring process, the concrete must be compacted with a wooden lath or shovel.
- After pouring the base, you should wait at least 14–18 days and only then begin laying the walls of the pool. For masonry, you will need to pull the mooring cord, fixing it on bricks and any other material. The thread is stretched strictly along the perimeter of the future pool.
- The cement-sand mortar is laid out along a stretched guideline. A plastic container filled with sand is placed on top of the fresh solution. The bottles are tied together with wire with a cross-section of 3 mm. The work process is similar to bricklaying. Laying the first row continues until the base of all four walls is completed. Then they move on to laying the second and subsequent rows. The optimal wall height is 100–150 cm.
Upon completion of the work, it is necessary to finish the interior of the pool. To do this, all cracks and voids are covered with cement mixture until a smooth surface is formed. If the cement layer is more than 3 cm, then it is better to use a reinforcing mesh, which is attached to the bottom of the bottle using self-tapping screws.
The front side of the pool walls is finished in a similar way. Waterproof paint for swimming pools is used as a protective and decorative coating for interior walls, which is applied with a roller in 1–2 layers. After painting you should wait at least 5 days.
Instructions for creating a pool from pallets with your own hands
To create a pool from pallets, you will need to purchase wood antiseptic, PVC film and a drain pipe of any convenient shape.
The process of constructing such a pool consists of the following steps:
- Wooden pallets need to be treated with an antiseptic or antifungal impregnation 1-2 times.
- Depending on the shape of the pool, it is necessary to dig a hole 30 cm deep. We carried out calculations for a pool of 9 pallets, then the hole will have a round shape. The size of the pit should be slightly larger than the diameter of the pool itself.
- A layer of gravel with a fraction of 5/20 should be poured into the bottom of the pit and distributed evenly over the surface. The layer thickness is no more than 20 cm. Next, the frame of the future container is assembled inside the pit. The pallets are mounted with the plank flooring inside. Metal corners, boards and self-tapping screws are used for connections.
- The drain pipe is being installed. To do this, a hole is cut in the frame, through which a pipe is threaded, draining outward. Afterwards it is necessary to strengthen the structure with 2-3 tightening straps.
- Wooden wedges made from blocks are driven in around the circumference every 30–50 cm. This will further strengthen the structure. A layer of concrete mixture 10–15 cm thick is poured. A rule is used for leveling.
- The concrete layer will dry in 25–28 days, but further work can be carried out within 10–14 days from the moment of pouring. To cover the inner surface, PVC film is used, which is fixed in the upper part of the pallet.
The exterior of the pool can be lined using particle boards or moisture-resistant plywood.
It’s easier to make a pool from pallets with your own hands, step by step, using the visual examples in the photo. A simple structure is usually erected in a country house for one season. The primitive structure cannot be called a full-fledged swimming pool, but on hot summer days the whole family can splash around here.
Pros and cons of a homemade pool from pallets
The construction of a bathtub from pallets without investing large amounts of money, drawing up a complex project and attracting expensive specialists is already considered a big plus.
If we consider other advantages, the pool has many of them:
- The use of pallets allows for quick assembly of the bowl. On your own, you can create a pool in a couple of days. If all the materials are at hand and there are assistants, the duration of assembling the font will be reduced to several hours.
- To construct a cheap pool from pallets with your own hands, use used materials. Pallets are taken from a warehouse or store. If necessary, they are repaired. You will only have to spend money on purchasing a tarpaulin or durable film to cover the inside of the bowl.
- A beautifully designed pool will become part of the landscape design. A hydraulic structure installed with your own hands will decorate the garden, yard, and recreation area near the gazebo.
- In the absence of assistants, all stages of the project can be carried out by one person.
- The pool can not only be quickly assembled, but also disassembled. The pallet structure can be dismantled in a couple of hours. Time is taking just draining the water.
There is only one drawback to a bathtub made from pallets. The pool will not last more than one season. For the winter, the bowl will have to be disassembled. Even if the structure is located under a canopy or inside a large bathhouse, it is still short-lived. For DIY assembly we used old pallets. Over time, they become loose and the structure becomes flimsy.
Advice! If the pool is to be installed under cover for several years, the pallets must be thoroughly treated with an antiseptic and painted.
What you need to make a pool from pallets with your own hands
Despite the simplicity of the design, a project is created before construction begins. The measure is not forced. However, the project will help to imagine the future appearance of the font, calculate the materials, and simplify assembly with your own hands.
Advice! It is easier to assemble any design if you have a drawing at hand. This also applies to a primitive pool made of pallets.
Based on the shape of the building material, it is easier to assemble a rectangular pool from pallets or in the form of a square. If desired, the bowl can be built as a polygon, resembling a circle or oval. However, joining the pallets will become more difficult. Reinforced fasteners will be needed to prevent the structure from falling apart.
The choice of pool depth parameters is similarly limited. There are only two options: 80 or 120 cm. The depth limitation is determined by the size of the pallets - 80x120 cm. Pallets on the walls of the pool can be placed vertically and horizontally.

Simultaneously with the preparation of the project, the required amount of materials is calculated. First of all, this concerns pallets. It is assumed that for a medium-sized pool you need at least 10 pallets. The most convenient is considered to be a rectangular font, where 4 pallets are placed vertically on the long sides, and 3 pallets on the short sides. Knowing the width of the pallets, calculate the size of the pool - 320x240 mm. For four sides of a rectangular bowl you will need 14 pallets. If you also line the bottom with pallets, you will need another 6-8 pieces.
With this size, the pool holds about 9 m 3 of water. Translated into weight, 1 m 3 is equivalent to 1 ton. The bowl will have to withstand 9 tons of water pressure.

If you can find used pallets completely free of charge, then you will have to buy film. Here you need to choose the right waterproofing material. Regular greenhouse film will not help you create a good pool with your own hands from pallets, since it is not designed for heavy loads. Transparent PVC material is destroyed in the sun and does not tolerate temperature changes. In addition, the insulating substrates along the sides and bottom will be visible through the film, which will give the pool an unaesthetic appearance.
For waterproofing a bowl with your own hands, black rubber film, used to create artificial reservoirs, is optimally suited. The material is highly durable and can withstand heavy loads and direct exposure to sunlight. In addition, the effectiveness of the film is justified by the color. Black color attracts the warmth of sunlight. The water in the pool will warm up faster.
A blue film will help make the font more impressive. The polymer-coated material is specifically designed for swimming pools. However, such film will cost more.
Advice! If the household has an old PVC sheet from a suspended ceiling, it can be used instead of a film to waterproof the font.
The amount of film is calculated so that after completely covering the bottom and sides of the bowl, there is still a reserve of about 20 cm hanging from the sides. The piece needs to be whole. Bonding film does not always provide reliable sealing.

To summarize the completed project, the following materials will be needed to assemble the pool:
- used pallets;
- waterproofing film;
- a piece of used tarpaulin or linoleum for upholstering the sides from the inside, a backing for the bottom under the film;
- old blankets, carpets and other soft materials for insulation;
- screws, mounting angles, staples;
- tape for fixing the film;
- any used panels, plywood or other sheet material that is suitable for lining the outside of the bowl and making it decorative;
- protective impregnation against moisture for processing pallets.
You will need a simple set of tools. All you need to do is get a hammer, a screwdriver, a saw, a tape measure, and scissors. When everything is in stock, they begin work.
How to make a pool from pallets with your own hands
Assembling the bowl from scratch requires a few simple steps. As an example, here are instructions with a photo of a pool made from round pallets:
- Assembling the font with your own hands begins with preparing the site. You need a flat place without stones or large vegetation. It is optimal to remove the grass and add a small layer of sand. If you have unnecessary foam boards, they can be used for the substrate. The prepared area is covered with a tarpaulin, and the sides of the font begin to be formed from pallets.

- As each pallet is installed, they are connected to each other with fasteners. First, the pallets can be sewn together with strips, then reinforced with clamps and mounting angles.

- When the sides of the bowl are assembled, they begin arrangement. The inside of the fence is covered with old blankets, carpets, and felt. The soft substrate at the bottom is arranged in the same way.

- The final cover is film. The waterproofing material is spread evenly over the bowl. Overlaps of about 20 cm are made beyond the sides. The edges of the film are fixed with tape. To prevent the round bowl from being crushed by water pressure, it is tightened from the outside with a cable or mounting belt.

- The outside of the font is covered with clapboard or other facing material. Decorative edging is nailed from edged polished boards along the end of the sides. It can be used instead of benches. The board is treated with protective impregnation and opened with transparent or colored varnish.

- The finished pool is filled with water. The structure is inspected for leaks and the strength of the pallet connections is ensured.
To make it more convenient to use the font, install a ladder with your own hands. You can consider lighting for night swimmers.
In the video you can see a DIY pool made from pallets:
Operation and maintenance of a pallet pool
To make the water less contaminated with dust, leaves and other debris, cover the bowl with a tarpaulin when not in use. Large debris that accidentally penetrates is caught with a net. The cover is opaque, preferably dark in color. The tarpaulin will reduce the likelihood of water blooming in the sun, and the dark color will speed up its warming up. If the water acquires an unpleasant odor, reagents are added for disinfection.

Advice! It is easier to pump dirty water out of a small bowl into the garden for irrigation and pump in clean water, in which, after warming up, you can immediately bathe.
Conclusion
A do-it-yourself pool made from pallets is understandable step by step for a simple summer resident without construction experience. Assembling a hydraulic structure is no more difficult than installing a greenhouse.