When using LED lighting in the interior, it is important that its operation is stable, durable and does not have a harmful effect on human vision. Correct functioning of LED devices is ensured by voltage converters, which should be selected after making some calculations. A properly selected power supply for a 12V LED strip will protect the LEDs from voltage surges and premature loss of glow quality.
Unlike conventional incandescent lamps, LED structures cannot be connected to a 220V network. They are available with a supply voltage of 12V or 24V. 12V LED strips are most in demand as lighting in home interiors. To obtain the required voltage, special adapters are used - power supplies that convert the voltage in the 220V network to the required value of 12V.
Before choosing a power supply for an LED strip, you should familiarize yourself with their types and characteristics. Stabilizers for LED products differ according to the following criteria:

- degree of protection – there are sealed and non-sealed models;
- housing design - plastic, aluminum sealed for rooms with high levels of humidity, metal with perforation and contact pads (used for dry rooms and requires installation in a closed place to avoid dust).
Voltage stabilizers are an essential element of high-quality lighting, ensuring maximum efficiency of LED light sources. They supply electricity with the required parameters, protecting against possible power surges and premature failure. Thanks to power supplies, LED strips emit a uniform glow without flickering.
Power supply for 12V LED strip: calculation and connection of the device
To understand what kind of power supply is needed for an LED strip, it is necessary to make certain calculations that take into account not only the output voltage, but also the amount of current supplied to the load. Therefore, for each specific backlight, you should calculate the total value of the current consumed by all LEDs in the strip.

Options for calculating the power supply for LED strip
Before calculating the power supply for the LED strip, you need to read the accompanying documentation for the product, which indicates the current consumption per linear meter. If such data is not available, the calculation can be made independently.
For example, let’s calculate the total number of LEDs for a 12V strip 15 m long, with a density of 30 SMD 5050 LEDs per meter: 15 (m) x 30 (pcs.) = 450 pcs. Considering that each SMD 5050 LED consumes a current of 0.02A (this value is given in the diode parameters table), the total current consumption of the entire strip section is 9A (450x0.02 = 9). Therefore, a 12V power supply with a load current rating of 9A will be required.
Helpful advice! Oversized power supplies are quite difficult to hide in an eaves structure. Therefore, to illuminate ceilings, it is not recommended to use strips with a high density of LEDs, which require powerful converters.

When calculating the power of the power supply for the LED strip, we multiply the voltage and the resulting current value: 12Vx9A = 108 W. Therefore, a stabilizer with a power of at least 108W will be acceptable. However, it should be taken into account that the unit is selected with a 20% power reserve, otherwise it will quickly fail from overload. This means that the required power will be: 108x1.2 = 129.6 W, i.e. for this case, the optimal choice of power supply for the LED strip is 12V - 150 W.
In addition, you can calculate the power of the converter using data on the main characteristics of flexible LED products. Having selected the desired type of tape, we find in the table the corresponding power value of one meter and multiply it by the total length of the backlight. Taking into account the power reserve, we obtain the required power of the power supply.
Table of main technical indicators of 12V LED strips:
| LED class | LED size, mm² | LED strip power, W/m | Tape density, pcs./m | Luminous flux value, lm/m |
| SMD 3528 | 3.5x2.8 | 2,4 | 30 | 150 |
| 4,8 | 60 | 300 | ||
| 9.6 | 120 | 600 | ||
| SMD 5050 | 5x5 | 7,2 | 30 | 360 |
| 14,4 | 60 | 720 |
An example of connecting an LED strip to a power supply
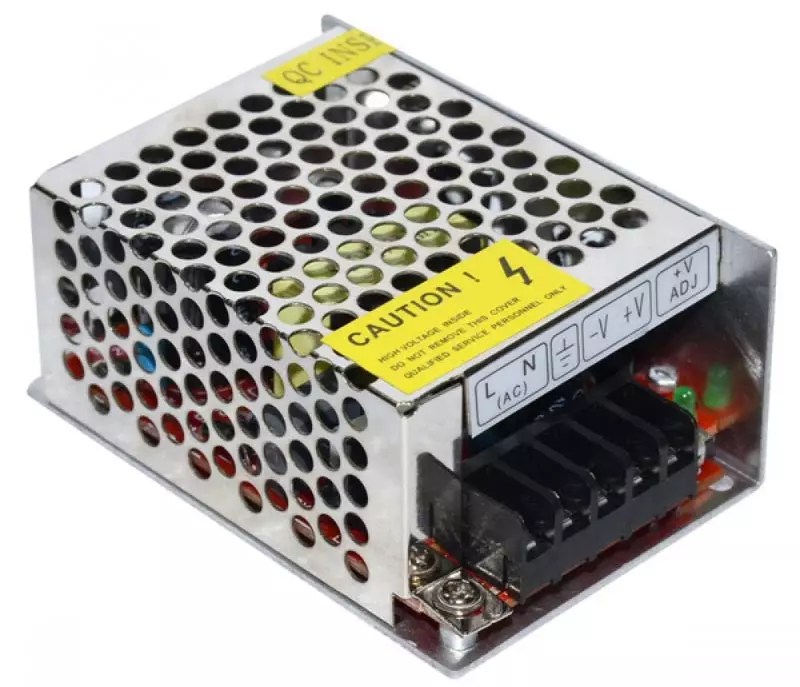
It is necessary to mount the backlight to the selected surface after the power supply is connected to the LED strip. As an example, we use the connection of the tape to a block whose body is made of metal and has holes for cooling the component elements and the terminal strip. One of the walls of the case is equipped with a plate indicating markings for correct connection of wires.
Terminals marked “L” and “N” – phase and zero, are intended for connection to a 220V network. Grounding is indicated by the symbols “FG”. The terminals marked “G” are interconnected and are designed to connect the negative terminal of the LED strip. Three terminals with the symbols “V” are also connected inside the adapter and the positive terminal is connected to them accordingly. It should be noted that such markings are also used on other converter models.

To connect a single-color tape, connect the wires to the terminals, taking into account the polarity. The power cord plug has three wires with a sheath of brown, blue and yellow-green. We attach the brown and blue wires to the “phase” and “zero” terminals, without fear of mixing them up, since they can be swapped. The yellow-green wire is connected strictly to the ground terminal. If there is no ground, the terminal is not used: this does not matter for the operation of the tape.
Note! The absence of a grounding wire in the power cord is a violation of safety regulations when performing electrical installation work.
The above example of a diagram for connecting an LED strip to a power supply is suitable for using backlight from one strip up to 5 m long. If you need to connect several pieces of strip, then you need to use a parallel connection scheme.

Diagram of parallel connection of LED strip power supplies
If, when decorating an interior, there is a need to illuminate several decorative elements located at a certain distance from each other, parallel connection of strips of tape to a voltage converter is used. This scheme is also used when the lighting line of the structure is quite long and exceeds 5 m.
Consecutive connection of segments will lead to uneven load distribution, as a result of which the LED strip will not work correctly, emitting weak light in the final section. It is possible that the outermost section of the tape will not glow at all, while the initial one will begin to overheat and quickly fail. This means that you cannot connect the end of the first segment to the beginning of the second.

With a parallel connection, each section of the LED strip must be connected to the power source independently of the others. This can be done by connecting each piece of tape to the power supply with separate wires. But a parallel connection can be made in another way: lay the main wire line from the converter, to which you can subsequently connect individual sections of the LED strip.
To ensure that the contact of the tape conductors with the main wire is reliable and strong, soldering or connection using special connectors is used. The use of connectors for connecting greatly simplifies the repair of the backlight in the event that problems arise during operation. If the tape needs to be laid along a complex path, the tape itself can be used as the main wire.

Price of power supply for 12V LED strip
You can buy a power supply for a 12V LED strip not only at lighting equipment sales points, but also on the web pages of manufacturers and organizations selling LED products. There you can familiarize yourself with the range of converter models, their technical characteristics and the cost of the units.
By contacting site managers, you can get professional advice on how to choose a power supply for an LED strip, depending on its type and operating conditions. Experienced specialists will help you choose the right device that will ensure durable and high-quality operation of the LED design. As a rule, all products are certified and provided with a guarantee from the manufacturer.

Note! When purchasing an open type converter, remember that it can only be used in rooms with a minimum degree of humidity and in places where there is no risk of water ingress.
Before you buy a power supply for an LED strip, it is worth reviewing the cost of products offered by different companies. This will help in choosing a model with the necessary parameters on favorable terms. Approximate prices of power supplies for 12V LED strip are presented in the table:
| Converter model | Dimensions, mm | Main settings | price, rub. |
| Interior power supply 12V 15W IP 20 | 70/39/30 | Supply voltage 110-220V, power 15W, equipped with a power indicator and voltage regulator | 270 |
| PSU 12V 35W IP 20 | 85/58/32 | Supply voltage 110-220V, power 35W, has a power indicator and voltage regulator | 380 |
| PSU 12V 60W IP 20 | 159/98/38 | Supply voltage 110-220V, power 60W, has a power indicator and voltage regulator | 540 |
| PSU 12V 150W IP 20 | 200/89/40 | Supply voltage 110-220V, power 150W, equipped with power indicator and voltage regulator | 780 |
| PSU waterproof 12V 30W IP 67 | 220/28/20 | Supply voltage 110-220V, power 30W, protection from moisture and dust | 560 |
| PSU waterproof 12V 60W IP 67 | 148/40/30 | Supply voltage 110-220V, power 60W, protection from moisture and dust | 1100 |
| PSU waterproof 12V 100W IP 67 | 202/71,2/45 | Supply voltage 110-220V, power 100W, protection from moisture and dust | 1670 |
Sometimes there are situations when it is necessary to highlight a small area. Then purchasing a power supply will cost much more than purchasing the tape itself. In this case, you can make the converter yourself.
How to make a power supply for an LED strip with your own hands
The cost of switching power supplies for high-power LED strips very often exceeds the flexible strip itself. However, there is an option to reduce the cost of a backlight device by using power supplies from outdated models of computers, TVs, tablets or other electrical appliances as a stabilizer. Surely such products can be found in every home.

The power of 12V converters from old electronics usually ranges from 6 to 36W. This is quite enough for the operation of a small section of LED lighting, for example, the area of a kitchen apron. You can use transformer models, but they are quite heavy and their power is twice that of the tape. As a result, when such a power supply is connected to the tape, it overheats greatly, even if it is improved by means of additional cooling.
For normal operation of the LED strip, it is better to use switching power supplies, which, with sufficient power, weigh very little. For example, a 12V and 2A converter from a broken TV will do. The power of such a device is 24W (12x2), which allows the LED strip to work properly and the power supply not to overheat.
Helpful advice! 5V mobile phone chargers can be used as a power source for a DIY small night light made from 3-6 LEDs.

You can adapt the electronic ballast (current limiter), which powered a failed fluorescent lamp, under the power supply for a 12V strip. To do this, you need to convert the fluorescent lamp regulator into a step-down transformer, and then, using the circuit, connect an LED strip to it. The conversion involves winding the secondary winding, then a secondary diode and capacitor are added to the circuit. The main condition is that the power of the belt must correspond to the same ballast parameter.
Repairing the power supply for LED strips
12V voltage sources that have failed can usually be repaired. If you have enough knowledge and skills, you can try to repair the voltage converter yourself. Malfunctions can be eliminated using a power supply circuit for a 12V or 24V LED strip, since they are identical.

The most common problems with power supplies are:
- capacitors C22, C23 fail - they usually swell or dry out;
- transistors T10-11 do not function;
- PWM controller TL494 is faulty;
- dual diode D33, capacitors C30-33.
Malfunctions of other components of the converters are rare, but they are also worth checking.

To diagnose and correct problems, you must perform the following steps:
- open the housing and check the fuse. If everything is in order with it, you need to measure the voltage on the capacitors (C22, C23), after applying power. The value should be around 310V. Therefore, the line filter and rectifier are normal;
- carry out PWM diagnostics (KA7500 microcircuit) - if there is a voltage of 12-30V on pin 12, then we check the microcircuit. Otherwise, you should check the standby voltage power supply;
- the voltage at pin 14 after applying external power should be approximately +5V. If not, you need to replace the microcircuit. If there is, you need to check the microcircuit using an oscilloscope.

Repairing a power supply consists of replacing faulty elements with the same components or their analogues. In order not to encounter the problem of breakdown later, it is necessary to follow the manufacturer's recommendations, since exceeding the permissible load limit will lead to failure of the adapter.
The correct choice of power supply and related devices for LED systems guarantees the durability and quality of lighting. Thanks to these devices, LED sources emit bright, flicker-free light that can gracefully transform your interior.
It’s been a long time since I did a review about homemade products. I decided to make another LED light bulb (in addition to my previous ones). The criteria are still the same:
- Low financial and labor costs in production.
- It should be such that there is no desire or opportunity to steal (although this is relative).
- Must be reliable in operation.
If anyone is interested, let's go.
I ordered this LED strip as part of a promotion that was on Muska. I think many people ordered it. I ordered it specifically for experiments. I received it not so long ago. It was inexpensive.
Standard polyethylene bag. 
Everything was packed to the highest class. 
There is no meaningful information on the packaging. 
Immediately checked for functionality. 
There are two wires on both sides of the tape for connecting 12V. White is a plus, black is a minus.
I recalculated. Exactly 300pcs. 4.95m. 
Connected again. 
The strip is assembled from SMD3528 LEDs (0.06W 20mA 4-8 lumens).
I illuminated it at different currents. 
The tape is assembled from parallel connected blocks. There are 100 in total. The circuit of each is primitively simple. 
I decided to check the stated characteristics. If you apply 11 V, the current consumption is 0.66 A. 
Increased the voltage to 12 V. The current increased to 0.88 A. 
I increased the voltage to 13 V. The current increased to 1.14 A. But it never reached the promised 2 A. 
Realizing that the tracks are too thin. And a lot is lost on them. Connected on both sides.
Voltage→Current when connected on one side→Current when connected on both sides.
10.0 V→0.42 A→0.64 A
10.5 V→0.54 A→0.83 A
11.0 V→0.66 A→1.03 A
11.5 V→0.76 A→1.17 A
12.0 V→0.88 A→1.42 A
12.5 V→1.01 A→1.60 A
13.0 V→1.13 A→1.83 A
When connected on both sides, the current increases significantly, but still does not reach 2 A. In principle, this is not important for me. I just posted information that might be useful to someone.
I'll make a light bulb.
The principle is simple: the cheaper and simpler, the more reliable. The driver will be homemade using ballast capacitors. To do this, you will need a minimum of parts: several pieces of LED strip, a ballast capacitor of 0.82 μF * 400 V, a filter capacitor of 10 μF * 400 V, 4 rectifier diodes (almost any with a reverse voltage of at least 400 V, KD105 is also possible).
As a donor I use a deodorant bottle and a base from a faulty fluorescent light bulb (“energy-saving”).
The cylinder body is completely aluminum. Would be a good radiator for LEDs. 
The container will have to be opened. I performed this operation more than once as a child. True, they were dichlorvos cylinders. 
I'm glad that the notches coincided. 
The hit is perfect. I collected everything I needed in a heap. 
First, preparatory operations. 
I insert the ballast encoder and solder it inside the base. The base is insulated. Short circuit is excluded.
Then I solder the rectifier bridge with electrolyte. 
The electrolyte falls exactly inside the cylinder. Sits hard. Here, closures are also excluded.
But those who are worried can play it safe with heat shrink.
All that remains is to glue the LEDs. I cut 14 pieces of tape, 2 blocks each. 
In the tape they are connected in parallel, but I will need a serial connection. 
I placed double-sided tape under the soldering points. It will be additional insulation. I connect adjacent blocks in series. 
The driver will be a circuit using capacitors. For me, this is the simplest, most reliable and economical solution. By the way, I can raise the power of my light bulb, I can lower it if it doesn’t suit me (in general, choose the one that is needed). Just give me a soldering iron and ten minutes of time. I have already written about all the pros and cons of such schemes more than once.
For those who for some reason are not satisfied with the ballast driver, you can buy a ready-made, full-fledged one. But these are additional financial costs. Their operational reliability is also lower. Nothing spoils in the ballast.
Standard Chinese driver circuit with minor modifications. I didn’t draw the blocks themselves, they are absolutely the same, the diagram is at the beginning of the review. Used 28 series-parallel connection blocks (2 parallel). 
For those who do not want to solder the driver themselves, you can take it from a faulty Chinese light bulb.
For greater reliability and electrical safety, some places can be painted with nail polish.
The cylinder was attached to the base using two self-tapping screws. Screwing self-tapping screws into the aluminum light bulb body is no problem.
The size of the light bulb turned out to be rather large. 
And with a bioeffect:) When working, it emits deodorant residue in the form of a pleasant (different for everyone) smell.
A little scary, but this is condition number two.
And a little advice for “young arsonists”. Personally, I test such homemade products first through small containers. I connect it in series through a capacitance of about 10,000 pF. This is enough for the homemade product to light up. At the same time, it will protect against strong “BANG” if installed incorrectly.
Well, now I’ll check the power of the resulting light bulb. 
At a network voltage of 224 V, it consumes 4.3 W. At a different network voltage, the power will change slightly.
The LED strip is designed to operate on a voltage of 12 V. Therefore, it has a bunch of resistances stuck in it to limit the current. And I have a current driver (the ballast circuit is a current driver). These resistances waste useful energy (at least 0.6 W wasted). For efficient operation, it is better to bridge some of the resistances. You can leave a couple, no more (one in each parallel).
I compared my homemade product with a Chinese light bulb. Power consumption is almost the same.
What do you think, the temperature of the LEDs of which one will be higher during operation?.. 
The pulsations do not bother me at all. But I decided to save the LEDs. A quiet regime is preferable for them. That is why I installed a 10 µF condenser filter.
And yet let's see the pulsations. There are a lot of skeptics. Well, they don’t trust such drivers. And optimists who trust them too much. Just the facts. 
I calculate the magnitude of pulsations using the formula from GOST. 
I got about 9.5%. This is a lot for a reading room. For the landing it doesn't matter.
The brightness of my LED bulb corresponds to an incandescent lamp of 30-40W, this should be enough for a landing. This is better than not burning at all.
Making the homemade product took half a day. I thought I could handle it faster. But the hands work much slower than the thoughts work.
Writing the review took much more time.
In conclusion, I will repeat a little: soldering and riveting light bulbs is a thankless task, although it is interesting. Factory soldering is certainly more reliable. It is much easier to attach some ready-made LED light bulb. But homemade ones work much more reliably. And if your hands itch, no one can stop you!
About the tape itself. It is rather weak for making light bulbs according to the described principle. The maximum power of each LED is only 0.06 W. More suitable for window displays and the like.
And the most important thing.
This light bulb is not galvanically isolated from the electrical network. It MUST be covered with a lampshade.
And if you are not sure that the switch turns off a phase and not a zero (this also happens), then you need to screw it in/unscrew it with gloves, observing all safety precautions.
That's all!
Good luck everyone!
LED lighting is widely used in everyday life. It is relevant for individual surfaces either as an additional or. In order for the lighting to be stable and the installed products to last as long as possible, you should choose the right 12 V power supply for the LED strip. A wise choice will allow you to avoid a premature decrease in the quality of the glow and will protect the product from changes.
Before choosing LED strips for interior design, you should familiarize yourself with the operating features of such products. For example, it is impossible to directly connect to 220 V, since they were originally designed for 12 V. Violation of this rule will lead to failure of the tape.

To prevent the lamps from burning out, it is necessary to reduce the voltage in the power source from 220 V to the required value. This can be realized using a 12 V power supply. For a 12 V LED strip, it is a necessary element, without which it is impossible to connect the product to.
Attention! The most widespread are 12 V LED strips, but 24 V models can be found on sale.

Advantages and disadvantages of 12 V power supplies
The power supply has a number of undeniable advantages:
- Increases electrical safety when operating LED strip;
- Increases the service life of the product;
- Reduce the consumed voltage to the required level;
- Allows you to stabilize the load on.

The disadvantages of such devices include the cost of purchasing them, as well as the need for decoration during installation work. We have to consider various options for positioning the power supply relative to the tape, allowing the device to be kept away from others.

Types of 12 V power supplies
Manufacturers offer ready-made devices with various design options. Depending on the level of protection against precipitation, devices can be:
- Sealed allowing operation in elevated conditions, including open air. Able to remove heat well and not afraid of unfavorable natural factors;
- Semi-hermetic. A universal option that can be used inside and outside the building. Has a degree of protection IP54;
- Leaky, which can be used in dry rooms.

A wide range of models allows you to select a power supply with a power consumption of 12-800 W, designed for a current of 1-66 A. There are products with active and passive cooling. In the first case, the device is equipped with a built-in fan, which, while providing the required level of heat dissipation, is capable of creating some noise during operation.
Power supplies for 12 volt LED strips can be in a sealed housing made of:
- Plastic. Such models are compact, airtight, light weight and compact in size. At the same time, they are characterized by poor heat transfer and limited power selection. Maximum power does not exceed 100 W;

- Aluminum. The most expensive type, characterized by a high level of reliability, tightness and strength. Due to its characteristics, it has good heat transfer and is not afraid of the effects of most negative factors: temperature fluctuations, direct sunlight, humidity. not only in everyday life, but also in installation;

- Other metals. The devices are manufactured with perforations and contact pads. They can be installed in dry rooms, highlighting closed areas to reduce the amount of dust that gets inside.

How to calculate the power supply for an LED strip with your own hands
In order for the power supply to work stably, it is necessary to correctly calculate its power in advance. The calculation will require knowledge of the rated voltage and power that one meter of LED strip Pm will consume. These indicators are individual and depend on the components included in the LED strip, their quantity per linear meter, as well as the length of the product itself (L).
- We find the total load by multiplying the power per linear meter of the LED strip by its length: Ptot = L × Pm . For example, if the power of a linear meter is 15 Watts, then five meters of tape will consume 5 × 15 = 75 Watts;
- We multiply the resulting value by the safety factor kz, which is numerically equal to 1.2...1.3: Pbp = kz × Ptot = 1.2 × 75 = 90 W. The safety factor will allow you to avoid overheating of the power supply during operation. We select a device with a power that is greater than the calculated value.
Attention! When calculating the power of the power supply, you should take into account the power of the RGB controller included in the connection diagram. This value, as a rule, does not exceed 5 W.

If the power of a linear meter of LED strip is unknown, you can calculate it yourself. To do this, you need to know exactly how many and what kind of LEDs are contained in one linear meter. Let it be 30 pieces of SMD 5050, each of which is designed for a current of 0.02 A. In this case, the total value of the current consumed will be equal to 30 × 0.02 A = 0.6 A. Hence the power per linear meter of the LED strip is 0, 6 Ax12 V = 7.2 W.
Connecting the power supply to the LED strip with your own hands

Before you figure out how to connect the power supply, we suggest you get acquainted with the symbol on the device and the LED strip:
| Photo | Description of work |
 | , intended for connecting the power supply to the network, are marked L and N. The order of connection (“+” / “–”) does not matter. You can connect the device to the power source in any order. |
 | If available, you can connect to the terminal marked accordingly. |
 | Terminals designed for connecting LED strip. Designated as +/– V, depending on polarity. When connecting, this requirement must be taken into account. |

| On an LED strip, the wire with positive polarity is usually red, and the wire with negative polarity is black. On the tape itself, the contact points are labeled as follows: positive - 12 V, negative GRND, or there may be no inscription at all. Some manufacturers use V+ / V- markings. |

Parallel connection
This scheme is relevant if the required lighting exceeds 5 meters. A serial connection is impossible, since the load on the current-carrying paths will exceed the permissible value and fail. Also during operation there will be an uneven glow. In this case, the products are connected in parallel:
| Photo | Description of work |
 | Each piece of tape is connected to a busbar with a suitable cross-sectional size (1.5 cm²). To connect the LED strip to the bus, you can use wires of a smaller cross-section (0.75 cm²). |
 | Not LED strips, but buses will be connected to the power source. |
 | After checking the correct connection, the wires should be connected to the appropriate terminals on the power source. |
Serial connection
If the length of the connected product is less than 5 meters, it is not necessary to resort to a parallel connection circuit. In this case, you can connect the power supply to the LED strip as follows:
- We connect the power cord to the corresponding terminals on the device. As a rule, blue and brown wires correspond to “phase” and “zero”, and yellow-green wires correspond to grounding. If there is no ground, this terminal remains unoccupied;
- We connect the tape to the appropriate circuits;
- We check the functionality of the system.
Attention! The absence of a ground wire violates the requirement for the safety level of the installed lighting system.

How to make a power supply for a 12 V LED strip with your own hands
It is not always possible to purchase a suitable 12 V power supply model. In this case, you can make the device yourself:
| Photo | Description of work |

| We prepare the necessary materials and tools:
|
 | Using a multimeter, check the polarity of the charger. |
 | Solder the DC-DC converter to the charger, observing the polarity. |
 | We connect the tape to the output contacts of the DC-DC converter, observing the polarity. |
 | We check the functionality of the created 12 V power supply. |

Attention! A homemade power supply for LEDs has current limitations. In the example given, 1 A. This value must not be exceeded.
Instead of a power supply from a phone, you can use a converter from a computer or other equipment. A transformer for a 12 volt LED strip may not be the best choice, since their parameters often exceed the required ones by two or more times. This will lead to the fact that during operation such a device will constantly overheat. Additional cooling will not solve the problem. That is why, if you have a choice, it is better to give preference to a switching power supply.
Repair of 12 V power supply
After some period of use, the lighting may stop working. The cause of failure may not always be the burnout of the LED strip: the power supply may fail. There are many reasons that can cause the converter to break down:
- Prolonged exposure to high humidity conditions, if the device was not originally designed for such operating conditions;
- Accumulation of dust and dirt inside the device;
- Poor assembly of the device or the use of low-quality parts when assembling the product;
- Violation of operating conditions due to non-compliance with the manufacturer’s requirements;
- Initially incorrect calculation of indicators. Often, after preliminary calculations of the power value, some users do not add 20-30% to the required value, and therefore the unit operates at the limit of its capabilities.
Attention! Before starting repair work, you should accurately determine the cause of the power supply failure.
The following signs indicate that the device is burnt out:
- A characteristic burnt smell that intensifies after opening the case;
- Presence of blackened, swollen or burnt parts. Most often, capacitors swell;
- There is a break in the tracks and contacts between the elements of the electrical circuit.
Attention! If you find a hole in a burnt-out board or significant damage to individual parts, refuse repairs: it will not be cost-effective.
If there are several damaged parts for the device, it will be enough to replace them. To do this, you will need a circuit diagram for the operation of the converter, although most often such devices have a standard circuit, and the cause of failure may be the burnout of transistors, capacitors, or a dual diode. The remaining parts rarely burn out.

Problems can be diagnosed in the following sequence:
- Having opened the case, we check the functionality of the fuse. If it works, we control the voltage on the capacitors (C22, C23). They must be energized at this time. Its performance is indicated by a value of about 310 V;
- We carry out PWM diagnostics;
- We control the output voltage and check the performance of the microcircuit using an oscilloscope.
Article
LED strips cannot simply be plugged into an outlet - they need power at a lower and constant voltage. This is precisely the difficulty for most people who dream of LED lighting, but cannot afford to purchase it. Ready-made power supplies for 12 Volt LED strips cost about 500 rubles or more. Moreover, the higher the power consumption, the more expensive these devices are. It turns out that it is much easier to make a power supply yourself - for this you do not need to have a wealth of knowledge in electronics, the circuitry is simple.
Tape supply voltage
The main parameter of LED strips is the supply voltage. Of course, it is different from what we have in our outlets. Based on voltage, tapes are divided into three groups:
Moreover, the current must be constant! If you plug the tape into the network without a power supply, it will fail. The unit voltage must be appropriate - 12, 24, 36 Volts. With its help, the mains voltage is reduced to the operating value. The most popular models of LED strips operate at a voltage of 12 V. Therefore, you need to choose only those LED strip supplies that can generate such voltage.
Device Features
The design of such devices is quite simple; they do not contain scarce elements. A standard power supply for 12 Volt LED strips consists of the following elements:
- Step-down transformer - its power should be approximately 25% greater than that of the LED strip. This is done so that there is a small reserve.
- Bridge made of semiconductor diodes. This is a simple design that includes two pairs of semiconductor diodes, which make it possible to obtain a constant voltage from an alternating voltage. But more often, ready-made diode assemblies are used, which have 4 terminals - an alternating current source is connected to two, and the rectified one is removed from the rest.
- A capacitor installed between the positive and negative terminals provides reliable current filtering. More precisely, with its help the entire variable component is cut off. Diodes convert the current, but after this a small proportion of the alternating component remains. An electrolytic capacitor allows you to get rid of it.
All these components are contained in a robust housing. Moreover, if necessary, a cooler (fan) is installed. You can even make sure that it is turned on constantly - this will ensure the normal operation of the homemade LED strip power supply. When making it yourself, it is recommended to pay attention to the safety of the device - it should not overheat.
Transformer power supplies
The simplest in design are transformer power supplies. The main element in it is a coil transformer. With its help, the voltage is reduced from 220 V to 12..15 V (or 24, 36 V). The voltage generated on the secondary winding is supplied to the input of a bridge rectifier using semiconductor diodes. Then filtering occurs using a chain, usually consisting of an electrolytic capacitor, resistor, and inductor. Sometimes zener diodes or microassemblies are installed in order to fix the output voltage at the same level.

The advantage of transformer power supplies is that they operate even without connecting a load (the so-called idle mode). In addition, there is galvanic isolation from a 220 V network. But, despite the simplicity of the design, there are a number of disadvantages: very low efficiency, large dimensions, high sensitivity to voltage changes. And the most important inconvenience is the large mass. It is because of these shortcomings that many people use transformerless power supplies for LED strips.
Switching power supplies
There is no need to think that pulse-type designs do not have a transformer. It exists, but its dimensions and weight are much smaller than those of the structures discussed above. The device operates at high frequencies (several tens of thousands of Hertz versus 50 in a household network). But the disadvantages remain the same - high sensitivity to voltage changes. Moreover, when operating in idle mode, the device may fail. Such power supplies for 12 Volt LED strips can be used, but it is not recommended to turn them on without load.
How to calculate power

When making your own power supply, it is necessary to take into account the power consumption of the LED strip. Exact data can be found in the specification for a specific model. Here are the most common types of data:
- SMD-3528 accommodating 60 LEDs per 1 meter, total power 4.8 W.
- SMD-3528 with 120 LEDs per meter has a power of 7.2 W, respectively.
- SMD-3528 with 240 LEDs per meter has a power of 16 W.
- SMD-5050 with 30 elements - 7.2 W.
- SMD-5050 with 60 elements - 14 W.
- SMD-5050 with 120 elements - 25 W.
If you are selecting a power supply (ready-made) for an LED strip or assembling elements for self-production, you need to take into account all the parameters. The main ones are:
- Power.
- Operating voltage.
In order to calculate the total power of the tape, you need to know how much one linear meter consumes. This value is then multiplied by the length (in meters). Next, you need to add another 25% of the obtained value and select a power supply (or transformer) whose power is closest to the calculated one.
Example of power calculation
For example, you have a tape available:
- There are 40 LEDs per meter.
- Total length - 5 meters.
- The supply voltage is standard - 12 Volts.

With a nominal power value of one meter of 4.8 W, the total value can be calculated. It will be equal to 24 W. It is recommended to add another 6 W to this value (this is 25%). This means that the power supply must have a power of 30 W.
DIY making
So, you have decided to assemble your own power supply for the LED strip. The size of the power supply depends on the power of the transformer (if a circuit using it is selected). For a simple device you will need a transformer with a primary winding rated for 220 V. The output current should be about 1 Ampere, the voltage should be 12 Volts.

You will also need several elements:
- Diode assembly. You can use 4 semiconductor diodes connected in a bridge circuit.
- An electrolytic capacitor with an operating voltage of at least 25 V. You can use elements with an operating voltage of 50 V. The capacitance must be at least 470 μF.
- Zener diode or microassembly KR142EN. This is a voltage stabilizer, but it must be installed on the radiator.
Power supply assembly process
You have an LED strip in stock, the power supply has been calculated and the elements have been selected, now you can begin assembly. Both printed and wall-mounted installations are allowed.

Of course, the whole structure will look much more attractive on a printed circuit board. The manufacturing process looks like this:
- The diodes are connected to each other using a bridge circuit. Be sure to observe polarity; all diodes have an anode (positive terminal) on the strip side of the body.
- Connect the secondary winding of the transformer to the diode bridge.
- An electrolytic capacitor must be connected to the bridge output. When connecting, you must observe polarity! Otherwise the capacitor may explode!
- A choke is connected to the positive terminal gap.
- Next, a zener diode is switched between plus and minus. After it, it is also advisable to install another capacitor.
Finally, the entire device is assembled into one housing, the elements are securely fixed and two outlets are made. The red wire should indicate the positive terminal, black or blue the negative terminal. At this point, the production of the power supply for 12 Volt LED strips is completed, you can use the device.
”, then you probably noticed that the steam room also has LED strip lighting. As in the case of the bathhouse lamp, we decided to make an LED strip with our own hands.
We needed LED lighting behind the backrest in the steam room, since the wall adjacent to it turned out to be insufficiently lit. Many will ask why it was impossible to use a standard LED strip. Not every LED strip is suitable for such purposes: due to temperature changes, the service life of the silicone coating on the LED strip is reduced, the LEDs on the strips often burn, and dark gaps are obtained. Of course, there are LED strips on sale that are specifically designed to work in such difficult conditions, but their price is quite high. By making an LED strip with your own hands, you can save money, and if it breaks, you can easily repair it.
Materials for making LED strip
- LEDs with an operating voltage of 3 Volts and an illumination angle of 20-30 degrees
- getinax leaf
- green plastic bottle
- clear heat shrink tube
- enameled wire
- rosin
- solder
How to make an LED strip with your own hands
1. Cut leaf getinax into strips 10mm wide.
2. Cut strips from a plastic bottle the same width as the getinax. We drill holes in the getinax for LEDs with a diameter of 5mm. 16 holes were drilled in our 0.5 m long strip.

3. We insert the LEDs into the holes and solder 4 LEDs into one circuit rated for 12 V.

4. Solder 4 chains into a common parallel circuit using enameled wire.


5. Before putting the heat-shrink tube on the made strip, we check the functionality of the LEDs with a 12-volt voltage.

6. Put on the heat shrink tube.


7. Use a hair dryer to gently heat the tube until it shrinks.

8. The LED strip is ready for use.


