Who today can imagine living in the modern world without electricity? Few people, in fact. The electricity consumed by each must be measured. Therefore, you need to install a device that will help with this.
Which counter to install
There are electronic and induction meters; this division is based on the functional principle. not so durable and accurate, so more and more consumers are replacing them with electronic ones.
There are also classifications that are based on the accuracy of the devices and the rated current. When the error is smaller, the measurement is more accurate. Meters with a rated voltage of 0.4 kV are usually chosen for country houses where there is no powerful equipment.
Electricity meter in a private home: what you need to consider when installing
An electrical installer with average qualifications can install the device. But there are installation rules and a number of documents that you need to acquire before this. A standard contract, for example, needs to be requested from the network provider; you also need a work assignment, which will contain an act of division of balance sheet ownership. This package of papers contains the requirements that the consumer must comply with in order for his home to be connected to the power grid. In addition, the documents differentiate the responsibilities of the home owner and the electricity supplier. It is precisely in this regard that it is recommended to install the electricity device inside the house in a heated distribution panel.
Installation of an electricity meter: list of requirements
It is best to install the device in a dressing room or hallway, so that in case of inspection or work with it there is access.
The input line must be de-energized in advance. This is done in agreement with the company’s electricians or network provider.

An interval of 0.8 - 1.7 m is the optimal height if a mounted installation of an electricity meter is performed. The device is mounted horizontally on the surface.
First, the incoming electrical circuit must be connected to the circuit breaker, and then to the meter itself.
All electronics in the building must be secured. For this there must be a protective ground. If a phase imbalance occurs or it will be protection.
The general wiring for the whole house (usually a panel with automatic switches) is connected to the meter output.
If the consumer sees that the integrity of the seal has been compromised, an urgent need to call a representative of the network provider to reseal the meter.
The requirements of the PUE during installation must be adhered to.
It is important to do a test run.
Electricity meter in an apartment: what you need to take into account during installation
The rules for installing an electricity meter (PUE) contain all the important aspects; based on them, representatives of the network company install devices in apartments.
Finding out the date is the first thing you need to do before you start installation. It should be on the seal. For 3-phase meters, the statute of limitations should not exceed one year, for single-phase meters - two.


Before connecting, contaminated Vaseline must be removed from the conductor and immediately reapply a thin layer of Vaseline. The screws are tightened in two steps. The first one is tightened without jerking with the greatest permissible force, then the tightening is not completely, but is greatly weakened, then the secondary one is with normal force. This is how the electricity meter is installed. The price that representatives of the service organization will ask you for in case of self-installation will consist only of the service for sealing the device.
The electrical meter terminal box, adapter box or test block must be subject to the sealing process. The voltage transformer chamber, as well as the disconnector drive handle, and again the clamp assembly are sealed if the meter was installed at a consumer substation.
In every home, access to sources of electricity is a top priority. However, this is often hampered by various organizational and technical difficulties. One of the most important tasks for every homeowner is installing an electric meter. Since without taking into account the electricity consumed, not a single energy saving company will enter into an agreement. It is for this reason that it is worth paying special attention to installing an electric meter in the house.
Rules for installing and connecting an electric meter in a private house
Important technical aspects
According to the functional principle, electronic and induction meters are divided. Today, most meters are being replaced with electronic ones, since induction ones are less accurate and their use is strictly limited.
Also, meters can be of different accuracy classes and rated current. Accordingly, the smaller the error, the more accurate the measurement. For private homes without powerful equipment in the form of crushers, carpentry, etc. It is most rational to use meters taking into account the rated voltage of 0.4 kilovolts.
If the calculated current exceeds 100 amperes, then in this case the electric meter will have to be installed directly through the transformer circuit.
Before purchasing a device, it is necessary to clarify the period for installation of the seal by the state trustee and its integrity. If the network is three-phase, then the inspection sign should not be older than 1 year, and for a single-phase network - 2 years.
How to install an electric meter and important organizational aspects
A semi-skilled electrician can install the electric meter. However, before this, it is necessary to request from the network provider a standard contract, an assignment for performing work with an act of division of balance sheet ownership.
These documents contain a set of requirements, the fulfillment of which is mandatory for consumers to connect private homes to the electrical network. It also describes the boundaries of responsibility between the electricity supplier and the homeowner. It is for this reason that it is best to install an electric meter on the territory of the house in a heated distribution panel inside the building.
Meter installation process
- It is best to install the device in a dressing room or hallway, which will facilitate access to it in case of inspection or maintenance.
- You must first de-energize the input line. This can be agreed upon with the network provider or company electricians.
- The height for wall-mounted installation varies from 0.8 to 1.7 meters horizontally to the surface.
- The general wiring to the house is connected to the meter output. As a rule, this is a shield with machine guns.
- If the integrity of the seal is broken, you must immediately call a representative from the network provider who will seal the meter.
- During the installation process, all requirements of the PUE must be observed.
- We perform a test run.
Rules for installing an electric meter in an apartment
Often, electricity meter installation in apartments is carried out by representatives of the network company. First of all, in the process of installing and connecting the meter, follow the rules of the Electrical Installation Regulations, which describe all the main aspects.
Important nuances
First of all, before installing the meter, you need to check the state inspection period. The seal must bear the date of inspection. The statute of limitations for state verification should not be higher than 1 year for 3-phase meters, 2 years for single-phase meters.
As a rule, meters are mostly installed in distribution panels on apartment sites. If the meter is installed directly in the apartment itself, where the input is located, then it is best to mount it in the hallway in a special closed panel. In this panel you can also place a group of machines for the entire apartment.
Meter installation process
- We are preparing a place for installing an electrical panel with automatic machines and a meter.
- It is necessary to de-energize the input line. This can be agreed upon with the network provider or company electricians.
- Following the rules of the PUE, we switch the input and output circuits of the meter.
- Do not forget about protective grounding, which allows you to protect all electronics in the house in the event of a phase imbalance or short circuit.
- The input current circuit must be connected to the circuit breaker and then to the meter.
- We perform a test run.
Rules for installing an electric meter on the street
Installation of an electric meter outdoors outside the premises must be carried out in accordance with a number of technical and operational requirements.
It is best to install the meter on the front side of the house at a height of 0.8-1.7 meters, which will provide easy access to it for representatives of the network company and technical service.
The meter can be mounted directly on the support of a concrete pillar if it is located on the premises of the house. Also, a circuit breaker should be installed in the electrical panel, and it is better to install a group of circuit breakers for all consumers in the house indoors.
Meter installation process
- Before installation work, it is necessary to disconnect the network line in accordance with the rules of the Electrical Installation Regulations.
- The height for hanging the meter varies from 0.8 to 1.7 meters horizontally to the surface.
- At temperatures below 5°C, electricity meters will behave incorrectly. It is for this reason that you should think about a heated electrical panel.
- The input current circuit must be connected to the circuit breaker and then to the meter.
- Do not forget about protective grounding, which allows you to protect all electronics in the house in the event of a phase imbalance or short circuit.
- We connect the counter output to the input machine or group of machines.
- Test activation.
What to do if the meter is asked to be taken outside
Recently, questions about moving the meter outside have become more frequent. People ask whether such demands are legitimate. A few days ago, this useful comment appeared in this article.
All electrical meters must be checked periodically. The timing of such testing is set by the device manufacturer. Sometimes you have to dismantle the old meter and install a new one. You can choose them yourself or with the help of specialists. How to choose meters, how to install them and where to go if problems arise is in the material.
Choosing a new electric meter
Only those meters whose types are approved by Rosstandart and included in the state register of measuring instruments are suitable for electricity metering.
You can, of course, choose a meter yourself, but it is better to contact specialists: they will advise which device is best suited for you, taking into account the type of house, allocated power or the state of intra-house networks.
When choosing a new meter, the technical capabilities at a specific address are also taken into account: type of connection (direct connection to the circuit or transformer), type of electric meter (single-phase or three-phase), metering system (single or multi-tariff), meter model, etc. In addition, benefits are taken into account if the client has them, as well as discounts or bonuses valid at the time of application.
A meter for metering the amount of electricity consumed is not so much a useful as a necessary device. Residential or industrial premises not equipped with this device, but consuming electric current, are considered illegal. Owners of such houses are subject to heavy fines, and their houses are disconnected from the electrical network. Therefore, installing electricity meters is simply a necessary measure.
Differences in meters based on operating principles

- The most common type of counters, which has been used for many years, is mechanical. The second, younger type of meters is electronic. Mechanical counters work on the principle of rotation of round metal elements in them. The current flowing through the device initiates the movement of this element. Energy consumption is recorded based on the number of revolutions completed. This type of meters has a lower cost than electronic ones, the intervals between their checks are also longer, but the accuracy of the readings is not always absolutely correct.

- Electronic electricity meters work on a different principle. There are no mechanical elements, and accounting is carried out using semiconductors or microcircuits. The absence of mechanics means the absence of moving elements. Information about the incoming current is directly transmitted from the voltage sensors. This device has a higher cost, but gives the most accurate result.
- Another important difference between meters is the number of phases they support. Devices with one phase and three are connected respectively to a network with one or three phases. There are varieties of three-phase devices that are connected to a single-phase network. As for single-phase meters for networks with three phases, in this case three devices will be needed.
Differences between meters based on other characteristics
- One of the main characteristics that plays into the hands of the electricity consumer himself is the accuracy of the device’s readings or its error. Previously, this figure varied from 0.2 to 2.5%. The majority of devices had the maximum permitted percentage of inaccuracy in readings. But after a new state standard for accounting for errors for household measuring instruments was introduced, this figure decreased to 2%. Accordingly, most of the instruments sold have just such an indicator of inaccuracy in their measurements.

- Another characteristic of household and industrial meters is the connection method. They are connected directly or through a current transformer. This characteristic is important when connecting and is calculated based on the total load on the electrical network. If this figure does not exceed 100 A, then a direct connection method is allowed. If the indicator is exceeded, then additional installation of equipment is necessary that has a secondary current of 5 A. When choosing a meter, they are guided not only by the total load of the network, but also by the voltage class of the device itself. This figure is most often 220, 380 or 100 V.
- It is important to take into account the voltage class of the current counting device because it directly affects the type of installation. For example, if the equipment is installed on the high side, then during installation, measuring voltage transformers are also installed in the network, which at the output will give a figure of no more than 100 V. The high side is considered if a high-voltage line with indicators from 6 to 10 kV, or if high-voltage transformers are available.
- The next characteristic of meters is their tariff. The most common devices in private homes are devices that take into account only one tariff. Two-tariff and multi-tariff meters are more expensive and require the preparation of appropriate documents, which is why they are not used in private homes. In addition, for an individual, division into tariffs is not always provided. This is necessary mainly for legal entities, that is, various industrial or office buildings. The essence of a multi-tariff meter is that it counts according to several specified tariffs. For example, day and night rates.
Basic rules for installing a single-phase meter
Installation and replacement of electricity meters is demanding not only in terms of connection diagrams, but also in the remaining stages of installation and preparation for it, which boil down to the following rules:
- Selecting a room for installation. For installation, choose dry rooms that will not interfere with installation and maintenance of the device. The temperature range of the room is allowed from 0 to +40°C. If the intended installation location does not fit into these parameters, then they are organized by insulating and heating the voltage cabinet.
- Selecting an installation location. There are prescribed rules that determine possible locations for installing the meter. Installation is permitted on walls, on panels and in metering panels, in cabinets, in relay compartments of a complete switchgear.
- Choosing a mounting method. Possible options are on metal shields, on plastic shields and boxes, on wooden shields.

- Selecting the mounting height. The optimal distance from the floor level is 80-170 cm. The meter should be located at eye level, this will make it easier to maintain and take readings.
- When installing equipment, monitor the angle of its inclination; it should not be more than 1o, since a larger inclination will create an additional error in accounting for electric current consumption. This note is relevant only for induction devices.
- Selecting the size of the structure for installation. By design we mean a niche, cabinet or panel in which the metering device is placed. The size of this element is selected in such a way as to provide access to all output elements and the counter itself.
- When connecting wires, be sure to take into account their color markings. All wires are stripped to at least 12 mm.
- Provide for the installation of automatic switches in front of the meter. This measure will help when replacing or repairing equipment, as it will make it possible to turn off the power during the period of work. Organizations that control energy consumption often make claims of energy theft if switches are installed in front of the meter. To avoid this kind of problem, you need to take care of sealing this element. To do this, the machine is installed in a special plastic box, which has an eyelet for a seal.
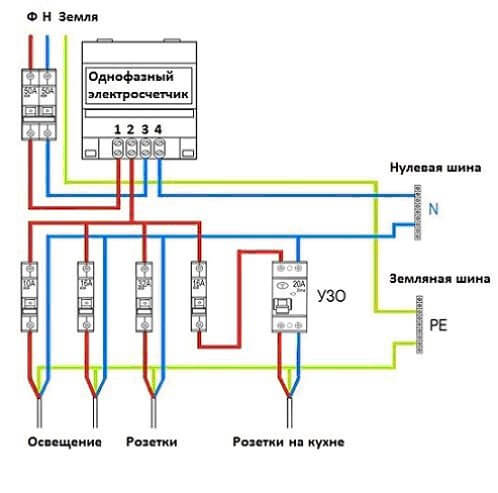
Installation diagram of a single-phase electric meter
When purchasing an electric meter, you should pay attention to ready-made electrical panels that contain all the necessary components. If there are no such shields, then you need to purchase the following items:
- Counter.
- The shield is a box made of wood or plastic in which all equipment is installed.
- Automatic switches.
- The level for mounting switches is DIN rail.
- Contact plate, desired material is copper. This part must be designed to connect at least 10 wires.
- Three-core cable with a cross-section of at least 3 mm, quantity - about 1 m.
- Self-tapping screws for mounting all equipment in the panel. Choose products with a wide stainless steel cap; plastic dowels are also suitable for this purpose.
Connecting an electricity meter looks like this:
- First, you need to first distribute all the equipment in the panel in order to mark a place for each part and make sure that the compactness of the panel will not interfere with the operation of the meter and its maintenance. When distributing, all parts are placed in such a way that there is enough space left for fasteners.
- Fix the plate, DIN rail and counter to the places marked for them.
- The automatic switches are fixed on the rail with a click.
- Start wiring the wires, the connection diagram looks like this:

- Wiring begins with the phase output directly to the circuit breakers of household appliances that are available in the apartment. Electric stoves, water heaters, underfloor heating or autonomous heating systems, etc. are equipped with such separate circuit breakers. They are necessary in order not to create voltage surges in the general network and not to overload it.
- Most often, the phase of the electric meter is located on three contacts on the left side, but to accurately determine it, it is necessary to study the diagram of the device. To output the phase to individual machines, the cable sheath is cut and a red or brown core is pulled out of it. Measure the required length of the wire, taking into account in which plane it will be mounted - vertically or horizontally. Pulling the wire diagonally is strictly prohibited.
- The wire removed from the cable is stripped to 2 cm, inserted into the terminal intended for it and tightened with fasteners. On the side of the machine switch, the wire is stripped no more than 1 cm. Next, jumpers are formed from the wires in the shape of the letter P, all ends are stripped and all the machine switches located in the vicinity are connected to the system. It is important to ensure that when connecting the wires to the machines, they lie without overlapping each other, otherwise the connection will overheat.
- After connecting the phase, zero is output. Any other wire color can be selected for it. The required length from the electricity metering device to the copper plate is also measured. Most often, the terminal for zero is the very first terminal on the right or the fourth on the left side. The wires for the zero are stripped and connected on both sides.
- The shield is attached to the wall after the meter is connected. Mark the installation location, drill holes and screw the shield to the wall with self-tapping screws.
- Grounding installation. For steel panels, grounding is carried out according to the meter - shield - contact plate scheme. If the shield is made of a material that does not conduct electricity, then the grounding is routed directly to the plate.
Before connecting the meter to the network, it is necessary to check with the control authorities about the possibility of carrying out this work independently. Often, employees of these institutions allow self-installation and only check the correctness of the design and seal the meter.
Why do you need to install a three-phase meter?
Meters with a three-phase system are installed in places that have high energy consumption. In private households, this figure is not high, which is why single-phase devices are often installed. But if consumption exceeds 10 kV, then a three-phase system is used.

The three-phase system produces at the output not the usual 220 V, but 380 V, which is convenient and simply necessary for carrying out some work, such as electric welding. Such equipment eliminates voltage surges in the house on which it is installed and in neighboring buildings. This helps to increase the service life of all electrical household appliances and completely eliminates their breakdown due to a sudden change in voltage in the network.
When installing a three-phase device, there is no need to install large cross-section wiring, since Ohm's law applies in this case. Devices with three phases are either directly connected or indirect. The second option is applicable for current transformers and very large loads in the network. For private households, a direct connection is sufficient, which operates at a load of up to 100 A and a power of up to 60 kV.
Installation diagram of a three-phase electric meter
Equipment such as a three-phase electricity meter is optimally installed in special panels that have a platform and fastening with 3 screws. The equipment is installed quite quickly, the algorithm for attaching all the elements is similar to connecting a single-phase meter and has already been described above, and the connection diagram itself looks like this:

Connection diagram in detail:
- The power cable has three phases, a fifth conductor for grounding and zero, it goes into the electrical panel. The yellow phase is connected to the first contact, the green phase to the third contact, and the red phase to the fifth. When connecting phases, it is important not to make a mistake, otherwise the device will generate an error. The phases are determined using a special device or by trial and error. That is, after connecting one phase, they check the device for errors and continue until all wires are connected.
- Energy is removed from the device from contacts number 2, 4 and 6.

- Zero comes to pins 7 and 8.
- The grounding, or rather its conductor, is attached to a special bus. It is mandatory to connect the zero to the ground, this protects against overvoltage in the network.
- The circuit for old-style induction three-phase devices looks a little different. Here the first phase arrives at the first contact, then a jumper is made between this contact and the next one, and the phase approaches the load from the third. The remaining phases are also connected - jumpers between pins 4 and 5, 7 and 8. The input is on pins 4 and 7, and the output is on 6 and 9.
- New samples of electronic devices are equipped with an add-on that connects a remote data transmission system to the network. This necessitates the presence of additional contacts.
It is possible to install an electricity meter yourself; it is not necessary to call a certified specialist. It is enough to know and be able to safely carry out work with electricity, follow instructions correctly and understand what the danger of electric shock is. However, before installation, you must obtain permits, and to directly connect to the network, you will need to call a representative of the energy supply company. We will now talk about all the points in more detail, having looked at how to install an electric meter with your own hands in a private house and apartment.
Organizational events
Technical events
Having the technical documentation in hand, indicating the names and location of installation, you can begin installing the electric meter yourself. First of all, you need to purchase materials and elements for self-assembly.
If you plan to install the electricity meter on the street (for private houses and dachas this is the optimal location), on the outer wall of the house (facade) or on a pole, it is necessary to install a YUR-NG (external metering and distribution box, sealed box). It is already equipped with a place and elements for attaching the metering device, as well as a separate lockable box for input. In addition, the box is equipped for the installation of modular machines. You can see an example of installing an electric meter in an outdoor box in the photo:

In order to install an electric meter indoors, you can use a YUR box for internal installation or a mounting board; it also provides space for installing additional machines.

Described in our article. It is better to move or replace a meter, as well as install a new meter, from one to a new one. In addition, it is recommended to install protection elements (RCDs, automatic circuit breakers) in the panel instead of outdated plugs, having previously laid down the possibility of switching to a modern power supply system. You can read about that in our article. The figure below shows a connection diagram for a single-phase electric meter with grounding:
If you decide to install an electric meter yourself, according to the rules of the PUE (see), you need to fulfill the following requirements:
- The electricity meter can be installed in electrical cabinets, on switchboards and panels with a rigid structure.
- The installation height at the electric meter terminals varies from 0.8 meters to 1.7 meters.
- In places where there is a risk of damage, contamination, or access by unauthorized persons, the electric meter must be installed in a box and locked with a key.
- The location of the meter should allow easy access for maintenance, reading, and replacement.
- The input cable must meet the design requirements and be of appropriate cross-section for trouble-free supply.
- Twisting and soldering on the input cable are not allowed; it must be one solid piece from the access input to the metering device.
When connecting the cable to the meter, know that the core must be like this, according to the accepted rules - brown, black, red, white are conductors connected to the phases, designated as L. Blue - zero wire N, yellow-green insulation for the protective conductor PE. Keeping color coding in mind makes it difficult to get confused.
Please note that installing an electric meter under voltage is strictly prohibited! All electrical installation work must be carried out only with the input circuit breaker turned off!
In a private house, as well as on a summer cottage, if the newly installed electricity meter is located on a pole at the border of the plot, it is possible to connect the house from the nuclear power supply system by laying it, or by doing it at a height by air. We recommend that you read these articles on our resource, which describe in detail methods for laying cables in a trench and making cable wiring yourself.
By the way, the cost of installing an electric meter by a specialist varies from 1000 rubles for a single-phase model and from 1500 rubles for a three-phase device.
Installation of a single-phase model
Rules for installing a three-phase meter
As for the methods of connecting devices, as well as, we have discussed in detail in the relevant articles, which we strongly recommend that you read. Otherwise, we hope that you liked our information about how to install an electric meter yourself and what documents are needed for this.