My home is my castle. Yes, that's what they often say. But you and I are not living in the Middle Ages, our fortress should not be an ordinary house, but a cozy nest, where everything is beautiful and comfortable. In this article, we will look together at various ideas for decorating rooms that you can do with your own hands without much expense.
Hallway
Even the simplest entrance area can be made functional and stylish. Wood paneling will bring a fresh touch to the interior. Not only is it simply beautiful, it is also convenient. On the panel you can screw hooks for bags and jackets. You can also make a small shelf on top for useful little things.
There is also an interesting solution for small apartments. Shoe rack, hooks and cabinets can be combined into one organizer.

An ordinary front door can also be made into a stylish element with the help of wooden trims.

To keep your shoes out of the way and not dirty anything, you can make an unusual stand from a wooden box and stones. So even after a walk in the rain, your hallway will remain clean.

By the way, instead of pebbles, you can use an artificial mat made of plastic grass.
An old ladder can be used as a shoe rack. Now all the shoes will be at hand.

For a couple of years now, it has been fashionable to make all sorts of household items from wooden pallets. In the hallway you can use them as shoe stands. You can make a shelf on top for small items or just put flowers, and attach hooks for umbrellas on the sides.

There is a small life hack for pet owners. To keep dog or cat bowls out of the way, mount them on a separate shelf in a closet or under a countertop.

Surprise your guests with a non-standard approach to such an ordinary thing as coat hooks. Wooden slats, branches, screws, a little imagination and voila! The unusual hanger is ready.

Bathroom and toilet room
These premises should, first of all, be comfortable. However, one should not forget about beauty. After all, everyone is pleased when the necessary things are at hand, when there is no need to untangle the wires from the hair dryer or rush around looking for ear sticks. We offer several simple ways to organize your space.
An old closet drawer or shutters from a flea market can be turned into a toiletry holder.

And old floorboards can be used in wall decor. It looks unusual, but is very simple to do: the slats are either glued to the wall or screwed with self-tapping screws. They can be painted, varnished or otherwise decorated on top.

Nowadays it is very possible to use jars to serve drinks and dishes. Why not use them in decoration? You don't have to look for those same Mason jars that the whole Internet is crazy about. Any others will do.

We are all accustomed to the fact that towels hang on hooks and take up quite a lot of space. Use shelves to store bath accessories. And it’s convenient, because you can put something else on the shelves, and it’s beautiful.


Now it has become very possible to use stone to decorate a bathroom. They cover the walls and decorate the bathtub. You can even make a rug out of pebbles! Just don’t forget the rubber base in this case so as not to scratch the floor.

To avoid the hassle of separating your laundry before washing, make a rack with several storage baskets at once. Baskets can be painted in the color of the laundry for which they are intended.

By the way, about washing. Tired of your regular white washing machine? Paint it. All you need is permanent enamel and a stencil. The latter can be made from masking tape.

Living room
Getting a stylish shelving unit quickly and inexpensively is no problem. Use wooden boxes. They can be arranged as you need, making shelves of various sizes. There is another plus - you can put together such a cabinet with your whole family and have a lot of fun.


Using the same principle, you can make a desktop. You will need modular shelving from Ikea, a tabletop, slats, screws and some paint. The number of shelves and the shape of the entire table depends on your needs.
In general, the use of wood in the interior is one of this year’s highlights. Wooden pallets, parts from old furniture, ladders, branches, etc. are used.


Hanging shelves will help make your living room more interesting. You can use both ropes of different diameters and belts.


A cornice is always a very expensive pleasure. But if you have a non-standard window and only need to order the appropriate size, then it turns into a complete pain. The simple solution is to use small-diameter plastic water pipes. You just need to paint them in a color that suits your interior.

Another life hack on the topic of curtains. How to decorate a window without using a cornice at all? You will need a wooden lath and a lot of hooks for clothes. Don't forget to sew the loops to the curtain.

You can zone the space in different ways: walls, screens, curtains. There is another way - jute cords. You can use any other materials like ribbons or colored fishing line.

Bedroom
Garlands and photographs will help you decorate your bedroom walls in an unusual way. But you don’t need heavy frames with glass or any special things for this. Photos can be posted on fishing line, string, or directly on the wall using double-sided tape. And single-color garlands will create an atmosphere of comfort and romance.


Shelves of unusual shape will add freshness to the interior.


Great idea for girls to organize their decorations. You will need branches, cords and decorative nails. The latter need to be stuffed onto branches at the required distance and hung on the wall with laces.

The new is the well-forgotten old. The same goes for decor. You don't have to buy a new chest of drawers or cabinets when you have an old one. You can simply paint it. And then your favorite thing will serve you for many more years.


To save space, there is one very simple “trick” - a shelving wall. This will help get rid of most of the closets in the room.

Add some magic to your bedroom with cotton clouds and garlands.

An old ladder can serve not only as a clothes hanger, but also as a library shelf. This solution seems strange, but just try it – it’s really convenient.

The most important element of the bedroom is the bed. A large double bed is a dream. However, such a thing is often expensive. Don't despair, because making your own bed frame is not at all difficult. Using wooden slats of different thicknesses, self-tapping screws, saws and stain, you can make the bed frame exactly the way you want.

Kitchen
The kitchen is the most visited place in the house. Making it functional and comfortable is quite easy, and now we will look at several examples of rational organization of space that will not only help to restore order, but also make the room more comfortable.
To keep spatulas, spoons, forks and knives out of the way on the countertop, use jars. If you paint them, it will be great.

In small kitchens, you need to make the most efficient use of space. Hidden shelves and built-in wardrobes are your best friends in this case.
Even in the cabinets themselves, you can organize the space so that you can fit more. Internal shelves can be mounted not only on the walls, but also on the doors. It seems like such a simple idea, but so useful.

Life hack: to prevent lids from pots and pans from taking up much space, use regular plastic towel hooks.


There is always one problem with deep drawers - it is difficult to get to what is in the depths. The solution is simple - round rotating shelves. All products are visible and easy to get.

We are all used to the fact that spoons, forks, etc. are stored vertically in the kitchen drawer. What if the box is too small for, for example, a rolling pin? Diagonal placement of sectors will allow you to fit everything.

So that all the spices are visible and do not get lost on the kitchen countertop, make a stand with a ladder. On the top tier you can place small pots with herbs such as parsley, dill, cilantro or basil. Now everything is at hand.

Corner sofas and kitchen islands can also be assembled with your own hands. Moreover, you can think of places to store kitchen utensils in them. Not only will no one have such furniture, but it will fully meet all your needs.


One of the very convenient moves in the kitchen is the use of magnetic tape. You can store knives on it, as well as spices in jars with metal lids. Great idea to save space on your kitchen counter.

And your favorite mugs can be hung on regular hooks. Both stylish and comfortable.

Who said that when we grow up, we part with our toys? There's no need to do that. You can use small figurines to decorate your interior. They can find new life as magnets, coasters, handles, or anything else you come up with.


It would seem that you can do with such an ordinary thing as a refrigerator. We all like to put notes on it with reminders. What if you write on the refrigerator itself, and with crayons? You just need to paint it all with special paint for chalkboards and enjoy. By the way, this technique works on any surface.

Yard and garden
When decorating your home, you shouldn’t forget about what’s outside. Let's start with the entrance area. From concrete blocks and a couple of wooden slats you can make a cute and comfortable table where flowers, a watering can, a lantern or anything else will live.

By the way, you can make various benches from concrete blocks, decorate flower beds, build a barbecue, and even make flower pots. It all depends on your imagination.


You can also make stylish ottomans and armchairs with your own hands. You need old tires, liquid nails and thick rope. The finished structure can be painted in any color. These ottomans are suitable for both indoors and outdoors, because they don’t mind rain.

Boxes or pallets made of wood can serve as the basis for a garden cabinet. Here you can store various flower accessories, pots, watering cans and other tools. And if you leave a flat work surface on top, you can make something or replant flowers.

What could be unusual in a flower pot? It would seem - nothing. However, here you can surprise everyone. Plant succulents in a birdcage. When they grow, it will be very beautiful. And instead of a regular hanging pot, you can use an old chandelier.

An ordinary children's inflatable pool can be used as a sofa. Just put a blanket or blanket inside and cover the sides with pillows.

It’s so beautiful to use candles in the garden, but they are constantly blown out by the wind. To prevent this from happening, you can make candlesticks from empty tin cans or ordinary glass ones. You can decorate everything with stones or ribbons if desired.


These, of course, are not all ideas for home and garden, only a small part of what you can do with your own hands. You just need to not be afraid to experiment and fill your home with cute and beautiful things.
Since ancient times, people have had a penchant for creativity and self-expression. This is evidenced by cave paintings, primitive jewelry and other archaeological finds.
Interesting types of handicrafts for the home have become a part of our lives. Many women leave routine office work, completely devoting themselves to what they love. Gradually, they gain customers, a stable income, and their creative results become works of art. From a hobby, passion turns into the meaning of life.

Positive influence of handicrafts
Hand made is not only a fun and exciting process, but also a useful pastime. Creation itself can be compared to meditation: the body is in a state of mental balance and calm.


The head takes a break from intellectual stress, thoughts are freed from unnecessary information, and energy is directed in a positive direction. Physical well-being improves. By doing needlework, you can find many new friends with similar interests.

The interior, the design of which uses exclusive hand-made items, is always filled with warmth and comfort. Handicraft prolongs the life of old, worn things. At the same time, you become the owner of unique accessories that have no analogues or copies.

"Grandmother's" inheritance
In Soviet times, the presence of a carpet in the interior of a room was a sign of the well-being and wealth of the owners. After several years of neglect and oblivion, carpets are gaining a second youth. To make them you will need thick yarn, old clothes or plastic bags cut into strips, a hook (preferably No. 10) and a little patience.

Work order:
- We put a chain of chain loops on the hook, knit the loops with single crochets;
- We close the first and last loop into a ring;
- We knit a couple of loops to get the second row and work the second row with double crochets;
- We repeat the previous operations, increasing the number of loops in each new row;
- Once the desired size is achieved, complete the project by knitting a row of stitches using single crochets. Bring the ends of the threads to the wrong side and secure with knots.


A rug knitted from fluffy or multi-colored “Grass” yarn will turn out bright. You can make a stylish accessory from clotheslines or cord. If you have never had to do such work, then handicraft patterns will help you knit a carpet.

Keep up with the times
Traditional types of creativity practically never go out of fashion. More and more craftswomen are returning to half-forgotten crafts, inspired by the history of their country. But progress in needlework cannot be stopped! New techniques and hobbies are emerging.


Modern handicrafts that will allow you to stay in trend:
Fom-floristry
This is a relatively new hobby, the workpiece of which is foam rubber - foamiran. This amazing material, similar to suede to the touch, takes any shape under the influence of heat. Simply apply it to a heated iron or hold it in warm hands.

Using foamiran you can create flower arrangements for vases, wedding bouquets and boutonnieres, hair decorations, brooches, curtain clips, toys and much more. Foamiran is not afraid of moisture and can be used for bathroom decoration.


The whole process is absolutely clear even to a beginner: blanks of the required shape (for example, chamomile petals) are cut out of a sheet of material with scissors, folded by touching the iron and assembled into the final product with glue.

Embroidery
Although the needle appeared at the turn of the 10th–11th centuries, creativity has not lost its relevance. Along with established types of embroidery (threads, beads or ribbons), a new technique has appeared - diamond embroidery.

Strictly speaking, this is the process of laying out a picture using round or square acrylic rhinestones. It is called embroidery because the work uses a pattern similar to cross stitch.

Working with polymer clay
The material is called clay, but has nothing in common with natural sedimentary rock. This is plastic for making small jewelry (earrings, beads, brooches), as well as for making dolls and decorating mugs.

The technique is quite simple: an elastic mass similar to plasticine is given the desired shape. Hardening and final formation of the product occurs in the oven (temperature 100-110 degrees, holding time up to 30 minutes) or in boiling water.


Fresh thoughts on interior design
Interior design for an apartment or country house is one of the main applied areas for realizing your creative ideas. Interesting craft ideas for the home:
A homemade key holder will be a wonderful accent in the hallway. The simplest option is to fasten several boards together, paint, varnish, and install hooks. You can use decoupage cards, chipboards, pebbles, stones and shells as decoration.


Impress your guests with an unusual approach to such an ordinary thing as a clothes hanger. A few branches, a wooden base, glue, and self-tapping screws will turn the hanger into a stylish eco-decor.

You can decorate a nursery using crafts using the quilling technique. This handicraft is for beginner adult craftsmen and children aged 6 years and above. Its essence is the creation of three-dimensional compositions using the paper rolling method.

The main advantage is the availability of materials. You can make the blanks yourself by cutting white or double-sided colored office paper into strips ranging from 2 to 10 mm wide. You can wind the resulting ribbons onto toothpicks, pen refills, and knitting needles.


To glue paper spirals, use PVA office glue. Quilling will allow you to create a wall panel, a Christmas tree decoration, or a design for a postcard.

A budget-friendly type of handicraft that can decorate a living room or bedroom can be weaving from paper wicker. Floor and table vases are created from twisted and painted newspaper tubes.


Gramophone records are a good help in creativity. Craftswomen use them for wall panels or as a basis for clocks. Records and discs fastened together can be used as a screen for zoning in the living room.

The listed handicrafts make up only a small part of the entire variety of creative directions. Photos of handicrafts for the home using other techniques.


If you have free time that you have nothing to fill, learn a new craft. It's not as difficult as it seems. Create, inspire and be inspired!

Photos of handicrafts for the home with your own hands


And today we have an article “ Simple (and not so simple) craft ideas". Where we have collected a selection of original, creative and, if possible, simple ideas that you can make yourself and implement with your own hands.
Simple (and not so simple) ideas for needlework - this is a thematic collection of ideas. Some of them are made very simply - literally in half an hour and from scrap materials. Some are made more difficult - but with desire and skill you can easily implement them. So complexity in this case is not a hindrance, but an additional one.
So, let's move on to the ideas for handicrafts. By the way, at the end of the article there are a couple of ideas from the field, so we gave fair warning in advance :)
The first idea we will focus on is the idea of the original tea cup coasters/ coffee / chocolate:

That is, everything is very simple.
As you can see from the picture, the time to implement this idea is a maximum of half an hour. And the materials are ordinary wire and a dense square (for example, beautiful tiled tiles). A little patience - and you have the stand that no one else has!
Instead of tiles, any other beautiful and similar-shaped object can be used - a piece of wood or plank, marble tiles (scattered in abundance in places where monuments are made to order), the remains of a mosaic from broken tiles (for more details, see the article “Mosaic from broken tiles and broken cups ") and so on.
The second idea is beautiful beads:

If the photo doesn’t really show what’s what, then you can use the article “Two simple and beautiful bracelets,” where the second version of the bracelet is very similar in execution to this example of beads. Well, then it’s a matter of scaling :)
The next original idea for needlework is beautiful earring:

This idea is a difficult one because it requires me to work with metal.
But there is always someone who knows how to do it. So if you want such an earring, then you can turn to professionals with this image. I'm sure they will do no worse to you.
For example, I once made beautiful earrings from walnut and juniper. However, there was a problem: I knew how to work with wood and did not know how to work with metal. And the wooden parts of the earrings needed to be fastened with some kind of silver... In general, these parts lay on the far shelf until the wife came up with a bright idea: she took them to the jeweler and asked them to put them together. 15 minutes - and the earrings were ready! So the conclusion is simple: outsourcing rules :)
Now let's move on to original calendars:

As you can see, everything is very simple: print (or draw) months and dates on a large sheet of paper; weekends can be allocated. In this case, the dates must be commensurate in size and location with the location of the pimples on the film. And then combine the film and the substrate - and go! Pop bubbles!
The second version of the calendar is perpetual calendar:

That is, once you spend money on one, you won’t need calendars anymore in principle. Great investment!
Next idea - and lighting areas: candle light bulb:

Previously on our website we have already published articles on making candles: “How to make wax candles” and “Herbal candles without a wick”. Well, this picture is an example of the original shape for these candles.
Next example - original sofa made from pallets:

By the way, if you liked pallets, then you can find more materials in the article “Pallets are an excellent material for furniture! ".
And now original table:

How to make this table? Very simple! A couple of cuts, half an hour of work with a jigsaw + decoration. By the way, you can read more about a similar design in the article “Stool in patchwork style.”
And almost the last example of original furniture for today - mink chair:

As you can see, not like a mink, which is an animal. And like a mink, which is a small hole. It’s probably a little difficult to do... But what potential!
Now let's move on to creative wall design:

Agree, this is an original way to fit the latch into the overall design of the room :)
The next example is a great one. sample for decorating walls with wall stickers:

And overall, as such, it’s a wonderful way to spice up almost any design!
Almost finally - an example from the area, toy “necrophiliac’s dream”:

Or, as they say, “Love to the grave for a necrophiliac is nothing more than a slight flirtation” :)
Well, if you are too lazy to make such an elegant coffin, but want to joke, then you can use this one original orange peel design:

Good luck with your craft ideas!

New types of needlework do not appear very often in the world, but modern girls who want to stand out from the crowd have plenty to choose from!
Traditional handicraft techniques rarely go into oblivion; rather, on the contrary, ancient crafts are returning and quickly gaining their fans. But progress does not stand still, and modern technologies and people’s lifestyles contribute to the emergence of new types of needlework that deserve no less attention than the most ancient techniques. What to do for a girl who wants to be in trend and keep up with the rapid development of the handicraft world.
Street knitting in a new style
The knitting technique has existed for a long time, but modern knitters do not want to limit themselves to creating clothes and home decor items. Today it is fashionable to knit “outfits” for city streets, parks and your own summer cottages. This direction appeared in 2005 absolutely by accident. It was invented by the owner of an American store in order to attract attention to her product. The hobby has received a name and has already won the hearts of Europeans.

Want to try? Start knitting covers for trees, garden flowerpots, and garbage containers. Tie a mesh fence, dress a doghouse or birdhouse, lampposts or flowerpots in a bright “suit”. It is not only fashionable, but also very beautiful!

Diamond embroidery - a Japanese miracle
When studying modern types of needlework, you cannot miss. This fascinating and very beautiful hobby comes from China. In it, the Chinese women combined two ancient techniques at once - mosaic and embroidery with beads and stones. Diamond embroidery technology is not very similar to traditional ones, since needles and fabrics are not used here.

The picture is obtained by laying out patterns of rhinestones on a ready-made diagram, previously coated with special glue. Instead of a needle, tweezers are used, with which the motif is carefully laid out, following the image. The finished work is coated with transparent varnish for durability.
In this way, you can “embroider” not only paintings, but also three-dimensional objects, for example, boxes, vases, bottles.

To try yourself in this new type of needlework, you need to buy a ready-made kit, which includes a diagram with an adhesive surface protected by paper, a set of rhinestones, and tweezers. In large paintings, the adhesive base is covered with sheets of several fragments, which prevents drying out and allows you to stretch out the pleasure of creating a masterpiece for several days.
Polymer clay jewelry
Polymer clay, or plastic, is a relatively new material that needlewomen could not ignore. Plastic has nothing in common with real clay, since it is a typical polymer. with this material it is simple - it is easy to give the plastic mass any shape by mixing shades and colors. Finished products can be baked, or you can simply boil them in boiling water - this is faster and much safer.

Mastering new types of needlework, craftswomen learned to create elements for jewelry from polymer clay - necklaces, earrings, pendants, bracelets. These can be complex flower figures or ordinary beads reminiscent of minerals.
One of the most interesting trends in this type of creativity is a technique that imitates cross stitch. This kind of work requires perseverance and patience, but the result is worth the try.

Weaving from newspaper tubes
This relatively new type of handicraft was born due to the fact that waste paper collection points were closed, and free advertising newspapers began to appear in boxes every day. Newspapers are used to weave decorative and household items: baskets, vases, laundry boxes, caskets, and all kinds of boxes.

Toys made from nylon socks
Crafts made from denim
Most often, new types of needlework are born from modern materials. This is how crafts made from denim fabric appeared, for which, as a rule, they take outdated or outdated jeans. From durable and practical material, needlewomen learned to sew furniture covers, blankets, rugs, pillows, rugs, and curtains.

Fashionistas are making bags and new coats from denim. Animal lovers come up with costumes for their pets. Creative people create wall panels, playing with different shades of jeans. If you want to be inspired by new ideas, see our other publication on this topic.
Knitting from plastic bags
Some new types of handicrafts appear in the world thanks to concern for the preservation of the environment. Such hobbies include knitting from plastic bags. Of course, mostly people take new bags for work, but the idea itself was born precisely at the moment of thinking about their disposal. Where else to put dozens of bags from the supermarket if you don’t learn how to turn them into beautiful crafts?
Beautiful bathroom rugs, shower slippers, and openwork napkins are knitted from colored garbage bags. The moisture-resistant material is not afraid of mold, so it is actively used for crafts used in wet rooms and in the garden.

Multi-colored polyethylene makes durable and beautiful fashionable bags, baskets for vegetables and fruits, boxes for small items, boxes, cosmetic bags and many other things that can be crocheted.
Parchment Craft - a new word in paper art
– Russian pronunciation of the definition of parchment craft, which translates as parchment craft. The technology for creating crafts was borrowed from the Middle Ages, when the finest untanned leather was used for embossing. Leather is an expensive material, so modern needlewomen at the end of the 20th century began to work with tracing paper and parchment - affordable paper.
The second name of this hobby is pargamano, born from the name of the manufacturer of special paper for this creativity, Pergamano, because it is impossible to get an elegant craft from ordinary tracing paper; you need a special one - with a density of at least 150 g/m2.
unusual or look at the list. To help those in doubt, we have prepared a guide that will help you decide on your choice of hobby.
The world of creative people cannot be limited, we will wait to introduce you to new hobbies, so visit us often and join our groups on social networks to stay up to date with the news.
If you want to beautifully decorate your home with your own hands, but don’t know where to start, we offer you interesting decorating ideas that you can easily repeat yourself.
DIY home decor
In order to decorate your apartment and make it even more comfortable, you don’t have to spend fabulous money on a decorator. You can become your own interior design master. To do this, you need to arm yourself with the necessary materials and patience.
Florarium
Necessary:
- glass container with or without a lid (aquarium, vase, jar)
- soil that matches the plants
- drainage (sand, small pebbles, expanded clay, broken brick)
- activated or charcoal
- plants
- decorative elements for decoration (figurines, houses, branches, driftwood)
- tools (spatula or spoon, long tweezers, sprayer, watering can, scissors)
- Prepare the container by washing and drying it (you can pour boiling water over it).
2. Pour the first layer - 3-4 cm of sand (you can use expanded clay, pebbles or decorative stones).
3. Lay out the second layer - activated carbon (can be pharmaceutical in tablets) or regular fine wood. This layer will absorb all harmful chemicals and prevent the appearance of mold and mildew.
4. Pour 4-9 cm of wet soil (for desert plants - sifted sand, for tropical plants - ready-made substrate).
5. Level the soil and make a hole for the plant. Clear the roots of the plant from the soil from the pot. Plant and cover with soil. Make sure that large leaves do not touch the walls of the container, otherwise condensation may constantly accumulate on them and they will rot.
6. Water the flower and add decorative elements. Ready!
Felt carpet
The main material is multi-colored strips of felt (or any other dense material: an old blanket or plaid, coat, sweater, jacket). You can glue the pieces with any glue, in this case a glue gun (hot glue) is used. The main feature of the carpet is the beautiful color transition from one shade to another.
The technology for creating a carpet is very simple: apply a strip of glue to felt and roll it tightly into a roll, glue the next strip at the joint of the previous one. You can make several large round or oval “rolls” (any other fancy shape) and connect them beautifully, giving it the shape you want. Arrange them beautifully, and fill in between them with stripes.
Knot pillow
In order to make such a clever and beautiful pillow, you just need to sew a “tube”, which you then need to tie with an interesting knot.
To do this you will need:
- a piece of knitted fabric or cotton (woolen) tights
- padding polyester
- cardboard roll of paper towels or toilet paper
- long stick for compacting padding polyester
- needle and thread
To simplify the process, take tights and cut off all excess (you can also use sleeves from an old sweater, socks, or knee socks). Connect all the pieces and make a long “sausage”.
But if you are not looking for easy ways and want to create a new chic decor for your home, take the fabric and cut it into strips of 20-30 cm. The length of the “pipe” is approximately 3 meters.
Then build a roll and use it to fill the “tube” with cotton wool or padding polyester. Use a stick to tamp. Stuff tightly and tightly, then sew the edges.
Tie it with any original knot, delighting your family and guests with an unusual pillow.
Furniture decor with wallpaper
If you want to refresh your interior or just decorate an old boring closet, you can resort to the old proven method of decorating furniture using wallpaper.


Materials and tools:
- wallpaper:
- sandpaper;
- primer;
- wallpaper glue;
- water based varnish.
The decor technology is very simple:
- Restore and paint furniture.
- Clean the wooden surface and prime it.
- Glue the wallpaper with glue.
- Cover with varnish.
Examples for inspiration: 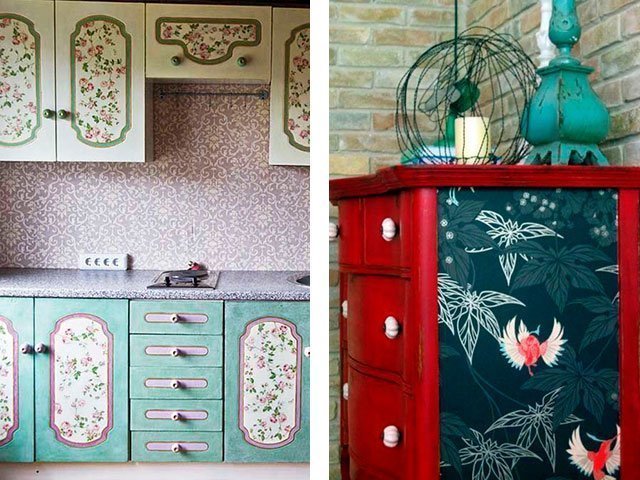


Phone charging holder
If you have diligence and some free time, forget about the phone lying on the floor. A phone holder is probably the most necessary purchase, so you can easily make such a gift for friends. They will certainly be very happy, since it is impossible to buy such a “gadget” in a store, and not everyone has the skills.
Necessary:
- Empty cosmetic bottle
- scissors
- pencil
- sandpaper
- brush
- paper napkin
Process of creation:
- Mark the shape of the holder with a pen.
- Cut
3. Wash thoroughly, dry and sand with sandpaper.
4. Decoration - you can paste it with a napkin or simply paint it with acrylic paints. If you want, add rhinestones, stones, ribbons, beads.
In this case, we decorate with just a beautiful napkin. It is necessary to apply glue to the bottle, carefully apply a napkin and smooth out all the folds. Also apply a layer of glue on top. Trim uneven edges, cut a place for charging, decorate the bottom beautifully.
Patchwork plaid
Tools:
- ruler,
- fabric or existing flaps,
- roller knife,
- scissors,
- thread,
- padding polyester
- sewing machine.
Materials:
- textile;
— padding polyester (100 mm) or other filler;
- threads.
- Cut the required number of 12x12 squares of different colors (when sewn they will be 10x10). Plaid 150*160 cm = 240 pcs. The same amount is needed for the wrong side.
- Cut padding polyester squares 9.5x9.5 cm.
- Make blanks: fabric-sintepon-fabric.
4. Place the assembled workpiece under the foot so that 1 cm remains from the corner to the beginning of the stitching. Then we align the layers of the upper and lower fabrics so that their edges match, and lower only the needle. With the needle lowered into the fabric, we turn the workpiece and stitch the block. You should stop 1cm before the end of the block so that you have the same seam allowance as when you started stitching. To roughly understand where you need to stop, you can, just as at the beginning of the stitch, raise the foot, unfold the fabric and look at the remaining distance according to the markings on the plate.
5. After you finish stitching the workpiece, do not cut the thread. Just lift your foot, pull out the thread and move on to the next square.
6. When all the blanks are stitched, we end up with a long “garland”. We cut the connections.
7. Next do 4 And 5 steps, getting the blanks cross-stitched and ready for assembly (sew the second line as slowly as possible, especially towards the middle of the block, so that the fabric feeds more evenly).
8. Assemble the blanks into rows. To do this, add two reverse side inside and sew them together using the same 1cm seam allowance.
9. When connecting rows together, it is important that the seam allowances go in the same direction. When finishing the stitching, raise the needle and presser foot, and then use a plasticine knife (a very convenient tool!) to move the seam allowances in the desired direction. Then lower the needle and foot again and continue stitching rows without cutting the threads.
To ensure that there are no holes where the seams meet, it is better to take the allowances themselves by 1 cm. And do not forget about the bartack at the beginning and end of each line.
10. The hardest part is over and all that remains is to simply sew the blanket around the perimeter with the same 1 cm allowance.
11. Cut seam allowances. They are cut in such a way that there is 2-3 mm left before the stitching. The distance between the fringes is at your discretion. In my opinion, it is ideal to cut allowances every 0.5-0.6 mm. It is possible more often, but not less often.
The blanket is ready!
New Year's gnomes
To create such wonderful gnomes you will need:
- Gray and red felt
- Knitted fabric
- White thread and needle
- Scissors, white paper, pencil
- Cotton wool (or any other synthetic filler)
- Button
- Wooden legs
- Strand of white synthetic hair
- Red paint
- Make a pattern for the Hat and body (you can simply attach a white sheet of paper to the monitor and trace along the outline).
- Embroider snowflakes on the hat with white thread.
- Cut the edges of the cap, thus making a “tassel”.
- Use white thread to sew the back of the hat and handle using a buttonhole stitch.
5. Decorate the body with white snowflakes.
6. Sew the sides and bottom, leaving an opening.
7. Fill the torso with cotton.
8. Sew small narrow “tubes” from knitted fabric - legs for the gnome.
9. Sew them to the back of the body, closing the hole.
10. You can make socks from striped knitted fabric.
11. Make a beard by collecting a strand of white artificial hair (you can simply wind white threads) and sew it to the body.
12. Sew on a button for the gnome’s nose.
13. Paint wooden shoes red (you can find such blanks in any craft department).
14. Glue the shoes to the legs.
15. Connect the hat and body (with a small stitch at the base of the arm).
16. Wind the white thread around the tassel (you will get a handle).
Upholstered headboard for bed
3. Turn the headboard right side over. Spray the surface of the batting with spray adhesive and, starting on one side, carefully roll the fabric onto the batting. Press and smooth the fabric well so that there are no bubbles, folds or distortions. After the glue has dried, attach the canvas to the back of the plywood. Stretch the fabric well, wrap it around the frame and secure it with a furniture stapler.
4. Using nails, you can build any pattern, but we will make a neat line around the perimeter.
Make identical marks on each edge and stretch a thread that will serve as an auxiliary line.