Bouquets are not only given, they are also used. Often a large number of flowers are required to decorate various special events. You can create inexpensive and beautiful ones from corrugated paper with your own hands. This decor does not fade over time and can be stored for a long time.
Read in the article
Advantages and properties of corrugated paper
To make original decorations, corrugated paper is used, which has certain advantages:
- this is available and offered in stores;
- such material is packaged in rolls, which makes it possible to store it for a long time;
- It is easy to use; to create a composition you only need scissors;
- the workpieces are interchangeable, the parts are easy to connect and prepare again;
- The material is distinguished by a variety of textures and shades.

How to make beautiful flowers from corrugated paper with your own hands
Making flowers from corrugated paper with your own hands is quite simple. In this case, different manufacturing methods are used. Various blanks made from cut strips of paper are used. There are special instructions to help you create original ones.

Stages of creating a rose with your own hands from corrugated paper: step by step
Roses from this material are made in different ways. This produces a variety of compositions or simple flowers that are placed in a vase.
To make a flower from corrugated paper, you need to prepare paper of the desired color palette, pieces of wire, scissors, sheets of cardboard, a pencil and special glue.
| The step-by-step process is outlined in the table: | Image |
 | Step by step process |
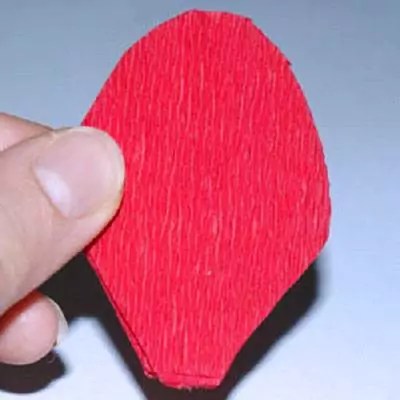
 | Separate petals are drawn on cardboard, which should be of different sizes. When using different flowers it will look better. |
 | Individual pieces are cut from the wire. In this case, one end is bent with pliers for the core of the bud. Then the middle of the wire is wrapped in a small petal. The lower part is glued to the stem blank. |
 | A bud is gradually formed. In this case, the petals are glued from small to large sizes. |
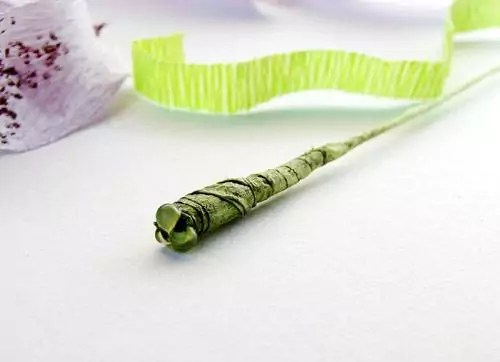
 | Using a ribbon, corrugated strip or green thread, you need to wrap the base of the bud. Then the stem is wrapped and the prepared leaves are glued from it. The material is finally fixed with glue. |
 | The petals and leaves are straightened. |
Several flowers are made and placed in a vase or in a variety of wicker baskets. If only buds are needed for decoration, then the stem part is cut off.
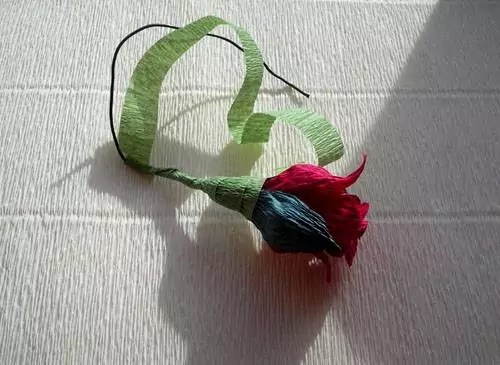
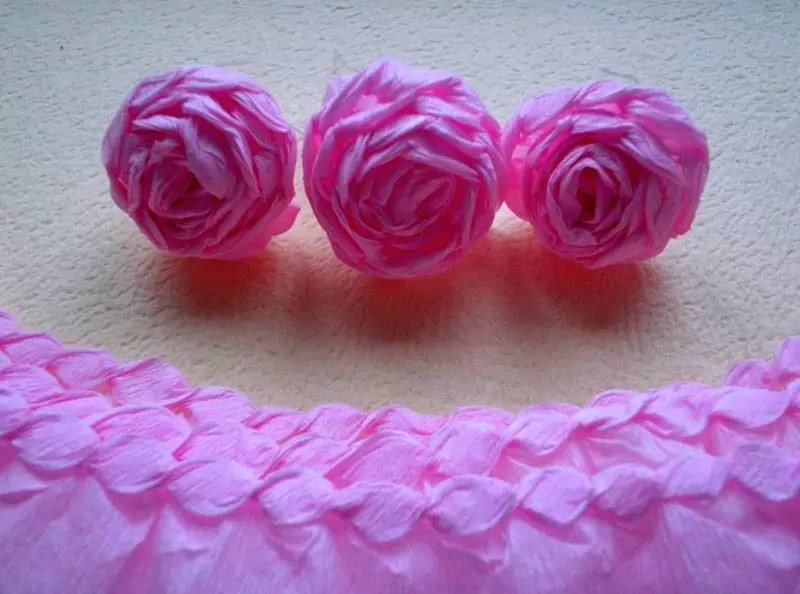
You can make a rose in another way, in which the product is completed in a few minutes. It is necessary to cut a long strip of corrugated paper. Its width should be 8-10 cm. One edge is processed like a pie edge. The edges of the strip are pinched along the entire length with your fingers. Then the strip is rolled into a bud, and the edge is glued to the finished product. The made bud is wrapped in green thread. The finished elements are mounted on a wire blank. At the same time, a whole bouquet is completed in one and a half to two hours.
Related article:
The correct application of this technology, described in the article, will be useful for creating your own products with unique aesthetic and functional characteristics.
An interesting option is to create one yourself from corrugated paper. This design can be made from scrap materials in a couple of hours. They are made to decorate interiors and for banquets.
Technique for making a paper peony
You can create a beautiful peony from this material. To do this you will need paper of various shades, paper clips for fastening, wire, thread and scissors.
The table shows the sequence of work.
| The step-by-step process is outlined in the table: | Process of creation |
 | Multi-colored rolls are cut into sheets of the same size. |
 | The elements fold into an accordion, but the width should not differ. |
 | The accordion is attached with a paper clip. The edging of individual elements is trimmed in the form of petals. You can also simply cut off the corners to create triangles. |
 | The middle parts of all blanks are connected and stacked according to size. All sheets are collected into one assembled element and rewound in the middle. |

A comment
Designer of the studio "Cozy House"
Ask a Question“When creating a peony, you can use 5-7 shades. In this case, an even transition from pale to rich tones is created.”
Related article:
It will be easier to show your talents if you carefully study decoupage for beginners step by step. This article provides detailed instructions that will help you reproduce the technology at home without errors.
How to make a sunflower?
When deciding how to make flowers from corrugated paper, you should try making a sunflower. In this case, you need to prepare material of black, brown and yellow colors, PVA solution, pieces of wire and scissors.
The petals should be oblong in shape and have sharp tips. The leaves should be the same. Then all actions are performed according to the instructions:
| The step-by-step process is outlined in the table: | Stages |
 | A strip is cut from a dark-colored sheet. The longer it is, the more magnificent the flower will be. |
 | Minor cuts are made on the larger side. In this case, the width between them should not be more than 4 mm, and the length of the cut should be about 1 mm. To speed up the procedure, the strip can be laid in several layers. |
 | The created blank must be twisted into a tube and wrapped with dark thread. It is necessary to straighten one edge to create a core. |
 | Then the petals are fixed with glue. The core is turned upside down and the petals are attached to it in a circle. Several rows of yellow petals are made and then green petals are formed. |
 | A rectangle is made from green-colored material that covers the wrapped core. The rectangle is glued in one part to the green petals, and then twisted around the wire blank. |
You can prepare the leaves in advance, which are best made wide. They are attached to the wire along with the winding of the stem.
Original tulips
You can create an original bouquet of corrugated paper from tulips. To work, you need to prepare corrugated paper, pencil, cardboard, scissors, wire, thread and PVA glue.
Creating tulips includes the following steps:
| The step-by-step process is outlined in the table: | Job |
 | A petal is depicted on cardboard and cut out. You will need about 5-8 petals from paper. |
 | The petals are laid out separately. All elements need to have their ends curled. |
 | The edges of the petals need to be stretched a little and the base should be shaped into a cup. |
 | All parts are distributed in a circle. At the same time, a bud is formed. At the bottom, all the petals are curled and fixed with adhesive. |
 | The flower is attached to the end of the wire, which is used as a stem. |
 | A strip is cut out of green paper and wrapped around the stem. The cut leaf is slightly bent and glued to the stem. |
Helpful information! You can try making tulips from paper and candy. To do this, you select candies in foil, they are attached to the wire, and then the petals are attached on top.
Making a Lily
Lilies are also created by the type of bud harvest. Their master class of flowers made from corrugated paper is distinguished by its complexity.
The process includes certain steps:
| The step-by-step process is outlined in the table: | Stages |
 | Paper of yellow, green and lilac shades is being prepared. You will also need paints, glue, a piece of wire, a brush and scissors. |
 | Petals are cut out from rectangular blanks. |
 | The ends of the parts are stretched and then curled with a pencil. |
 | At the base of the petals, spots of a dark shade are applied with watercolor paint. In this case, mix dark blue and brown. |
 | A stem is made from wire. The corrugated paper is then straightened and wrapped around the wire. |
 | A pistil is made on the stem |
 | The stamens are made of yellowish paper. In this case, the workpiece is cut off and cuts are made along its entire length. The resulting elements are twisted. |
 | Anthers are made from glue and semolina. A drop of adhesive solution is applied to the tip of the stamen and then dipped into semolina. Completed parts are painted. |
 | Leaves are made from thin pieces of green paper. They are given a curved shape. |
 | The stamens are glued to the pistil. Then three petals are attached, and after that the rest. |
 | A smooth transition is made to the flower stalk. Leaf blanks are attached with glue. |
Candies attached instead of pestles look unusual. They are wrapped in foil and attached to the stem blank.
Options for corrugated paper flowers with candies
Using beautiful flowers from corrugated paper, you can make a bouquet with sweets with your own hands. To do this you will need candy, corrugated paper for flowers and stems, wire, scissors and glue.
| The step-by-step process is outlined in the table: | Stages of work |
 | A rectangle is cut out of paper, folded in half and rounded on the side. This piece is used to wrap the candy. To give the product a beautiful shape, the paper in the center is slightly stretched. One edge is secured with an elastic band. |
The easiest way to feel the approach of any holiday is to start making home decor for the celebration. This time I decided to figure out how to make flowers from corrugated paper - realistic and stylized. Let's figure out together how to make flowers from corrugated paper and what you need for this.
There are many handicraft techniques in the world that allow you to make beautiful flowers with your own hands - today flowers are made from beads and fabric, ordinary paper (quilling, origami, appliqué, etc.), they are knitted and felted, but still one of the most popular methods of making remains assembly of corrugated flowers. What are these flowers good for:
- they can be either photorealistic or fantasy;
- they are easy to make in a few minutes (unlike felting or beading);
- easy to recycle (relevant for those who want to decorate a large hall with flowers for the holiday);
- very affordable materials - corrugated paper costs a penny, especially if you buy in rolls rather than sheets;
- no special training required;
- there is no need to use any complex tool;
- it’s easy to get an acceptable result without experience (for example, flowers can be made from paper with candies - even small bouquets look very presentable);
- the products are bright and expressive (which is very important for children).
Getting ready for work
What you will need to make flowers from corrugated paper with your own hands:
- several rolls of paper (it is better to choose matching colors and green for leaves and stems);
- wire, floral sleeve or any other devices for stems;
- cardboard for blanks;
- glue;
- sharp scissors;
- breadboard knife;
- threads and fishing line.
It is most comfortable to work at a table in good lighting. If you plan to make large flowers (more than 15 centimeters in diameter), then you can sit on the floor (of course, after sending your children, husbands, cats and your beloved dog for a walk).
Making flowers
The simplest option:
So, making flowers from corrugated paper in more complex versions almost always follows the same scenario. I will describe it so as not to rewrite one by one:
- first you need to make a petal template;
- cut 15-20 petals for each flower (if you want to make a realistic flower, then make petals of different sizes - for example, five small, five medium, five large);
- cut out the petals (when cutting, follow the direction of the corrugation);
- collect the central part of the bud (twist 5-7 petals together, tying them at the bottom and gluing them together);
- Next, the petals need to be slightly stretched and bent so that they take the most natural shape for the plant;
- Glue the prepared petals to the bud;
- fix the flower head on the prepared stem.
How to make a stem:
- take a piece of wire, a floral sleeve, an ordinary twig - at your discretion, measure the required length;
- cut;
- decorate with green corrugation, or fabric, or paper;
- we imitate leaves, shoots and thorns;
- cut on both sides again.
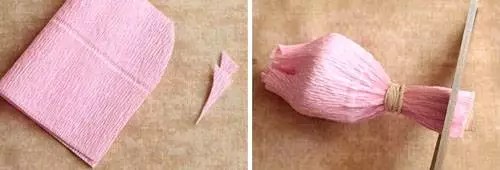
Making realistic roses
After we have made the blank, we need to stretch the petals - this will give the desired volume and we can imitate the natural bend of a rose petal:
Let's start assembling. We will need wire and thread. First, bend the wire as shown in the photo and wind our blank around the wire, forming a bud:
The outer petals need to not only be stretched, but also the corrugation should be slightly smoothed - this will give the effect of a wavy edge, and the flower will look lush.
Make a sepal from green paper according to the photo instructions:
Build some leaves for the stem and secure them.
Spray the finished flower with hairspray - this will give it a little shine.
And this is the easiest way to create a rose:
A similar option for twisting a rose flower, but with explanations from the author:
Realistic peonies
A peony is a large flower in itself, so it is better not to try to make small flowers, but to collect several really large and beautiful peonies. To make a large flower from corrugated paper, you will need about twenty minutes.
By the way, if you want to achieve a more natural color, you can take white paper and tint it with food coloring - delicate pink and orange flowers will really look like real ones.

The paper needs to be cut into rectangles, each rectangle should be rounded.
- Peony is a rather disheveled flower, so the petals can be cut here and there and even carefully torn.
- You will need a lot of petals - more than 25.
- For sepals, use green paper; cut out 8-10 green leaves from it.
- To get voluminous flowers, you can put candy in the center or form a ball of foil.
- Trim a few petals at random - the less neat you are, the more natural your flowers will be.
Or a more complicated option:
Decorative and stylized flowers
How to make simple flowers from corrugated paper? Step-by-step instructions for making different colors and different methods.
Realistic lilies. Photos of creation step by step:
We make large flowers from corrugated paper - roses.

Such elegant and simple flowers made of corrugated paper can be useful for photo shoots or interior decoration, and they can also be used to create various decorative compositions on the street (just keep in mind that the flowers are quite light and can be carried away by a gust of wind). In general, full-size flowers are often used for decoration, but making them according to the same principle as small flowers is not too labor-intensive.
Huge poppies:
Photos step by step: stylized poppies, but in miniature.
In order to make lush artificial poppies, you will need paper of three colors (black, red, green), wire, thread, glue or stapler, and of course, scissors.
- From a roll of black paper you need to cut a cylinder about ten centimeters long.
- Tie tightly with thread and cut into a fringe along one edge - this will be the center of our flower.
- You can also make a box in the middle - to do this you need to take the scraps and wrap them in black paper to make a ball. The ball is fixed with a thread or a stapler and attached to the center of the fringe.
- The roll of red paper must be unrolled and cut into six parts, each part folded like an accordion.
- Place all the accordions one on top of the other and secure them well with thread.
- The corners of the accordions need to be rounded with scissors.
- All petals need to be well unfolded (we straighten each accordion and it turns out to be a petal).
- Use thick wire or wooden slats as stems - they need to be wrapped in green corrugation, cut out large leaves and attached to the stems.
- Secure the poppy heads to the stems and straighten the petals.
Or a slightly different option on how to make a poppy flower step by step From and To:
Now you know how to make more flowers from crepe paper. If you want to make giant flowers, then for beginners it will not be very difficult, however, it is worth considering some points:
- use high-quality paper - of course, even from waste paper a master can make something beautiful, but for beginners it is better to rely on good materials;
- huge flowers must have weights, otherwise they will simply fall (or fix them with fishing line to the wall);
- do not smooth the petals completely, leave a slight corrugation;
- It’s better to have a lot of petals than a few (large roses with four petals look very pathetic);
- for a field composition, use several shades of green paper - then ordinary herbs and plants will look natural;
- if a child is making three-dimensional flowers with you, take care that he does not cut himself with paper, scissors, fishing line or threads;
- For decoration, use flowers made in two or three shades - more colors may look awkward.
More ideas and inspiration
Have you already wanted to make beautiful flowers from corrugated paper with your own hands? Great, that means you liked the ideas I proposed and mk. I’ll tell you a little more about what you can create with your own hands from corrugated paper.
Cute daisies:
See how they make crafts from corrugated paper - gorgeous roses that look better than real ones!
And in this master class you can learn how to make sweet flowers made of corrugated paper with your own hands. And so, flowers made of corrugated paper with sweets, decorated in the shape of a heart:
By the way, sweet bouquets with flowers made of corrugated paper are a wonderful find for any holiday. Such bouquets usually attract more attention than a traditional basket of flowers and are remembered for a long time.
And this is how you can make a Christmas flower - Poinsettia from corrugated paper:
Make paper flowers with your own hands from corrugated colored paper, or make a bouquet of flowers for holiday decoration, or maybe you want to make flower garlands from paper to decorate the hall? There is nothing simpler - learn how to make roses from corrugated paper step by step, and you can give a master class on any type of flower.
Try making corrugated flowers at least once, and then it won’t be difficult for you to make a new product - watch different step-by-step videos and make gorgeous bouquets with your own hands!
You always want to decorate the most significant day in some special way. Ready-made decorations are quite expensive, and if you decorate a large room with them, it will cost a pretty penny. Today, there are quite a large number of handicraft methods. Flowers can be made using quilling, beading, cold porcelain and even wool felting. But all these options are labor-intensive and require certain technical skills. You can make original flowers from corrugated paper with your own hands in literally 30 minutes. It always looks fresh and creative, plus you can add easy recycling.
Such jewelry has several important advantages that make it a leader:
- minimum amount of money spent on necessary materials;
- flowers can be made so realistic that they are almost impossible to distinguish from real ones;
- the material can be purchased at almost any stationery or craft store;
- extraordinary beauty can be achieved without specialized tools and complex circuits;
- quick disposal is especially important when decorating large halls or rooms;
- will be an excellent gift or decorative element for any celebration;
- This type of decoration can be made even by a child.
Even with all the abundance of DIY methods, flowers made of corrugated paper have been and will be at the peak of popularity. A wonderful way to express yourself and realize your wildest fantasies.

Preparatory work
Before you begin the mystery of flower production, you must first of all equip yourself with all the necessary arsenal in advance. Corrugated paper is best purchased in rolls rather than sheets. The roll contains a large enough footage, which is enough for a whole heap of buds, flowers and petals.
It is recommended to select paper in more natural shades, unless, of course, as planned, the final work should look natural and natural. For buds, leaves and stems, you should take several flowers, in this case, you can play with the shadows. Then the flowers will look more “alive”.

For the stem you need to take a thin pliable wire, a floral sleeve or any other materials.
You will also need thick cardboard for cutting out blanks, glue and sharp scissors. Not necessary, but you can prepare fishing line or strong silk threads and a breadboard knife.
It is best to work in good lighting, this can be either natural light or fluorescent lamps.
Important! If there are small children or animals in the house, it will be safer to work on a high table rather than on the floor.

Flower making process
At the initial stage, many needlewomen are faced with the question: how to make flowers from corrugated paper and where, in fact, you need to start. Of course, each craftswoman has already developed her own technology and some little secrets. However, nothing is impossible for those who want to reach the heights of professionalism.
The most complex technologies always come down to the simplest steps:

The stem, like the flower, should look natural. This can easily be achieved with regular wire and green paper. It is necessary to measure the required piece of wire or floral sleeve and decorate it with prepared corrugated paper, fabric, or even paint it with acrylic paints. Then attach leaves and thorns if the flower implies their presence. The finished flower is “settled” on the stem using glue. Since the wire and the floral sleeve are movable, they can be given absolutely any shape and bend.

How to make realistic peonies.Bystep by step instructions
Peony is a magical flower that is traditionally a symbol of purity and love. A cute bouquet can be an excellent gift for a wedding or birthday of a beloved friend. Peony flowers in nature are quite large in size. For a bouquet of flowers you don’t need to make a large number of heads; 7 pieces will be enough.
If you want to achieve a shade close to the natural color, you can take snow-white or milky paper and give a few strokes of pink, orange or peach acrylic. You can make delicate peony flowers from corrugated paper with your own hands in just 20-30 minutes.
At the first stage, you should carefully cut out rectangles according to the template and slightly round them, thereby giving a natural roundness to the petal.
To make one peony you will need to prepare 10 strips for small petals, 10 strips of wider paper for large petals and several strips of different sizes of green paper for making leaves. To give a realistic shape to the peony, you need to cut the petals slightly oval with a small stem, and the leaves slightly pointed towards the top.
 peonies - process
After all the shapes are cut out, with careful movements the petals need to be slightly stretched in width and height, until the petal is visually closer to the natural one. Next, give the petal a convexity on the outside, thus giving it some volume.
Important! When stretching petals or leaves, you must avoid using nails, otherwise the tenderness and fragility will be spoiled by unwanted lines.
Then the process of “folding” the bud begins. To do this, take several of the smallest petals and wrap one tightly in the other. When wrapping, you must ensure that each subsequent layer overlaps the seam of the previous layer. Thus, gradually, the petals are stacked on top of each other in layers. When the flower has been collected, its base should be secured with thread, fishing line or glue. Since a peony is a carelessly disheveled flower, you can safely tear some of the petals of the finished product slightly and then stretch the edges again.
In total, it will take about 25 petals to make one peony. Sepals are made from green paper. It is necessary to prepare about 10 green leaves, after shaping, wrap them around the finished peony.
To make the flower more voluminous and lush, at the initial stage a round candy or a formed foil ball is placed in the core.
It should be remembered that natural flowers in nature do not have perfectly smooth edges and lines, so the less neatness there is in the bud, the better.

Master classfor making delicate lilies
The royal lily flower is sensuality combined with majesty. Volumetric flowers made of corrugated paper always attract attention. This is not only a good addition to the main gift, but also a great decorative element for any holiday or event.
Using the example below, we will describe step by step how you can make a wonderful lily from ordinary corrugated paper.
To work you will need:
- paper in light lilac, yellow and green shades;
- watercolor, gouache or acrylic paints;
- glue or glue gun;
- wire for the stem, approximately 30 cm;
- brush and sharp scissors.
If the paper is on a roll, then you need to cut a strip 7 centimeters wide from it. From the resulting piece, cut into small rectangular pieces, which should be given a rounded shape to the lily petals. Then, the edges need to be stretched a little with your fingertips, for greater naturalness, and slightly curled with scissors or a regular pencil. Make a depression in the middle of the petal, thus giving it a natural roundness.
When the petals are completely ready, the magical process of transformation begins. To do this, you need to mix brown and dark lilac colors and use the resulting tone to draw natural dots at the base of the petal. For greater naturalness, the dots should be thicker at the base and almost disappear towards the middle.
The stem is made from wire. The required piece of wire is cut and decorated with a thin strip of green corrugated paper. Before wrapping paper around the wire, it is recommended to stretch it properly. This is done to ensure that all unnecessary stripes and folds disappear.

At any edge of the finished stem we make a pistil and form a stigma using hot glue. To be convincing, you should paint this place with green paint.
The stamens are made from yellow paper. A small even square is cut from the roll. We cut strips along its entire length, but leave the base solid. Then you need to twist each strip with twisting movements and treat the tip with a drop of hot glue. After all the work is done, dip the prepared stigmas in semolina, paint with acrylic or gouache in a brown-chocolate shade and let dry.
Lily leaves have a rather elongated shape. You need to cut long rectangular strips of green crepe paper, slightly stretching and folding them. We glue the stamens to the pistil and add three lily petals to the finished structure, placing them slightly above the tips of the anthers.
After this, glue three more petals over the joints of the previous petals and twist the edges of the finished flower again.
The final stage is “installing” the finished lily on the stem, adding petals and securing with drops of glue.

Corrugated flowers with candies
Every needlewoman, having reached a certain level, wants to do something extraordinary and memorable. Not a single holiday or special event is complete without sweets and flowers. Modern craftswomen have decided to combine these two components into one and call this direction suite design.
Flowers made of corrugated paper with candies came into fashion not so long ago, but they have already managed to win over quite a large number of the public with their originality and creativity. Today, through your PC, you can view photos and videos of a huge number of master classes on making an unusual bouquet. A detailed step-by-step description will help you turn all your bold ideas into reality. The main thing is not to be afraid to experiment. Only in this case will you get bouquets that are worthy of decorating not only birthdays, but also weddings.

To make a bouquet you will need chocolates, preferably round and wrapped. This will make the task much easier during the formation of a flower bud. You can take paper of absolutely any color, here you can give free rein to your fantasies. Squares should be cut out of the corrugation, rounded and petals formed by pulling and stretching the finished fabric.
The next step is to cut out squares of baking film. The candy is wrapped around the finished square and a small tail is left at the bottom, which is then wrapped with a beautiful thread or gold-colored ribbon. We gradually “wrap” the finished workpiece, layer by layer, with petals, immediately giving it the shape of a natural flower. You must try to ensure that the first layers completely cover the candy, but the subsequent ones may already be half-open.
A chic bouquet is carefully formed from ready-made flowers. This is done in different ways. You can “plant” each flower separately on a pre-prepared wire; you can use skewers, a foam ball, a plastic bottle or foam. After the bouquet has been completed, it can be decorated with satin ribbons, various laces, beads, stones or rhinestones. Such an original gift will definitely leave behind indelible pleasant memories.
To create a spectacular bouquet, you don’t have to stop at just one type of flower. These can be a wide variety of combinations of daisies, roses, daffodils, poppies, tulips, orchids and so on.

Giant size flowers
You can make large flowers from corrugated paper with your own hands for any occasion. Such decoration will always look festive and unusual. Flowers of a delicate shade can decorate a romantic party or wedding celebration. Huge, but at the same time fragile, as if made of porcelain, can add even more atmosphere to the holiday.
For a children's birthday party, products in bright and flashy colors are suitable. Not only will they become indispensable for decorating the festive photo zone, but also photo sessions. Magnificent life-size flowers made of corrugated paper will be able to “greet” guests at the entrance. With such a huge bouquet, you can properly greet your beloved wife from the maternity hospital or give it to your girlfriend.

Step-by-step process for making a large rose:
- on thick cardboard, draw a petal template in the shape of a heart and a drop;
- cut out 15 large hearts and 5 petals in the form of droplets from paper according to the template;
- each cut petal should be well stretched up and to the sides, giving it a natural and natural shape;
- for droplet-shaped petals, you need to beautifully wrap the edges using a pen or pencil;
- For the heart-shaped petals, we make wavy bends using a pencil only on the sides;
- for the stem you will need a piece of ordinary soft wire, which must be decorated with floral tape or green corrugated paper;
- the formation of a bud should begin with small petals, after gluing them to the stem with a drop of glue;
- after the base is formed, first the droplets and then the hearts are glued to it one by one;
- from a long strip of green paper, a sepal is cut into small cloves;
- The finished sepal is fixed around the base of the bud, secured with green adhesive tape or a drop of glue.
At this stage, the rose is completely ready. In order to make leaves, cut out oblong shapes from green corrugated paper. After this, place the edge of the decorated wire in the middle of the finished sheet, after moistening it with glue. Then fold both halves of the sheet so that the wire remains hidden inside the petal, and bend the remaining edges of the paper back.
At the final stage, the leaves are attached to the stem with adhesive tape and decorated with corrugated paper or a few strokes of acrylic paint.

Giant flowers made of corrugated paper can magically turn the most ordinary holiday into an enchanting celebration.
Do you want to learn how to make paper flowers with your own hands? You've come to the right place! 🙂 Here we have prepared for you an excellent selection of photos and master classes, including new ones for 2019, designed for different skill levels: for beginners and for more experienced craftswomen. After all, you can make flowers from paper, both simple (children’s crafts) and complex ones that cannot be distinguished from real ones.
First, of course, you need to decide what kind of paper and what techniques you plan to use for your crafts.
Let's take a closer look at all the possible homemade paper flowers. By following the step-by-step photographs in the master classes, as well as videos from YouTube, you will learn how to make the same beautiful 3D flowers as a gift for a birthday, March 8, Teacher's Day or compositions for decorating a hall, classroom, room, photo zone decor and other premises for the holiday .
Corrugated paper flowers
Corrugated or crepe is the name given to thin crumpled paper from which various crafts are made. It is good because the flower elements can be made voluminous by slightly pushing apart the microfolds of the texture with your fingers, and you get flowers with curved, convex petals.
The simplest flower made of corrugated paper:
Pansies, buttercups
Cute and uncomplicated buttercups and pansies: to create wildflowers you need to cut out identical petals, which are combined and secured with wire or glued to a wooden skewer, the stem is wrapped in a strip of green paper.


Rose and rosehip
The simplest craft - corrugated paper rose, which even children can do.
We cut out 3 circles from red crepe paper, place them on top of each other, then roll them into a cone and staple them approximately in the middle. Then turn it halfway out and straighten the petals. We attach it to a skewer, which we wrap in green crepe paper. Glue the leaves. A simple rose is ready.


This is what a scarlet flower looks like:

Volume roses more impressively done like this:

Simple small roses in 10 minutes (how to make a flower out of paper -):


"Roses for Mom." Christina Matishina.
Made from corrugated paper.

And detailed instructions on how to make a basket with flowers with your own hands -
 This is such a beautiful bouquet:


Hyacinths
Spring flowers made of paper - hyacinths- also the simplest crafts.


"Flowers in a vase. Hyacinths made of corrugated paper." Senior group No. 5 of MBDOU No. 267 of Izhevsk. Teacher Kochurova G.V.

Peony

Beautiful and naturalistic peony It is obtained from tinted crepe paper: to obtain large voluminous petals, place a white piece of corrugated paper on a cup, spray it with water from a spray bottle, and straighten it to the shape of the cup. Paint it with yellow and pink paint and let it dry. We take the core ready-made or make it from yellow crepe paper, paste it with our lush petals.
Application “Basket of peonies” - a very beautiful three-dimensional postcard -

Narcissus
Daffodils And lotus —


Please note that the technique for assembling flowers is the same, but the shape and number of petals are different for everyone; this photo shows diagrams and patterns of petals and the shape of the core of different flowers:

These cutting stencils are easy to make with your own hands.
These simple paper flowers were sent to us by Tatyana from St. Petersburg. The manufacturing technology is simple, but the bouquet looks wonderful in this children’s craft.
Paper carnations from Masha Shevtsova.

Large growth flowers
Large flowers made of corrugated paper turn out simply chic, with them even an adult woman can feel like Thumbelina. It can be used to decorate a hall with your own hands for the holiday, a photo zone for taking beautiful memorable photographs, you can hang it on the wall or give it to the hero of the occasion. How to make voluminous growth peonies with your own hands is shown in this video:
Just giant roses:
There is a faster option - huge but simple flowers that can be hung on the wall of the photo zone:
As you can see, the size of the flowers is limited only by the original dimensions of the paper; real giants are made from huge paper.
Little flowers
You can also make miniature charming spring bouquets - apple or cherry flowers corrugated paper:


pink buds, snowdrops, coltsfoot,

crocuses and daffodils,

small poppies, cornflowers,

forget-me-nots... It all depends only on your imagination.


Making a flower using lollipop
Using a small ball (we took a lollipop), you can get a fantasy flower with very lush petals that will keep their shape, but it is advisable to grease the ends with PVA glue so that they do not unwind.

We cut out 5 squares from corrugated paper and wrap them around the lollipop so that the “tail” is longer on one side than on the other.


For the core, fold a strip of red crepe paper several times, cut the ends - these are the “stamens”.


We place the core between the long tips of the petals and wrap everything around the stem stick. We wrap the stem with a strip of green corrugated paper.

It turns out such an original flower with lush petals.

Snowdrops
Delicate first spring flowers snowdrops -


Swimsuit
Tender lights (swimsuits). For the petals, you need to cut out several identical circles, in which one edge curls into a tube, and the other expands and curves. For the core, a strip of paper is cut and rolled into a roll. By the way, see how to make a swimsuit from foamiran.

Chrysanthemums, daisies, carnations
All master classes on making these flowers from crepe paper are on a separate page


Sunflower
Craft made from crepe paper and real seeds. :


Poppies
Charming flowers - poppies made of crepe paper - :

Crocuses
Crocuses are spring flowers, so they are often made by March 8th. You can make a simple and cute bouquet of flowers -.


Corrugated paper flowers with candies
Corrugated paper makes excellent
The simplest children's option tulips made of corrugated paper with candies. On March 8, we decided to make tulips for our teachers, because these are the most spring flowers. We chose truffles from the candies, and decided to try making the stems without skewers. For this we needed:
- thick green double-sided paper,
- red corrugated paper,
- red threads,
- glue (stationery or PVA),
- as well as packaging film for flowers and ribbon(the bouquet should look like a real one).
For the stems, we cut green paper into strips and twisted them into spirals.
Elongated petals, pointed on one side, were cut out of red corrugated paper, six pieces for each flower. Use your fingers to carefully spread the fibers in the middle of the petal so that it becomes slightly convex.

The candy was inserted into the spiral of the stem, twisted tightly and glued.

Then they wrapped the candy with petals, like a real tulip - three inside and three outside. In order not to fuss with glue (such thin paper under the liquid glue, one might say, melts), we simply tied it with red thread to match the paper.

Leaves similar in shape to the long leaves of a tulip were cut out of green paper and glued to the bottom of the stem.

Two more of these flowers - and the bouquet is ready. All that remains is to wrap it in film and tie it with a ribbon.

The paper tulips are ready, there are three bouquets.

You can take it to kindergarten and give it to them.


Simple clove
Another option for assembling a flower from corrugated paper without glue is to string the edge of a long strip onto a thread, like pompoms, but here you need to be very careful so that the thin paper does not tear.


The result is a carnation flower - quick and easy.
Flowers from napkins
Very easy to do crafts - flowers made from paper napkins.


These crafts are very simple and easy for children. Photos and step-by-step description of Elena Ermasheva on how to make bouquet of napkins with your own hands.

For such an original bouquet you will need:
- paper napkins: yellow and pink (35 pieces);
- bamboo kebab sticks (13 pieces);
- PVA glue;
- bronze acrylic paint with glitter;
- green paint;
- brush;
- scissors;
- felt-tip pen or pencil;
- plastic jar;
- decorative shavings;
- satin ribbon;
- linen fabric;
- 0.5 liter plastic bottle;
- small pebbles.

Paint the sticks with green paint and let dry.

For a bouquet of 13 roses you will need 117 circles with a diameter of 8 cm, 9 pieces per 1 flower. Cut out the required number of petal blanks.

For 1 flower you need to fold 7 circles in half.

Grease the edge of the fold of each circle with glue. Place the stick on the semicircle and twist the petal onto the stick.


In this way, carefully glue the remaining petals.


Pierce two circles in the center with a stick.

Lubricate the top circle with glue in three places. Glue to the finished petals.

Glue the last circle in the same way, the flower is ready.

Let's do it vase for a bouquet.


Flowers made of colored paper


For voluminous flowers you will need special double-sided paper. Regular school colored paper is also suitable for applications.
The simplest bouquet made of colored paper
Making such a bouquet from colored paper with your own hands is quite simple. Even a child can cope with this task. That’s why this craft is a great gift for mom.
If the child is not yet good with scissors, parents can help him. And you shouldn’t interfere with the rest of the process. Creativity with children is an important part of parenting. It develops creative thinking and a sense of beauty. In addition, the child sees the mother’s joy from the gift he received and becomes happy himself.

Materials:
glue;
colored paper;
scissors;
pencil.

Guide to creating a bouquet from colored paper
Take a whole sheet of green colored paper. Lubricate the long edges with glue. Fold the sheet in half horizontally so that the edges stick together. We cut the paper from the fold to the gluing point to a width of 1 cm.
 Lubricate the base of the workpiece with glue.
 Roll the paper into a tube. Secure with paper clips until the glue dries.
 Cut out flower blanks. We use several shades. It will be more convenient to first draw a template, and then cut out the flowers along the contour. Several yellow circles will serve as flower cores.
 Glue the centers to the flowers.

We glue each flower to a separate piece of colored paper.
 Distribute the flowers evenly throughout the bouquet. We straighten the leaves. The children's bouquet is ready:

Making a flower with a child
Paper flowers are a great gift option for mom. This craft is simple to make and looks much better than real flowers. This step-by-step tutorial describes the process of making a paper flower.
For a flower arrangement you will need the following materials and tools:
1. Cardboard (yellow and green).
2. Red corrugated paper (can be replaced with a napkin).
3. Stationery glue, pencil, scissors.
4. A small piece of plasticine.
5. Bottle cap.

Step 1:
The flower will consist of three flower blanks of different sizes. From yellow cardboard you need to cut out three flowers of the same shape, but different in size (from largest to smallest). For convenience, you can first draw the shape of the flower with a pencil and then cut it out. Glue the pieces together. The largest flower should be at the bottom.


Step 2:
Using a pencil, curl each petal down: place the pencil under the petal, press with your finger and pull down to the tip, twisting slightly. These actions will make the flower lush and voluminous.

Step 3:
For the middle of the flower you will need corrugated paper or a red napkin. You need to cut a strip about 3 cm thick, then cut many narrow strips up to the middle. Roll the workpiece and cut again. There is another way: just cut the paper into small pieces. Apply glue liberally to the middle of the flower and glue red pieces of paper.


Step 4:
You can make leaves like this: fold green cardboard in half, draw half of the future leaf at the fold and cut it out. There should be two such leaves.

 Step 5:
To make the stem you will need green cardboard. You need to cut a strip 2-3 cm wide from it, roll it into a narrow roll and secure it with glue. Cut the upper part of the stem into four parts.

Step 6:
All the parts are ready, all that remains is to connect them together using plasticine. It must be applied to the top of the stem and secure the flower. The leaves are attached using the same principle. Glue the flower onto plasticine to the bottle cap. This will be a stand for the craft.

The paper flower is ready.

“Postcard for March 8th!” Safonova Svetlana Alexandrovna.
Application made of colored paper. Gift card for March 8th.
We will need colored paper in red, purple, light green, yellow, and green. It is advisable to use glossy colored paper. Cut out three flowers of different shapes. Large, medium and smallest, and so on three times. Then we glue first a large flower onto the folded cardboard, then a smaller one, and so on three times. Cut out a vase from purple paper and glue it onto the card. We make three yellow circles, make the centers into our flowers and glue them. Then we cut out three stems and glue them from the flowers to the vase. Cut out the green leaves and glue them on. This is how the card turned out!

This video shows how to make paper daisies, they look very naturalistic, almost life-like:
The flowers turn out so realistic that they are difficult to distinguish from real plants.
Daffodils. Master Class
This master class describes how to fold daffodils from colored double-sided paper.

To work you will need:
· simple pencil;
· School line;
· scissors;
· double-sided colored paper in orange, yellow and green shades;
· PVA glue;
· thin wooden sticks;
· small vase.
Description of work
Take half a standard sheet of yellow double-sided paper. Prepare a ruler and a simple pencil.

Draw squares with sides of 5 cm on a piece of paper. Cut them with scissors according to the graphic design. For 5 colors you need to prepare 10 squares.

Take 1 square and make 4 cuts on it, as shown in the photo. Then take 1 wooden stick or pen rod and slightly twist the corners of the paper blank.

This will form your petals. For one flower you need to prepare 2 identical blanks.

Glue them together so that the petals of the top piece are between the petals of the bottom piece.
To make the center for the daffodil, you need to cut out a circle from orange double-sided paper. After this, bend the circle using a rod, as shown in the photo.

Glue the center to the center of the yellow blanks. One flower is ready.

Using the same principle, make 4 more flowers. This is how daffodils turn out.

To make stems, prepare thin wooden sticks and strips of green double-sided paper.

Just cover the sticks with green stripes and the stems are ready.

Cut thin long leaves from green paper. Using scissors, slightly curl one end of each leaf.

Glue 2 leaves onto the stems.

Now all that remains is to fix the buds at the top of the stems.

Beautiful artificial flowers look no worse than real ones.

Collect them in a bouquet and place them in a low narrow vase. They look amazing!
The advantage of such a bouquet is that you can admire its beauty for more than one day, because the paper will never wither.
Daffodils are not the only flowers that can be made. Experiment and your home will be decorated with a variety of flowering plants. For example, the faithful companion of spring daffodils are tulips, how to make them from paper easily and simply, look at the video:
Blue forget-me-not flower made of watercolor paper
You can make beautiful voluminous flowers for decorating cards and gift boxes with your own hands. There is such a wonderful direction in needlework - paper-plastic, which allows you to create incredibly beautiful flowers and bouquets. Thanks to the plasticity of watercolor paper, making flowers for scrapbooking is not difficult.
Necessary tools and materials for forget-me-nots:
- Blue watercolor paper;
- Scissors;
- Stencil in the form of a flower with 5 petals;
- Container with water;
- Ball tool;
- Sponge;
- Soft cloth;
- PVA glue;
- Pearl half beads.
Description of work
First you need to make a stencil of a flower with five petals: you can draw it by hand or print it on a printer. Using a stencil, cut out an even number of flowers from watercolor paper.

Place flowers in water for 5-10 minutes. Don’t be afraid to overexpose it, watercolor paper is quite thick and takes a long time to soak in water. After the allotted time, blot the workpieces with a napkin to remove excess liquid. If you can't find colored watercolor paper, you can color plain white paper with food coloring, gel pens, markers or gouache. This should be done while the paper is wet.

Place the flower on a damp soft cloth. Using a tool with a ball at the end or any other object with a rounded end (for example, the tip of a pen, brush), press on the edge of the petal and move it forcefully towards the center. Do the same steps with all the petals. This will give the flower some relief.


Now transfer the flower to a thick sponge and press down the center of the flower. Here the recess should be larger than in the petals.

After squeezing out the petals, turn the second flower inside out and press it in the center in the same way.

You should get these two types of flowers: with petals curved up and down.

Place the flowers on a flat surface and leave until completely dry. Dried flowers turn out very hard, reminiscent of cardboard.
Now it's time to assemble. Glue a flower with petals inward into a flower with petals curved outward. PVA glue is great for watercolor paper.


Glue a half bead into the center of the flower.

The embossed watercolor paper flower is ready! These flowers were used for decoration. Flowers made from watercolor paper are quite rigid, so they can be used to decorate wicker boxes and baskets, and also be used as interior decoration.

Easter bouquet of snowdrops. Zabrodina Anna.

"Snowdrops". Klementyeva Polina and Aleksandrova Oksana.
A very cute picture, but despite this, it is not at all difficult for children from 5 years old. To make it you will need half a sheet of blue cardboard, a white sheet, a green pencil or felt-tip pen, green plasticine, a napkin, and glue.

Simple DIY paper flower
From ordinary white paper, using a very simple method, you can make beautiful, elegant flowers that will definitely find use in your creativity. First of all, this is the creation of voluminous cards using the technique, which is often practiced by needlewomen, and these flowers can be collected in a bouquet or simply added to a flower arrangement. A small, lush accent will definitely attract attention to a wall newspaper or ad, a beautiful box or package.

What you need to prepare to create such a flower:
White office paper;
water and brush;
gouache or watercolor paints;
scissors;
glue;
decorative stamens;
a piece of thin wire.
How to make a lush flower with your own hands step by step
1. The list of materials used deliberately does not indicate the colors of paint and decorative stamens that can be used to create a flower, because they can be chosen according to your wishes. The base of the flower is ordinary white office paper, and then you can paint the product with any colors, according to your taste or need. First you need to take scissors and a sheet of white paper.
2. Cut out the first flower with oblong petals, 6 pieces, from paper. But the shape of the flower may be slightly different, but it is desirable that the petals be oblong.

3. Using the first flower as a template, cut out 6 equal layers of white paper. The more layers you use to create a list, the more magnificent the product you will get. You don’t have to worry about evenness and accuracy.

4. Using a brush and plain water, wet the petals. Dip the tip of the brush into water and brush over the petals as if painting them.

5. While the paper is still wet, squeeze each petal, conveniently using the same brush or pen, applying it to a rounded surface. This way, you will not only bend each petal into a kind of accordion, but also make them turn outward.

6. Do the same procedure with all the other petals, leave all layers to dry.

7. While the layers of the flower are drying, prepare a bunch of stamens. Since a white and yellow flower is shown here, the stamens were chosen accordingly. Take 6 or 7 double-sided stamens of white and yellow color, use a wire to find the middle and bend in half to get a bunch. Twist the end of the wire until it becomes sharp. In the future, the wire will help secure the stamens in the center.

8. Begin to fasten the dried layers of the white flower. Glue the second layer onto the first layer, moving it.

9. Then glue all other layers in the same way. Here is a preparation for a lush flower.

10. Make a small hole in the center of the flower with scissors and stretch the tip of the wire, fixing the stamens. Cut the bottom of the bush and coat it with glue.
11. Choose a paint color and lightly paint over the top of the flower, leaving white gaps to make it even more elegant.

12. A beautiful handmade paper flower is a great addition to.

Simple autumn bouquet - aster
An autumn bouquet made of paper will be an interesting DIY craft for children. Autumn is the time of year that gives us colorful colors and incredible materials for creativity. The craft is a bright bouquet, decorated with flowers that look like asters, autumn leaves and a bow.

- set of cardboard and paper;
- scissors;
- glue;
- black capillary pen;
- half beads-crystals;
- brocade bow;
- maple leaf template (or a special hole punch in the shape of any leaf).
How to make an autumn bouquet step by step
Prepare cardboard and paper for work. Thick paper (in this case green was used) is needed to create the base. You can also prepare waste cardboard from packaging or colored plastic for this purpose. The bright sheets from the set are essential for creating flowers and leaves. If you use single-sided paper for flowers, the reverse side of which is white, you will get interesting two-color buds.

From a thick sheet prepared for the base, cut out a piece shaped like a bouquet. The upper part will expand, and the lower part will have a tail, like a bouquet.

Cut out several maple leaves (or you can prepare blanks of a different shape, for example, oak, chestnut or birch leaves). It is better to use yellow, orange, brown or red paper for this work. Use a capillary pen to apply veins. The leaves should be small - this is an addition to the bouquet, which echoes the autumn theme. Make 5 or more blanks.

Glue the prepared leaves onto the base. You can glue four on top, one on the bottom, or distribute them as you wish.

Additionally, cut out oblong leaves. These are directly the leaves of the asters, which will become the central decoration of the postcard. Curl each leaf with the same scissors. Long details are a decoration for the bouquet.

To create buds, prepare thin brushwood from pink paper. Cut the leaf into thin strips and divide each into segments about 10cm or so long.

Fold each piece into a loop, overlapping the edges on top of each other. The reverse side of the paper may be white.

Cut circles for flowers from paper of any color. Lubricate the circles with glue and begin to apply loops around the circumference, forming flowers.

Glue on two or more rows of loops to create full buds. Decorate the centers with half beads. You can choose half beads to match the flowers or use yellow details.

Model three or more aster flowers to decorate the bouquet.

Glue autumn flowers in the center of the bouquet.

Decorate the lower part of the composition with a brocade bow to disguise imperfections and make the bouquet look complete.
An interesting autumn paper craft is ready.
Chamomile
For example, to do paper daisy, cut out two blanks from white paper and several from yellow, glue the core onto the main shape:

Rose
For roses It will take more preparation and effort, but the result will be impressive: fold the square of scarlet paper twice in half and once diagonally. Cut off the tip and wide edge in a semicircle, make 4 such layer blanks with 8 petals. To create volume, cut one side of the workpiece and glue it together to create different widths of the workpiece: 6, 5, 4 and 3 petals. Twist the petals, insert the layers into each other and glue them. Fold the leaves of green paper like an accordion.
"My scarlet rose." Sivolapova Polina.
To make this rose, you needed red double-sided paper (colored printer paper).

Another interesting option is two-color: here you will need not only scissors and glue, but also a stationery knife for cutting.

A simple option on how to quickly do it. Fold 2-3 sheets of paper into one accordion, tie them in the middle, and trim the edges in a semicircle. All that remains is to gently fluff the petals:

Simple flowers
Simple flowers can be done in a spiral way: on a sheet of colored paper, draw a classic spiral or a wavy one with petals, cut it out and twist it into flowers.


Dahlia
And even if you make circles of paper of different diameters and cut out petals in them, you will get a very lush flower - a dahlia.
Flower made from curled strips of paper.
Another option how to do it ribbon rose, paper or fabric, simply bending the petals at the desired angle and rolling them into a roll:
Video from YouTube:
Hyacinths Elizara Polyakova:


Large flowers for the photo zone
Flowers for office Decorations for photo shoot locations can be made from double-sided colored paper.
For example, in this video, paper with a density of 160 g was used, 15 - 24 pieces were needed. Templates can be found, for example, here: //pl.pinterest.com/pin/789818853371506785/. How to make a photo zone from paper flowers:
For a photo zone you need a frame on which the canvas is stretched, and then flowers are attached to it with wire and hot glue:
Another option is to make beautiful hanging compositions, for example, these:
Paper flowers opening in water
You can spend interesting time with a small child at home. This simple but fascinating miracle craft will interest your baby. Making flowers together will bring pleasure to everyone.

You will need:
- colored (both sides) xerox paper;
- office white paper;
- colour pencils;
- glass of water;
- white shallow plate;
- stapler,
- circle templates with a diameter of 6, 10 and 12 cm (for more complex color options).


Simple option
Draw several flower options on a white sheet of paper, approximately 4-5 cm in diameter with not very large petals. Available in different colors and petal shapes. Now they need to be cut out. Bend the petals of each flower into the center in a circle, one on top of the other.


 When the flowers are ready, place a plate and pour some water into it. Now you can lay out the paper flowers with the folded petals facing up. And then an amazing transformation will occur. All the petals will open and flowers will bloom on the water.
This action occurs because the paper absorbs water and tries to return to its original form. This means that it straightens in places where it is folded. It turns out that the flower is blooming.

 Flowers can be immediately cut out from colored xerox paper. You can glue something funny or draw something inside the flower. Optional.
More complex option
Option #1. The original flower can be made large in 3 layers. Take xerox paper and staple it in the middle. Using the template, draw two circles with a difference of 2 cm between them. Draw petals in the resulting donut. The finger will serve as a template. Cut out the flower, taking three layers at a time.
Now fold the petals correctly in the center. One after another, overlapping each other. And so on for all three circles. All that remains is to launch it into the water and see. The flower will open layer by layer. The baby will love it.


 Option number 2. This flower can also be made in 2-3 layers. Only now the difference between the circles will be 4-5 cm. You will get long petals. Now each petal must be twisted inward with a pencil. You can use a thinner diameter.

Origami flowers
Flowers made using the origami technique, of course, are not so similar to real ones, but they have their own charm. In addition, this technique helps develop fine motor skills, which is very important for children and adults too. How do you get such original things from an ordinary square of paper?
Calla lilies
Paper is most often used to make children's appliques. We suggest adding some chenille wire to it and making beautiful flowers that look like elegant callas. And when creating the flowers themselves, you can introduce the child to the basics of origami techniques. The entire process of making such an application is given in this master class.

To create such a craft, we prepared:
- white cardboard;
- red, orange, pink and green paper;
- glue;
- chenille wire;
- pencil;
- scissors;
- ruler.

The flowers for this application will be made of colored paper using the origami technique. Therefore, initially we prepare a square blank. In our case there will be a square with a side of 8 cm.
 Fold it in half diagonally.
 Now let’s unfold the blank of the future flower and begin to bend the sides towards the middle line.
 You need to bend it symmetrically on both sides.
 Next, we bend the upper parts of the bent elements back. We try to do this symmetrically. This is the template we have for a flower.
 The center of the flower will be a piece of chenille wire. It is enough to take about 4 cm. We use orange chenille wire, but if desired, such a center can be made of chenille wire of any color. We fix this piece with PVA glue.
We bend the bottom corner of this flower to the reverse side and glue it.
In a similar way, we make flowers from pink and orange paper.
 Now we distribute the flowers on white cardboard, and then fix them with glue.
We cut out narrow strips from green paper that will become the stems on our applique.
 We also make flower leaves from green paper. To do this, fold it in half, and then cut out the outline of half the leaf. We cut out 3 leaves of different sizes. We glue them onto our craft. The applique with flowers made of paper and chenille wire is ready.
Video on how to make spring lilies of the valley. Valeria uses a large sheet of paper to make it clearer, but for miniature flowers you need to take 5 x 5 cm squares and repeat after the author:

Flowers always bring joy and positivity, diluting dull everyday life. That’s why they love to decorate interiors so much. Fresh flowers are not always available, and they fade quickly. You can also make artificial flower arrangements with your own hands without much expense. They look no less impressive and do not require maintenance.
There are many significant events in life, and when your imagination for a gift runs out, you can surprise with your creativity. Large flowers made of corrugated paper will look extraordinary and elegant. This is a good option for weddings, anniversaries, photo shoots and other festive events. Using the same technology, flowers are made to the full height of a person and even taller, and an original head decoration. Homemade flowers from thin crinkled corrugation can be easily assembled into magnificent wall panels - it looks stunning, and if you hang it on a stand and place a lamp inside such a flower - it’s simply amazing! And you can’t count how many varieties of flowers you can make... It can be luxurious roses, scarlet field poppies, royal peonies, double chrysanthemums, delicate anemones and many, many others. You've probably already seen pictures on the Internet, let's try to make them yourself?
How to make a large flower from corrugated paper: step-by-step master class and photos
Making large indoor indoor flower installations with your own hands is not at all difficult. This will require a minimum of investment, a little patience and time. Since these decorations in the interior instantly attract attention, the process should be approached responsibly. To ensure that flowers can be placed on the floor without any problems, you need to secure them to a stable stand.
Huge DIY corrugated rose flower
Before starting the master class, you need to prepare a set for work:
- corrugated paper;
- cardboard;
- scissors;
- ribbon or thread;
- wire.
The first thing to do is cut out a template for the components of your future composition. And using it it will be easier to make initial blanks, which, as a rule, are mounted on a flat base. The petals will be in two different shapes - teardrop-shaped and heart-shaped. You will need at least 6 pieces of the first, 15–16 pieces of the second. The leaves should be made according to the same pattern, in the amount of 4 pieces. We straighten the resulting hearts, stretching a little to the sides. We add curl to the edges using a pencil.
The stem will turn out if you wrap the wire with floral tape. Now we begin to collect the flower step by step. First, we wrap a bunch of narrow petals to the base of the trunk. Thus, the central part is created. Around it we place blanks in the shape of a heart in a row, gradually increasing the volume.
We move on to making the leaf component of large roses. Three pieces of wire are lined with green paper and a leaf is attached to the top. We cut out the cup for the bud like a toothed ribbon. By wrapping it around the base of the flower, you get a beautiful stipule.
That's all the manipulations, all that remains is to assemble the details of the rose from compressed paper together.
This is a master class for beginners, which is recommended to start with.
Gallery: large flowers made of corrugated paper (25 photos)


Master class on making roses with twisted edges
Similar version of rose the most common due to its ease of manufacture and prominent design. To obtain volume, there is no need to wind many layers. A sheet of corrugated paper, wire and decorative tape will be enough.
Step-by-step instruction:

The result is a long stripe with graceful curls. All that remains is to twist it into a tight bud and secure it at the base with a thread. Made from wire and floral braid, we make a stem. By installing it in the core and straightening the petals, we get a finished rose.
How to make huge peonies: a master class for beginners
With the help of such giant flowers, you can not only transform the interior. This is a great head decoration that kids will love. To make them yourself, you will need:
- several multi-colored large sheets of corrugated or stapled paper;
- newspaper for papier-mâché;
- glue gun;
- thread with needle;
- balloon.
 We glue pieces of newspaper on top of the inflated ball, gradually increasing the layers. The base should be dense. Leaving the workpiece to dry for a day, then deflate the balloon. Carefully divide the newspaper sphere in half.
We combine these slices, and sew the edge area with thread. For best results, it is advisable to apply glue along the edge.
Now we move on to preparing petals of different sizes and shapes. It's easier to deal with this when there are templates. Don't be lazy to cut a large amount. There are at least 10 pieces of each type. More is possible, but less is not possible.
We stretch each leaf, roll it into a shape and bend the base to make it easier to glue it onto a newspaper base. Start gluing, preferably from the center and smaller ones in size. It is acceptable to leave a minimum space between the rows of twisted corrugation. So, fill out the entire form. The sides of the pedestal are decorated with the same paper.
The largest petals will be used for external cladding.
The result is an incomparable peony that can serve as a festive headdress.
Full size flowers
 Let us offer for consideration another delightful version of flowers, the size of a human being. Making them with your own hands is easier than the previous ones. There is no need to cut out individual petals and leaves using stencils and then put everything together. All you need is paper.
In a free style, cut out more circles of different diameters. We walk along the edge in a zigzag, using scissors. We put the blanks in a pile, from large to small. We coat each layer with glue.
Such decorations look amazing in wedding halls, at children's parties, and when creating a backdrop for photo shoots. Just don’t overdo it with an artificial greenhouse; dilute it with fresh flowers.
Big white flower
The set of tools and materials is still the same. We will just combine several different colors of paper. In our master class, a scarlet shade is chosen for the middle, and the components of the bud will be cream.
Petals are cut according to the template. The form is selected individually, as desired. We suggest considering an oval with a cut off bottom.
Size varies from 14 cm to 1.5 cm. To get gigantic inflorescences, you will need at least 10 pieces of each size. Small petals should be double. We start working with them - apply hot glue. Next, we fold them and give them the appearance. We act in the same direction, increasing the volume.
The previous one is located inside the new one.
Large leaves are combined in pairs.
The final edging will be green clippings.
When the craft is completely dry, all that remains is to straighten the flower. We pull each sheet separately and carefully give it the required shape.