Patchwork is a unique sewing technique. Patchwork is a technique for creating household items or paintings using scraps of fabric or knitwear. It’s easy to create any composition in the patchwork style. According to reputable craftsmen, even a beginner can easily make potholders or other small items for the home.
Anyone can create patchwork paintings. Such crafts can be used to decorate a children's room or kitchen. It is advisable to create pictures in the style of patchwork on foam plastic. You can create compositions on paper. Everything is limited only by your imagination.
Before creating a picture in the patchwork style, you need to make a template for the future composition on paper. After this, you need to cut out the workpiece and attach it to the foam. Next, outline the base of the drawing with a pencil and make small indentations in the foam (no more than 1-2 centimeters). Fabric panel option:

When making a patchwork style painting, follow the following algorithm:
- First you need to attach the paper blanks of the picture to the fabric. After this, cut out pieces of the appropriate size from the fabric. Don't forget to leave small allowances.
- Lubricate the fabric with glue.
- Gradually fill the canvas with scraps of fabric.
- After the drawing is ready, you can paint the background using acrylic paints.
If you are creating a voluminous canvas for children, you can decorate the picture with various beads or lace.
DIY potholders in patchwork style
Many people are familiar with the Ashet Collection, which has been translated into Russian since 2009. A series of these magazines contains master classes and various news in the field of handicrafts. The magazines of this publication outline multiple variations in the manufacture of oven mitts for the kitchen.
If your kitchen has a classic or rustic style, you can sew potholders using the patchwork technique. Such a product will look extraordinary and beautiful. In addition, potholders in a patchwork style are very practical. More ideas for creating patchwork little things at the link:
Before you start making potholders, choose the right fabric. It is advisable to give preference to natural cotton materials. In order to avoid shrinkage during the manufacture of potholders, you need to wash and iron the fabrics.

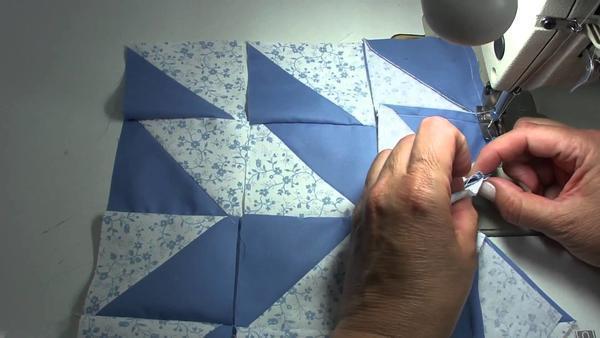
The process for creating tacks is as follows:
- First you need to cut four different colored squares from your fabric pattern.
- Next, cut each square into equal triangles.
- Sew two triangles of different colors. Repeat this procedure for all figures.
- Assemble the resulting parts into a square.
- Make material for the reverse side of the potholders. To do this, cut out a square of the required size.
- Attach the wrong side of the product to a square sewn from triangles.
- Before sewing both sides of the potholders, place a layer of padding polyester or batting between them.
- Sew the wrong side of the product to the front.
- Sew the edges of the part.
- Sew a loop made from a single-color fabric pattern to the finished potholder.
Basic patchwork techniques
There is a program for quick patchwork sewing. It's called patchwork corners. Using this technique, you can create various panels, knitwear vests and toys. To do this, you only need strips of plain fabric.
The “corners” technique provides 3 ways to fold the shred:
- The first method is the simplest. It is perfect for beginners. This method involves folding each square diagonally with the inside out.
- The second method is to fold the fabric inside out. After this, you need to tuck the corners on the workpiece.
- The third method is only suitable if you use thick fabrics. This method involves cutting rectangular pieces. After this, the workpiece needs to be folded with the wrong side 1-2 cm and ironed. Next, the corners are bent to the middle line of the rectangle and the part is ironed again.
A good quilting technique is "quick squares". Learning the patchwork technique begins with learning this particular method. Learn a master class on patchwork in the article:
If you want to make patches using this technique, follow the following algorithm:
- First you need to cut out two strips of the same width.
- Grind off the stripes and smooth the resulting seam using an iron.
- Cut out the third strip. Its width should be the same as the width of the two stitched strips.
- Attach the resulting strip to the two stitched right sides. Sew all the stripes.
- Divide the resulting workpiece into equal squares and cut them out.

If you want to create an extraordinary carpet or other piece of furniture, the Russian square technique is perfect for you. Products made using this patchwork technique will add depth and versatility to your interior.
Assembling the patch using the “Russian square” technique is done in the following order:
- Cut out a square that will serve as the base.
- Then iron it with an iron.
- Attach a small colored square to the center of the square.
- Sew strips on each side of the small square.
- Iron the workpiece.
- Attach a triangle made of fabric to the edges of the strips and stitch it. Determine the dimensions of the triangles taking into account the perimeter of the canvas. Remember that every little thing makes a huge difference. Even one wrong size can ruin all your efforts.
- Repeat this procedure until you have filled the entire base.
A fairly common method of patchwork sewing is the “well” technique. The first lesson of any handicraft club begins with the study of this particular technology. This technology involves creating a square base to which strips of fabric called “logs” are sewn. The shreds should be of different sizes. The “logs” must first be attached to the edges of the square base.
Lyapochika and chess technique
The Lyapochika technique appeared during the times of the peasantry, when our country was poor and people had to sew clothes from scraps of fabric. This technology involves sewing strips of fabric in rows. Each piece must be sewn strictly in the middle of the fabric, and then bend the corners of the material. If you decide to use the lyapochik technique, you can use fabric circles or squares as a base.
You can create a blanket or bedspread in a patchwork style using the “checkerboard” technique. If you decide to use this technique, choose fabrics of different textures.

When creating any product designed in the “checkerboard” style, adhere to the following algorithm:
- First make a template in the shape of a square.
- Divide the workpiece into 16 equal squares.
- Cut out 8 squares from dark fabric and 8 from light fabric.
- Take 2 squares of different colors, place them right sides together, and sew them together. Repeat this procedure with all squares. As a result, you should have 4 stripes.
- Sew all the strips together.
Patchwork: techniques (video)
Working in patchwork style is pure pleasure. Using the patchwork technique, you can make absolutely any product. To study technology, you do not have to learn any secrets from experienced masters or attend master classes. It is enough to follow some rules and select suitable fabrics. – this is the beauty and originality of your home. Go for it!
Patchwork (photo)


Lately, handmade work has become highly valued. Today we invite you to talk about the following - “Do-it-yourself fabric paintings.” If you approach this issue very responsibly, you can make a beautiful and original painting that will look much more expensive than paintings by famous artists. Of course, it is not recommended to use cheap fabrics in this case. Today, the market offers the buyer many different types of fabrics, both in color and density.
So, we will present to your attention a few step-by-step instructions. We wish you to be patient. Let's get started.
On a wooden frame
To make a painting you will need the following tools and materials:
- Wooden frame (choose the size you want the picture to be);
- Textile;
- Cutter's scissors;
- Staple driving gun.
First of all, you need to iron the fabric. This is required so that the picture is free of various swellings or other irregularities. Lay out the fabric on the table where you will work. Place the frame on top. Using scissors, cut out the required piece of fabric, do not forget to leave additional spaces on each side, about seven centimeters.
Then you need to stretch the fabric over the frame so that no fastenings are visible. Then we take a staple gun and, stretching the fabric, secure it to the frame. It is necessary to tighten it so that there are no irregularities.

That's all, the fabric painting is completely ready! You can safely hang it on any wall of your apartment or house.

Foam option
For manufacturing you will need the following tools and materials:
- Textile;
- Styrofoam;
- Cutter's scissors;
- Satin ribbon;
- Loop for attaching a picture;
- Glue;
- Pins.
Using the finished polystyrene foam, we cut out the fabric. We glue the fabric onto it.

The side parts also need to be made to match the picture. To do this, take a satin ribbon of the required size and glue it to the sides, as shown in the photo:


In order for the completed picture to be attached to the wall, we attach a loop for fastening to the back of the foam.

Using this manufacturing technique, you can make several paintings for one composition.


The painting can be of any size and shape. Imagine and experiment.
One option is to create a modular picture. As an example, such a picture is shown in the photo below.

Three-dimensional picture
Creating three-dimensional paintings is not so easy, but they look very expensive and rich. The most important rule is to learn how to cut out and make three-dimensional shapes.

- Picture frame;
- A sheet of plywood to fit the frame;
- Textile;
- Burning apparatus;
- Iron with steam function;
- Fabric paint (if required);
- Scissors;
- Glue;
Using glue, we fix the fabric to a sheet of plywood (base). If required, apply paint to the fabric. Then we attach the drawing and use a burning machine to make an outline. Then we cut out our drawing and use an iron to attach it like an applique.

The frame for the figures can be made of wire. To do this, we wrap it with cloth and attach it to the picture. If your painting has elements that require a certain shape, then this is not difficult to do. We simply fill them with filler, for example, padding polyester or foam rubber. Be careful in this matter; threads should not be visible in your image.
Then we insert the finished picture into the frame. That's all, you can safely hang it on any wall of your home.
From scraps of fabric
For work we will need the following tools and materials:
- Foam plastic - we use it as a base;
- Stationery knife;
- Simple black pencil;
- Fabric glue;
- Iron thin nail file.
So, on the prepared polystyrene foam we draw the necessary picture. In our case, these are houses.

You need to go along the drawn lines with a knife at a depth of 5 millimeters, lubricate them with ordinary glue.

We cut out the necessary parts from scraps of fabric, only they should be a little larger. We insert each of the scraps into the finished slots.

Now we move on to decorating the edges of the foam. To do this, take the fabric and secure it with decorative nails.

This concludes the master class. The painting is completely ready, and you can admire your work of art.
With this method of creating paintings, you can create works of art that no one else has. Basically, in the manufacture of such panels, figures such as flowers are used from scraps of fabric, which can be painted with paints according to your desire. Having got your hands on these masterpieces, you can create much more interesting and original paintings, not with ordinary colors. You can also use beads as an addition to the main pattern.
Schemes of paintings that can be made from pieces of fabric or denim:


Video on the topic of the article
A colorful owl against the background of the night, created using the “patchwork without needle” technique
Paintings made from scraps of fabric are a relatively new type of needlework called kinusaiga. The word is of Japanese origin, as this is where this creativity originated. Kinusaiga is divided into several directions: patchwork, patchwork (quilting, quilting). What unites them is the material - flaps, but what distinguishes them is the technique of execution.
New Year's panel on the wall made of rags
Festive wreath on the door made of scraps of fabric
A picture made from scraps with the addition of knitting threads
The picture is sewn using one of the patchwork techniques - quilt
In this topic, the reader will learn how to make paintings from scraps of fabric with their own hands, the diagrams of which can be downloaded and printed from the Internet.
Fabric paintings will be a wonderful color accent in almost any interior.
Meet patchwork
The uniqueness of the patchwork technique is that paintings from scraps of fabric are created without the use of a needle and thread. And the advantage of patchwork is its relative simplicity of execution, so even a novice master can create real masterpieces. Paintings from scraps of fabric:
Panel of flowers using the Kinusaiga technique
- are a worthy decoration for an interior in country or Provence style.
- will be appropriate in any kitchen.
- They will be a good gift for relatives or friends on the occasion of a housewarming or other celebration.
- do not require the purchase of expensive materials (everything you need can be found in any home).
- performed quickly (3-4 hours).
- have a 3D effect.
DIY New Year's painting
Before starting work, you need to prepare materials and tools so that they are at hand at all times.
- A sheet of polystyrene foam with a density of 25, 2-2.5 cm thick. You can use pieces that are used to package equipment at manufacturing plants.
- All kinds of colorful rags of different sizes. It is desirable that the fabric is thin. Rough and dense material is not suitable for small parts.
- PVA glue (superglue is not suitable, it melts the foam).
- A scalpel and a stationery knife (you can use one or the other).
- Manicure scissors.
- A seam ripper, which can be purchased at any craft store. Some craftswomen use a nail file; This is also possible, but the first option is more convenient.
- A diagram printed on a piece of paper.
- Felt pen or carbon paper.
The most necessary tools for creating a patchwork painting
Advice! When cutting foam plastic, and even during work, small white balls will inevitably crumble and create debris. Therefore, it is better to work in a room where there is no high-pile carpet, so that you can easily clean up the mess later.
Cute fleece rabbits in a painting made using the Kinusaiga technique
Step-by-step execution of a painting from fabric scraps. Master Class
If you don’t have a printer, you can draw the picture yourself by hand or by cells. The drawing must be transferred to the foam using carbon paper or drawn with a marker. The picture must have a frame, so the work begins with this element.
To create a picture with a beautiful bouquet you will need delicate chintz
The foam can be square or rectangular in shape - it all depends on the design itself. On each edge of the foam fragment you need to draw a margin of 2-4 cm - this is exactly the width of the frame.
To make it easier to transfer the design onto the foam, we secure it with buttons
It's time to pick up a scalpel or a utility knife. Using any of these tools, grooves 0.5-1 cm deep are cut. Deeper cuts will lead to a break in the base, and this should not be allowed.
Prick the outline with a button
Now you need to take the fabric. It is best to work with knitted patches; they stretch well and do not pop out of the slits. It is recommended to distribute the flaps in advance: which one will go where.
Using a ripper or a nail file, insert the edges of the fabric into the slits, then trim off the remainder and hide them in foam until the end
- PVA glue is applied to the selected fragment of the design with a brush.
- A proportionate piece of fabric is applied to this place.
- Using a nail file or seam ripper, the edges of the flap are tucked into the slits.
- The edges of the fabric remaining on top are trimmed with nail scissors.
We finish our picture, leaving a little fabric around the edges
First, a frame is made using this technique. The free edges are folded over and secured to the foam with buttons or a stapler. Next, the entire drawing is completed.
We fasten the remaining fabric with buttons along the edges
A hook is attached to the back wall of the painting or a loop is sewn on, through which the hand-made masterpiece is hung on the wall. Since the foam is very light, it can be glued to the wall with tile mastic.
In the patchwork technique, both individual designs and modular compositions are performed. For picture blocks, use fabric with a large print, cutting it into pieces.
Cute decorative paintings will decorate your home
Advice! Pictures from scraps of fabric for beginners should not be complex and curvilinear. At first, it is recommended to choose simple images in which there are no small details and the lines are mostly straight. Over time, when experience comes, it will be possible to take on more complex compositions.
Nice simple painting using the kinusaiga technique
Quilt - patchwork sewing
Another type of needlework that is used to create original paintings that fill the interior with warmth and homeliness. The essence of the procedure is to sew together three or more layers of fabric (using a sewing machine or by hand), resulting in a three-dimensional relief pattern on the surface. The picture gives the impression of a 3D effect.
“Quilting” is a borrowed foreign word; this handicraft is simply called patchwork. This technique appeared a long time ago; it could be seen in the interiors of village houses of the last century. Our grandmothers, collecting all kinds of scraps of fabric, sewed multi-colored blankets, bedspreads, and pillows.
An original painting made from scraps of fabric will decorate any interior.
Similar products can still be found today. They are characteristic of country and Provence style interiors, identified with rural life. All these gizmos currently play more of a decorative role than necessities.
Somewhat later, using patchwork, craftsmen began to produce paintings, and some of them are made so skillfully that they amaze the imagination. A quilt can be a kind of abstraction or convey a specific plot.
A fabulous panel of rags in bright colors
How do layers differ from each other in quilting?
- The first layer is the lining, for which, as a rule, cotton scraps of fabric are used.
- To create the second layer, use batting or padding polyester. It is this layer that is necessary to add volume.
- The third layer (top) is decorative. It is combined with applique, collage, embroidery.
The layers must be quilted together with a seam.
Homemade painting with New Year's mood made from scraps
Decorate the walls with panels with flowers
Handmade people use a variety of materials to create masterpieces. Shreds can be found in every apartment. To create an original decorative panel with floral motifs, even the smallest pieces of fabric are suitable, which a thrifty housewife does not throw away, but puts in a separate box.
Beautiful bright panel in a wooden frame with flowers
To complete a flower panel, which will take no more than 2 hours, you need to prepare:
- a scheme that you can choose on the Internet or come up with yourself.
- multi-colored bright rags.
- cardboard templates - they are needed for cutting out petals.
- scissors.
- beads.
- glue.
- needle and thread.
Necessary tools for creating a masterpiece with your own hands
First, round blanks of different sizes are drawn on the flaps using a template. The cut out circles are collected in a pyramid, the large one is placed down and reaches the smallest one. They grab the stack of blanks with a thread, and secure a bead in the center of the flower.
Delicate roses made of transparent fabric
To give the edges a waviness, the flower is lightly burned with a candle flame. Then thin blades of grass of different lengths are cut out of green fabric and assembled onto a base using machine stitching. The canvas is attached to any frame or stretched over a frame and flowers are sewn to it. The smallest parts are fixed to the main canvas with glue.
That's all, the wall panel is ready! You can hang it in the kitchen, nursery, hallway or give it to friends.
A colorful bouquet of tulips that can be used to decorate a gift box
Advice! Instead of a frame, you can use a small wooden hoop. They are inexpensive and can be found at any craft store. The fabric is stretched tightly in the hoop, so the picture looks very neat. By purchasing hoops of different sizes, you can create an entire flower arrangement - several paintings are hung on one wall at different heights, but close to each other.
Wall decor using homemade miniature paintings in a hoop
New Year's paintings from scraps of fabric for beginners
New Year's chores are very pleasant, but it is not always possible to give gifts to everyone you want. However, there is a way out - to make your own New Year’s picture from pieces of fabric.
The New Year's atmosphere in the house is created by small objects symbolizing the holiday.
Since it’s New Year, the theme is, accordingly, New Year’s:
- Father Frost.
- Decorated Christmas tree.
- Sleigh with reindeer.
- Colorful bag with gifts.
A small New Year's picture in a hoop, made by yourself
You need to stock up on pieces of fabric and thin leather. Colors: red, white, blue, gold, green, and for the face of Santa Claus you will need pink scraps. Ordinary cardboard is covered with chintz. If the main background is snow, you should take a white or bluish fabric.
New Year's motifs in home wall decorations
Next, figures of animals, Santa Claus, the Snow Maiden, and a Christmas tree are cut out of the same cardboard, depending on the intended plot. To make Santa Claus's beard look natural, the fabric for it needs to be cut into fringes. For sleds, fabric with a silver tint is best suited. The Christmas tree is assembled from several types of fabric with different shades of green.
Children can also quickly learn how to create such paintings
Advice! The fringe for the beard and fragments of the Christmas tree should be held over a burning candle. Thanks to this trick, the pieces of fabric will gain volume.
When all the details of the picture are prepared, you can start gluing them. A hand-made New Year's panel from scrap material will delight not only the master himself, but also the one who receives it as a gift.
The New Year's panel will lift your spirits and put you in a festive mood
The technique of making paintings from scraps is not complicated. There is no need to buy materials; they will definitely be found in any home. Despite the cheapness of the finished product, it will please the eye no less than a landscape or still life, which costs a lot of money.
Source: http://happymodern.ru/kartiny-iz-loskutkov-tkani/
 The technique of creating paintings from pieces of fabric is called “kinusaiga”. This type of needlework appeared not so long ago, but has already become very popular.
This unusual creative technique came to us from Japan and is divided into several subtypes: one of them is patchwork, and the second is sewing from patches, or quilting.
The difference lies in the specifics of creation, and the common feature is the material (multi-colored pieces of fabric).
Original canvases made from pieces of material will become a wonderful bright accent in the design of any room.
DIY fabric panel, photo
This educational article offers photos with ideas and master classes on creating handmade patchwork paintings and panels from fabric scraps using patterns downloaded from the Internet and sketches and drawings created by yourself.
DIY fabric paintings, photos
The technique with the unusual name “patchwork” is unique; its peculiarity is that when creating decorative cloths from shreds, a needle is not used - just like threads. The main advantage of this technique is its simplicity of execution.
Thanks to patchwork, it is possible to create entire decorative masterpieces without much difficulty, even without any experience in needlework. This creative technology is ideal for beginner needlewomen.
Paintings from scraps, photos
Paintings from pieces of material are worth making for several reasons:
- they are great for decorating rooms whose interior is decorated in Provencal or country style;
- can be used to decorate any kitchen;
- are an excellent gift for any holiday and, above all, housewarming;
- to create them you need available materials;
- the work of producing decorative canvases takes a minimum of time;
- have a volumetric effect.
Before you begin the creative process, you should prepare the following tools and supplies:
- foam plastic tape measuring 2-2.5 cm (pieces of foam plastic that are used to package household appliances are suitable);
- pieces of fabric that differ in color, shape and size (it is recommended to use thin material - it is easier to make small parts from it, it is more difficult to work with denim scraps);
- office glue (do not use super glue, otherwise the foam will melt);
- paper cutting knife;
- small scissors;
- buttons;
- a tool designed for steaming seams (can be bought in stores that sell sewing supplies) or a manicure file, but it is more convenient to work with a steamer;
- printout of the diagram;
- carbon paper or marker.
DIY paintings from scraps of fabric, photo
Using step-by-step instructions and MK, you can create an unusual decorative fabric in a short time and sew a real beautiful picture from scraps of fabric.
If you don’t have a printer, instead of a ready-made drawing, you can make the image yourself. It is most convenient to draw the outlines of the picture in cells. The pattern is transferred to the foam using carbon paper or drawn with a felt-tip pen. The canvas must be framed: the creative process begins with the manufacture of this particular part.
The foam blank can be of a square or rectangular configuration, depending on the specifics of the pattern. On each side of the foam base, draw a margin, making indentations of a couple of centimeters or a little more - this is the width of the frame.
On a note! To make it easier to transfer the pattern onto the foam blank, secure it with buttons.
Now it’s time to work with the knife. Using a cutting tool, make indentations of approximately 0.5 cm. If the grooves are deeper, the base will fall apart.
After this, you can take up the fabric. It is preferable to use knitted cuts - such fabric has the property of stretching and does not slip out of the grooves. It is worth first deciding on the placement of the flaps.
Apply glue to one area of the image using a brush.
Apply a flap of the appropriate size to this area.
Using a manicure file or a ripper, insert the edges of the material into the slits, and trim off the excess on the surface with scissors.
First of all, the frame is made using patchwork technique. The hanging edges of the fabric are folded over to the back and attached to the foam base with buttons or a stapler (try to pull the fabric tighter).
Having secured the canvas, they begin to create a drawing.
A hook or loop is attached to the back of the decorative canvas, thanks to which the picture is placed on the wall. Considering that polystyrene foam is a lightweight material, it can be fixed to the wall with mastic, which is used to fix tiles.
Using patchwork technology, individual images and entire modular compositions are created. To create picture modules, material with a large pattern is used, cutting it into separate fragments.
Recommendation: For beginning needlewomen, it is better to avoid creating complex drawings in the first stages. Until you gain experience, it is better to practice on simple patterns without miniature elements, and the lines should be mostly straight. Once you gain experience, you can try your hand at creating more complex and intricate compositions.
The handmade Kinusaiga technique makes it possible to create simple, but at the same time nice and original decorative canvases and paintings.
Fabric paintings, photos
Quilt - sewing from scraps
Another direction in needlework that allows you to make unusual paintings is called “quilt”, or sewing from scraps. Decorative canvases created using this creative technique make the interior warmer and more comfortable.
Patchwork paintings
The principle of making decorative elements using the quilt technique is to stitch together several layers of fabric (by hand or by machine). This technique is used to create three-dimensional three-dimensional images with relief.
The effect of three-dimensional drawings is reproduced on decorative canvases.
The concept of “quilting” is borrowed from a foreign language and translated into Russian means “sewing from scraps.” This technology has been used in handicrafts for a long time.
Decorative items created using this technique were found in village houses back in the last century.
Surely many people understand how grandmothers made bedspreads, decorative pillows and chair covers from multi-colored scraps.
Such items are still relevant in our time, especially in Provencal-style interiors. Such decorative elements are also appropriate in a country style setting. Such interiors are associated with rural life.
Today, such products serve primarily a decorative role, but previously they were also assigned a practical purpose.
A little later, using the technique of sewing from pieces of fabric, needlewomen began to make decorative canvases. Pictures made from small pieces of fabric look very unusual, and skillfully made items become unusual highlights in interiors.
A painting created using the quilt technique can depict an abstract drawing or a specific subject composition. Craftsmen make panels of fabulous beauty from pieces of fabric that attract attention with a riot of colors.
Do-it-yourself volumetric fabric paintings
Differences between layers in quilting
The first layer is a lining, mainly made of cotton material.
The second layer is made from batting; it can also be padding polyester. Due to this layer, the picture acquires volume.
The front layer is a decorative finish combining embroidered patterns and appliqués.
The layers must be stitched (the seams are made in the form of stitches).
Floral panels for walls
Lovers of handmade items use a variety of materials to make them. Scraps of fabric can be found in any home.
To make a beautiful and at the same time original painting with floral patterns, trimmings of any size, even very small ones, will be useful.
Thrifty housewives usually do not throw away scraps, hoping to someday use them in business. The Japanese technique Kinusaiga provides such an opportunity.
To create a bright panel with floral patterns you will need about a couple of hours and the following materials:
- printout or hand-drawn diagram;
- scraps of fabric of different colors (the brighter the better);
- cardboard stencils - for creating leaves;
- scissors;
- office glue;
- beads;
- needle, thimble and thread.
First of all, rounded details that differ in size are drawn on pieces of fabric using a stencil. A pyramid is made from round fragments. The assembly is carried out from the largest element (it is located at the bottom) to the smallest. The pyramid of parts is secured with a thread, and a bead is placed in the middle of the flower.
To make the edges of the flower wavy, lightly burn them with a candle. After this, cut out thin grass of varying heights from green material and attach it to the base by making a machine seam.
The painting is fixed to a frame base or stretched onto a frame, after which flowers are sewn to the canvas. Miniature elements are glued to the canvas.
The original panel can be placed on the wall in the kitchen, in the hallway, in the nursery, or as a gift to friends.
Recommendation! The frame can be replaced with a small hoop; these can be purchased at a store that sells craft supplies. The hoop allows you to stretch the material evenly and tightly, thanks to which the canvas looks neat.
Using hoops of different sizes, you can make an interesting floral-themed composition.
Paintings with floral motifs are placed on the same wall at different heights in close proximity to each other. Such decorative elements on the walls give the atmosphere a real homely feel.
Tulips, delicate roses, lilies - floral motifs are the ideal decoration.
Decorative canvases made from scraps on a New Year's theme
Preparing for the New Year holidays is both a hassle and a pleasure at the same time. Not everyone can afford to buy expensive gifts. In such a situation, you can make gifts with your own hands. One of the interesting options is decorative canvases made from scraps on a New Year's theme. Even novice needlewomen can make such a present.
The atmosphere of the winter holidays is created from small details symbolizing the New Year, so a handmade picture made from scraps of fabric on a New Year's theme will fit perfectly into the decor.
On the New Year's decorative canvas you should depict the symbols of this beloved holiday: a decorated Christmas tree, Santa Claus, a sleigh with a reindeer team, a bright bag in which gifts are visible.
You will need scraps of material and leftover leather (only thin ones). Stock up on white, gold, light blue, emerald and red scraps. For the face of Santa Claus, you will also need pink or beige trimmings.
Cover the cardboard with chintz fabric in white or pale blue to create an imitation of snow.
After this, animals, a Christmas tree, Grandfather Frost and his beautiful granddaughter are made from cardboard of the same thickness - the plot may vary.
To give Santa Claus's beard a natural look, cut the material into fringe. It is best to make a sled from silver fabric. The Christmas tree is created from fabric in green shades.
Paintings from scraps of fabric are easy to create; even a child can master this technique.
Having prepared all the fragments, start gluing them together. A homemade painting made from scraps of fabric on a New Year's theme will delight both the creator himself and those to whom it will be presented.
New Year's motifs in wall decorations will help create the atmosphere of the winter holidays. Paintings made from colored scraps with New Year's characters give a festive mood and perform a decorative function.
The technique for creating decorative canvases from multi-colored fabric scraps is quite simple. It’s not difficult to find materials for making such masterpieces; you probably have scraps of fabric in your home. Such a gift, although cheap, is very original and no less attractive than expensive paintings sold in stores.
Source: http://creahands.ru/kartiny-iz-loskutkov.html

Patchwork painting
Not so long ago, paintings made from scraps of fabric came into fashion. This type of needlework is called kinusaiga. The technique originated in Japan. There are several areas of kinusaiga, the main ones being:
1. Patchwork.
2. Quilting.
These types are similar in the material used. These are pieces of fabric. They differ from each other in the way they are executed. Patchwork is interesting because textile fabrics are created without a needle and thread. Quilting is patchwork sewing.
A panel made from scraps of fabric with your own hands in a patchwork style can not only decorate the interior of your own home in an original way, but also become an excellent present for all your friends and acquaintances.
This technique is quite simple, so even novice needlewomen can create real masterpieces.
A simple panel using the patchwork technique
Schemes for making canvases can be downloaded on the Internet. For a fabric painting using the patchwork technique, you will need the following materials: 1. Foam base for the picture about 2.5 centimeters thick (material left over from the packaging of household appliances will do).2.
Fabric scraps of various colors, shapes, sizes (the thinner the material, the easier it will be to work).3. Glue (do not use superglue, otherwise it will melt the foam base).4. Knife and small scissors.5. Tool for ripping seams. It can be purchased at a sewing supply store.
Some people use nail files, but the first option is more convenient.6. Buttons and printed diagram.
7. Copy paper and felt-tip pen.
Tools for creating a picture using the patchwork technique During work, the foam will crumble, so it is better to work in a room without carpets, so that it will be easier to clean up later.
Master class on creating a patchwork fabric in the patchwork style
Below is a master class that will help you make a lovely picture from scraps of fabric.
- First you need to prepare a drawing. To do this, you can use a printer or draw on the cells yourself. The ornament can be applied to the foam base using carbon paper or drawn with a felt-tip pen. The manufacturing process begins with a frame, which a textile painting must have.
- The base of the foam painting can be made in the shape of a rectangle or square. The frame is made like this: on each side of the workpiece, margins are drawn, retreating from the edge by a few centimeters. To make it easier to transfer the pattern, you need to secure the foam with buttons.
- Use a knife to make grooves. They should be no deeper than half a centimeter, otherwise the foam will break.
- Now you need to decide where the material will be placed. It is better to take knitwear: it stretches quite well and does not slip.
- Apply glue to one of the drawing areas. Place the selected piece of paper in this place and tuck its edges into the recesses with a nail file or steamer. Excess fabric is trimmed with scissors.
- First the frame is made. The hanging edges of the material are secured to the back of the foam base with buttons. After this they begin to draw the pattern.
- So that the picture can be hung on the wall, a loop is attached to its back side. To attach it to the wall, you can also choose a mastic that is used to fix the tiles. If you have no experience in patchwork, it is better to choose a simpler pattern at first.
Quilting: materials needed
As mentioned above, quilting is sewing from scraps of fabric. The essence of this technique is that several layers of fabric are sewn together by hand or by machine. The result is patchwork
the panels are voluminous and embossed.
They are called quilts. This type of needlework has been known for a long time. Previously, in villages this method was used to sew bedspreads, pillows, and blankets from multi-colored pieces of fabric.
To make a picture from scraps of fabric with your own hands using quilting technology, you will need:
1. Scraps of fabric of various colors.2. Faux fur scraps.3. Photo frame.4. Synthetic fabric.5. Threads.6. Fabric for background.7. Animal templates.
8. A piece of thin black leather.
Master class on creating panels using the quilting method
Below are step-by-step instructions that will help you create a panel using the quilting method.
- Using a template, you need to cut out an elephant with its head and ears from gray fabric. Then you need to embroider his eyes and mouth with black thread, and also sew on his head.
- Next, you need to cut out a sheep from the fabric. For this you need white or gray faux fur with short pile or fluffy fabric. Then her eyes are hand embroidered.
- A giraffe is made from yellow spotted tissue. You can also glue or sew black leather onto the yellow fabric to create spots on his skin.
- Two canvases are taken, and thin foam rubber is laid between them. The resulting frame is sewn on the side using braid.
- Palm leaves are made from green material. To do this, ovals pointed on one side are cut out. The edges should be made in the form of waves or fringe. Tree trunks are made from brown material.
- To make the figures more voluminous, a padding polyester is attached to them on the reverse side. And at the end they are sewn onto the background.
Textile flower painting
From scraps of canvas you can create a very original painting with floral patterns. It will take some time.
You will need: 7. Needles and threads.
take a hoop, then the picture will look especially neat.
If you use hoops of different sizes, you can create a very interesting composition on the theme of flowers. These can be tulips, roses, lilies. The resulting panels are hung on the same wall close to each other, only at different heights.
You will need: 1. Printed or drawn diagram.2. Bright patches.3. Cardboard stencils.4. Scissors.5. Glue.6. Beads.
7. Needles and threads.
You will need: 1. Printed or drawn diagram.2. Bright patches.3. Cardboard stencils.4. Scissors.5. Glue.6. Beads.
7. Needles and threads.
Pattern of patches with flowers
Using a stencil, round parts of different sizes are cut out of fabric and a pyramid is built from them. The largest fragment is at the bottom, the smallest is at the top
The pyramid is sewn into a flower, and a bead is inserted into the middle. Next, the edges of the flowers are burned with a candle to create waviness. Grass is cut out of green fabric and sewn to the base with a machine. The canvas is stretched over a frame or attached to a frame, and flowers are sewn onto it. Small parts are glued. That's all. The picture is ready.
Instead of a frame you can
take a hoop, then the picture will look especially neat. If you use hoops of different sizes, you can create a very interesting composition on the theme of flowers. These can be tulips, roses, lilies. The resulting panels are hung on the same wall close to each other, only at different heights.
This creates a real homely feeling in the house.
Panel "Tea Party"
The panel on which two women drink tea after a bath looks very interesting and unusual. It looks no worse than an expensive painting painted on canvas by an artist.
To create it, you need: 1. Printout of the “Tea Party” picture.2. Pencil and scissors.3. Fabric for the background (for example, stretch gabardine).4. Fabric scraps.5. Web for fabric.
6. Lace for a tablecloth.
"Tea Party" panel made from scraps
You need to attach a picture to the window, put background material on it and transfer the outline of the picture onto the material. On the window glass, transfer the outline of the samovar onto the pattern, and then cut it out of fabric with glitter. Then a cobweb is attached to this fragment with an iron and with this part the samovar is applied to the background.
Using the same method, a teapot made of floral material is made and attached to the canvas. The joints of the elements are covered with a part made of samovar fabric. The shoes of the woman on the right are cut out of darker material. A skirt is drawn on the window and attached to the panel using a spider web.
The remaining fragments of the picture are cut out and attached in the same way. After this, all the parts are sewn on a machine with a “small zigzag” stitch. Then the panel will turn out neat. The tablecloth is made of lace. The faces of women and cats, as well as steam from a samovar, are embroidered with stitches. In place of the earring in the ear, attach a pebble with glue.
The panel is ready. All that remains is to insert it into the frame and hang it on the wall.
There were times when paintings made with paints and brushes were in incredible demand. However, now they are in much less demand. They are competing with paintings made from scraps of fabric. Even those who have never been familiar with this technique before can make such a masterpiece with their own hands. The main thing is to carefully study the material presented below.
A few words about history
The technology, the features of which will be presented below, appeared relatively recently. But it quickly gained popularity. The Japanese invented it and called it kinusaiga. This creative technique involves working with scraps of fabric and allows you to create original crafts from what is often thrown into the trash. It is also worth noting that it includes several subspecies. The first is called patchwork, and the second is quilting or, in simpler terms, sewing from patches. The main difference is in the principle of operation or the specifics of creation. What is common is the material - various types of scraps or remnants of fabric. In any case, the creative process allows you not only to have an interesting time, but also to create a very beautiful and original picture from scraps of fabric with your own hands. If the needlewoman has imagination and proper execution, she will be able to create a craft that will decorate any room, become a wonderful accent and create a cozy and comfortable environment.
Reasons for the popularity of the technique

Scientists have long come to the conclusion that a person needs to engage in creative work. Otherwise, coping with the hustle and bustle of everyday work can be so difficult that depression begins or various ailments and illnesses appear due to nervousness. Professional needlewomen do not insist, but they advise craftswomen to at least try to make a picture from scraps of fabric. This process is really exciting! In addition, the finished product can decorate absolutely any kitchen. Or a room decorated in country or Provencal style. You can also give a painting made by yourself to relatives, close friends, acquaintances for a birthday or other holiday. And for a housewarming such an original gift will be especially useful! And all this despite the fact that the work will require available materials, and the creative process will not take much time.
Patchwork technique
Experienced needlewomen, talking about the features of this technique, note that it is unique, that is, one of a kind. And all because neither a sewing needle nor thread is used during the work. It is believed that the main advantage of patchwork is its unpretentiousness, simplicity, and uncomplicated execution. However, regardless of this, paintings made by hand from scraps of fabric look interesting and original. It is also noteworthy that patchwork is ideal for novice craftsmen, because it allows those who have no experience in needlework to create spectacular crafts.
Tools and materials for patchwork

To bring your idea to life, first of all you need to prepare various scraps and leftover fabric of various sizes, colors and textures. Professional craftswomen recommend using thinner material. Because working with it is much easier and more convenient. In addition, you should prepare:
- stationery knife for cutting paper;
- wooden ruler;
- comfortable scissors;
- black marker;
- buttons.
You also need to purchase a seam ripper - a tool for ripping seams - from a craft store. If you can’t find one, you can use a regular nail file. The basis for creating a picture from scraps of fabric using the patchwork technique is a rectangular or square piece of foam plastic. Moreover, you can take the one that is used to protect household appliances from damage. Experienced needlewomen say that if you have to cut the foam yourself, you should go to a room that does not have a carpet or rug. Otherwise, subsequent cleaning will turn into a real nightmare.
Since we will not be sewing the craft, glue will be required. However, it is important to immediately note that you should choose PVA glue or other stationery glue, because different types of superglue can melt the foam. Also, to work, you need to print an image of a picture or prepare a drawing, which we will use as a template for creativity.
Features of choosing a pattern
If you look at photos of paintings made from scraps of fabric, you will want to make the most interesting and original craft with your own hands. However, experienced masters do not recommend that beginners immediately take on the difficult option. The Kinusaiga technique allows you to create very simple, but at the same time attractive paintings. Therefore, at first it is better to choose a simple image. If the reader wants to make a unique work, he can draw a picture. But in this case, you should also not add miniature elements, and it is better to make the lines as straight as possible. Only after mastering the technology and making several paintings can you begin to create large and complex images, as well as modular ones. In addition, it is important to note that if the reader cannot choose the optimal design option, professional craftswomen advise looking at the pictures presented in children's coloring books. These images are simplified as much as possible and adapted for children. Therefore, it will be easy for novice craftsmen to turn them into a patchwork picture.

How to make paintings using patchwork technique
When everything you need is ready to hand, we begin to make our own paintings from scraps of fabric.
- First of all, we take the prepared piece of polystyrene foam and, stepping back two centimeters from each edge, use a ruler and marker to draw a frame.
- We press through the resulting lines with a stationery knife. We don’t lower it too deep; a half-centimeter “groove” is enough.
- Then we take a drawing or picture. We place it in the center of the foam and attach it with buttons at the four corners.
- Using a knife, very carefully make indentations along the contour of the image.
- At this point, the preparatory stage is completed, and we move directly to instructions on how to make paintings on foam plastic from scraps of fabric.
- In fact, this process does not involve difficult actions. We take the prepared material and a steamer or nail file.
- We determine the area of the picture that we will decorate and apply a little glue to it.
- Cut or select a flap of the desired size.
- We apply the image to the desired area and begin to carefully push the edges of the flap into the “grooves”.
- If there is excess fabric, it should be carefully trimmed with scissors and tucked in. Experienced needlewomen recommend using slightly curved nail scissors for these purposes.
This, in fact, is the whole essence of the technique of making paintings from scraps of fabric. Further work involves filling all areas with fabric as described earlier. Then you need to frame the paintings. To do this, cut out the entire frame or individual pieces. On the front side we tuck the edges into the “grooves”, and on the sides we bend them slightly and secure them with buttons. Finally, we add a crochet hook to the finished craft so that it can be hung on the wall.
Quilting technique

The next type of art of creating surprisingly beautiful patchwork paintings involves stitching together various materials either by machine or by hand. Moreover, it is important to note that this technique allows you to create three-dimensional or three-dimensional paintings from fabric with your own hands. Experienced craftsmen believe that this type of needlework is difficult for beginners. However, if you wish, you can still try to make a simple and original picture. In addition, many craftswomen can turn to their grandmother for advice and help. After all, decorative products made using the technology being studied were very popular in the last century. Perhaps someone even still has a bedspread made from scraps, or colorful pillows. As we mentioned earlier, such crafts are still popular today. They are especially often used to decorate interiors in Provencal or country style. Designers suggest adding patchwork paintings to the interior in a minimalist style to create a warmer and more homely environment.
Multi-layering using quilting technique
Professional needlewomen, explaining the principle of creating a picture from scraps of fabric to beginners, note that layers are of great importance in the technique, the sequence of which is important to follow. Therefore, this article should study this feature of the technology in detail. Cotton material acts as the base or first layer. It serves as a lining. The second layer is necessary to create volume, so what follows is a padding polyester or batting layer. The third is the canvas. You can purchase it at any craft store. The fourth and final layer is also called the face layer. It is essentially a decorative finish with stripes, appliqués, various patterns and more. It is extremely important to note that needlewomen must stitch all the layers so that the finished picture from scraps of fabric for children or adults turns out to be seamless. At the same time, if they work manually, they make a seam in the form of stitches.

Quilting Tools and Materials
The attentive reader has already noticed that this technology involves working with a needle and thread or a sewing machine. Therefore, the first thing we do is prepare these tools. We also need a picture or drawing on which we will build our craft. In addition, you need scissors, an iron or steam generator, several sheets of cardboard, carbon paper, many colorful scraps and, if necessary, a thimble. Experienced craftswomen recommend planning your work in advance. For this you need a simple pencil. They should draw lines on the prepared image, thus marking the seam lines.
How to make paintings using quilting technique
Having prepared everything you need, we proceed to the instructions on how to make a picture from scraps of fabric.
- First of all, we transfer our drawing to a prepared sheet of cardboard. We do this with a simple pencil and copy paper.
- Then we carefully outline the contours of all the fragments and mark the seam lines.
- We number all the details.
- From the prepared scraps, we select those that most closely match the color scheme of the intended painting. We are especially carefully looking for a material with which we can create transitions from one shade to another.
- We lay out the prepared flaps as they will be located in the plan. This is necessary in order to finally make sure that the choice is correct.
- We straighten all the approved flaps, and then thoroughly steam them.
- Cut out all numbered pieces from cardboard.
- We use them as templates to cut out fabric parts.
- Additionally, we prepare a cotton base (you can use an old sheet), a thick lining and canvas. The dimensions of the three layers should be the same.
- Next we work with the details that serve as the background. We fold the adjacent ones with the right sides facing each other and carefully sew them by hand or using a machine.
- Trim off the excess, turn it over onto your face and steam thoroughly. The last action is necessary so that the flaps do not move and the picture does not turn out crooked.
- Having collected the background of the picture, we “revive” it with the help of the remaining fragments.
- Then we sew the lining to the base, and then the canvas with the applique.
- We decorate the panel with finishing tape.
- And once again we thoroughly steam all the work.

Master class for beginners and children
It was said earlier that at first it is better to choose simpler paintings from scraps of fabric. Photos of professional work, of course, attract attention. However, to perform them you must have at least basic skills in working with the Kinusaiga technique. As you know, mastery comes with experience, so first you should practice on the most basic sketches in the style of children's drawings. At the same time, patchwork, as a type of studied technique, is best suited for beginners and children. Below is a video instruction prepared by a professional master. Using it you will be able to trace the entire creative process and, if desired, following the step-by-step recommendations of the master class, repeat the picture.

Now you should understand the specifics of creating original paintings from fabric with your own hands. Photos of finished works and a detailed description will help the reader determine the most suitable and interesting technique, and then realize any of his ideas. Experienced needlewomen note that the creative process is so addictive that learning will go quickly and bring a lot of pleasant emotions. After some time, experience is gained, and even then the former beginner will be able to make real masterpieces.
Currently, the patchwork technique has become very popular - a type of needlework in which a whole product with a certain pattern is sewn from multi-colored scraps of fabric using the mosaic principle.
Patchwork (translated from English as “patch” + “work”) is a very interesting and labor-intensive technique. But the products obtained with its help cannot but rejoice.
Products in the patchwork style are always distinguished by individuality and grace, and at the same time they are practical things. This technique has long and deservedly enjoyed enormous popularity both in Russia and in Europe. The patchwork technique is very popular in Japan. There is even a whole fashion trend - Japanese patchwork.
A very interesting option is patchwork painting. Anyone can create paintings in the patchwork style. Paintings using this technique can be used to decorate a child’s room or kitchen.
Set of tools for patchwork sewing
1. Various fabrics;
3. Special roller knife or scissors;
4. Pins and sewing needles;
5. Pencil or chalk (for drawing a design on fabric);
6. Cardboard, thick paper or soft plastic (for making templates);
7. Crochet hook;
8. Sewing machine.
In specialized stores you can also purchase ready-made patchwork kits, which, in addition to materials and tools, also include pattern diagrams.
The Curious World invites you to view a selection of stunning paintings using the patchwork technique.


